Login Page / Authorization based Oauth2 JWT / Resource Service 분할 - Front-End Service
👉 해당 포스트를 읽는데 도움을 줍니다.
👉 이어서 읽기를 추천합니다.
- Login Page / Authorization based Oauth2 JWT / Resource Service 분할 - Authorization Service
- Login Page / Authorization based Oauth2 JWT / Resource Service 분할 - Resource Service
0. 들어가면서
TDD(Test Driven Development)를 연습하면서 로그인 기능을 Spring Security와 함께 구현해보는 것도 좋을 것 같다는 생각이 들었습니다.
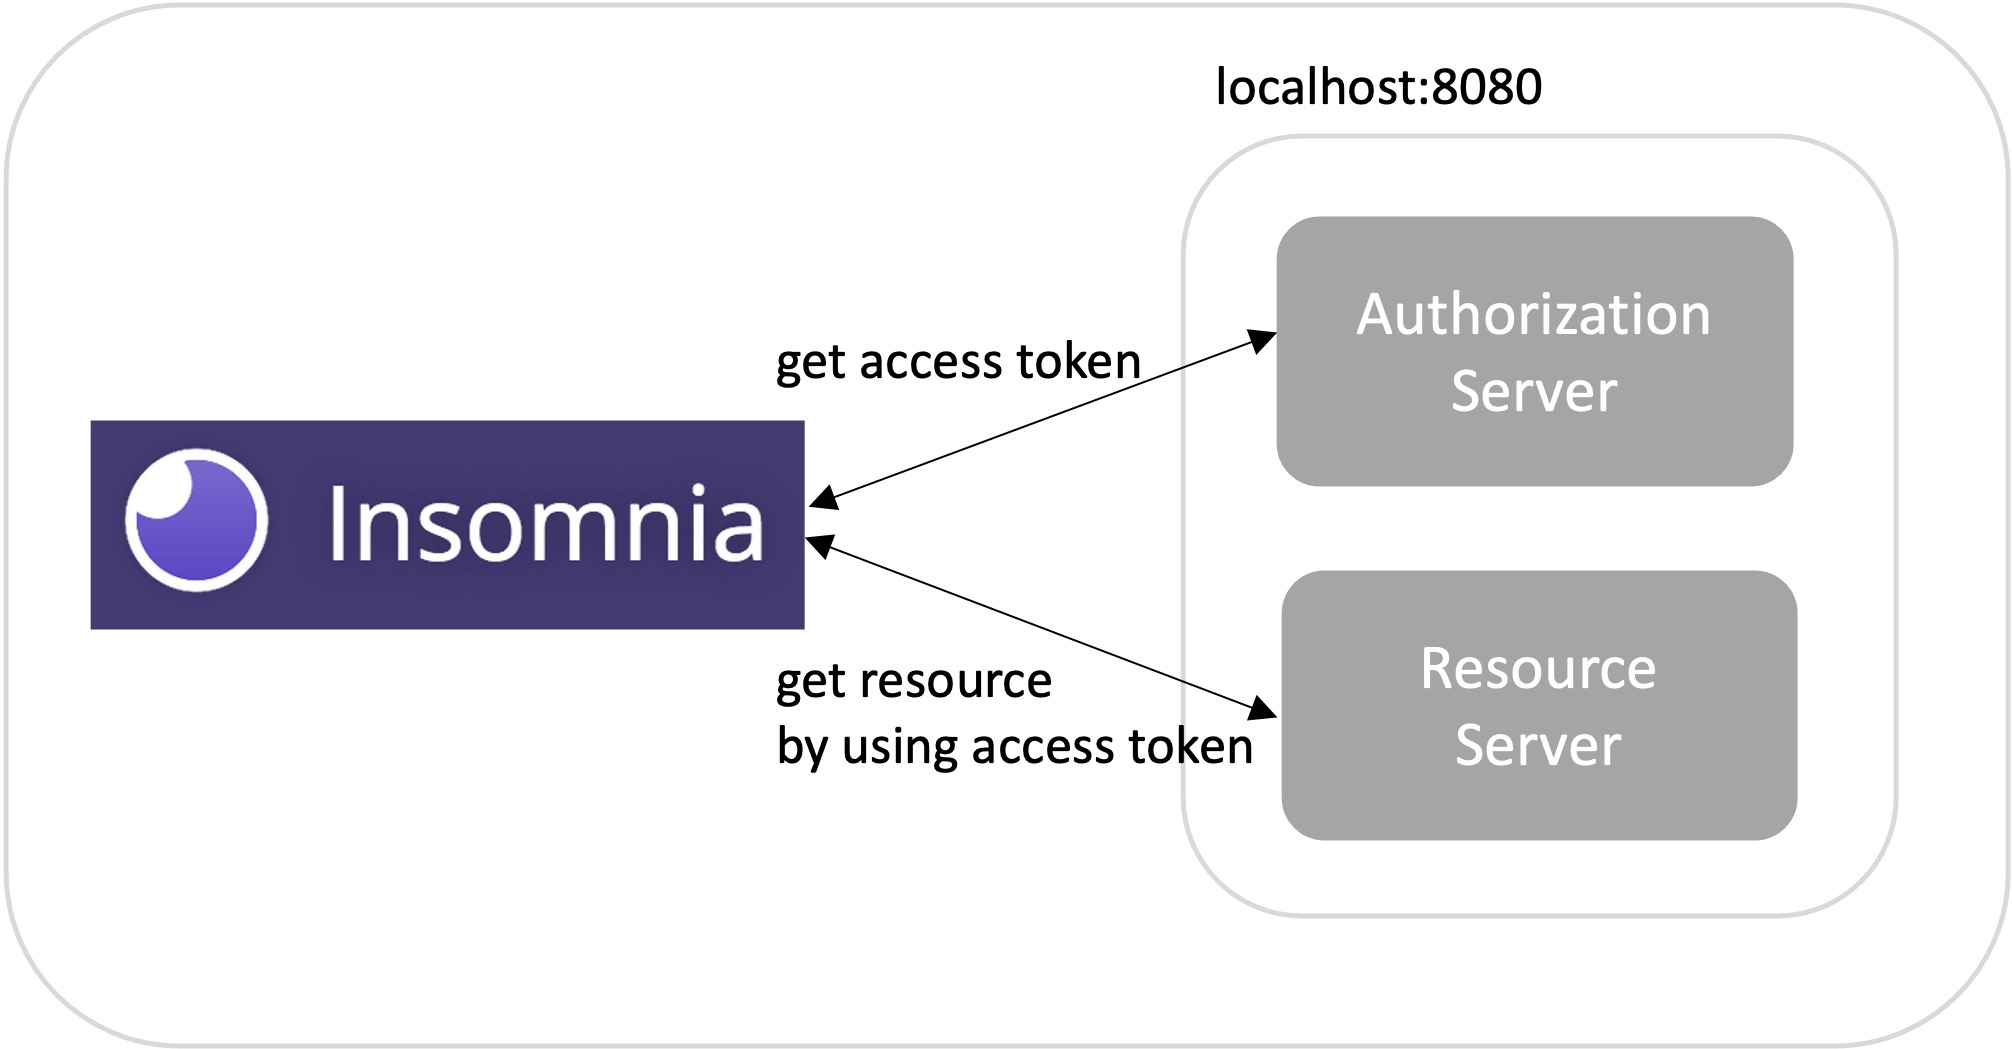
이전에 작성했던 Spring Security JWT OAuth Example 글을 참조했는데, 마음에 들지 않는 부분들이 있어서 다시 정리하였습니다.
다시 정리해보려고 하는 내용들은 다음과 같습니다.
Insomnia 툴(tool)을 이용한 테스트를 실제 로그인 화면으로 변경Authorization Server와Resource Server분리spring-security-oauth2의존성 - 보안 취약점이 발견된 2.3.3.RELEASE 버전 사용 (2.3.5.RELEASE 버전으로 변경)- 선 테스트 코드 작성 후 코드 구현 (RED-GREEN-REFACTORING 사이클 연습)
Spring Security JWT OAuth Example 서비스 구조
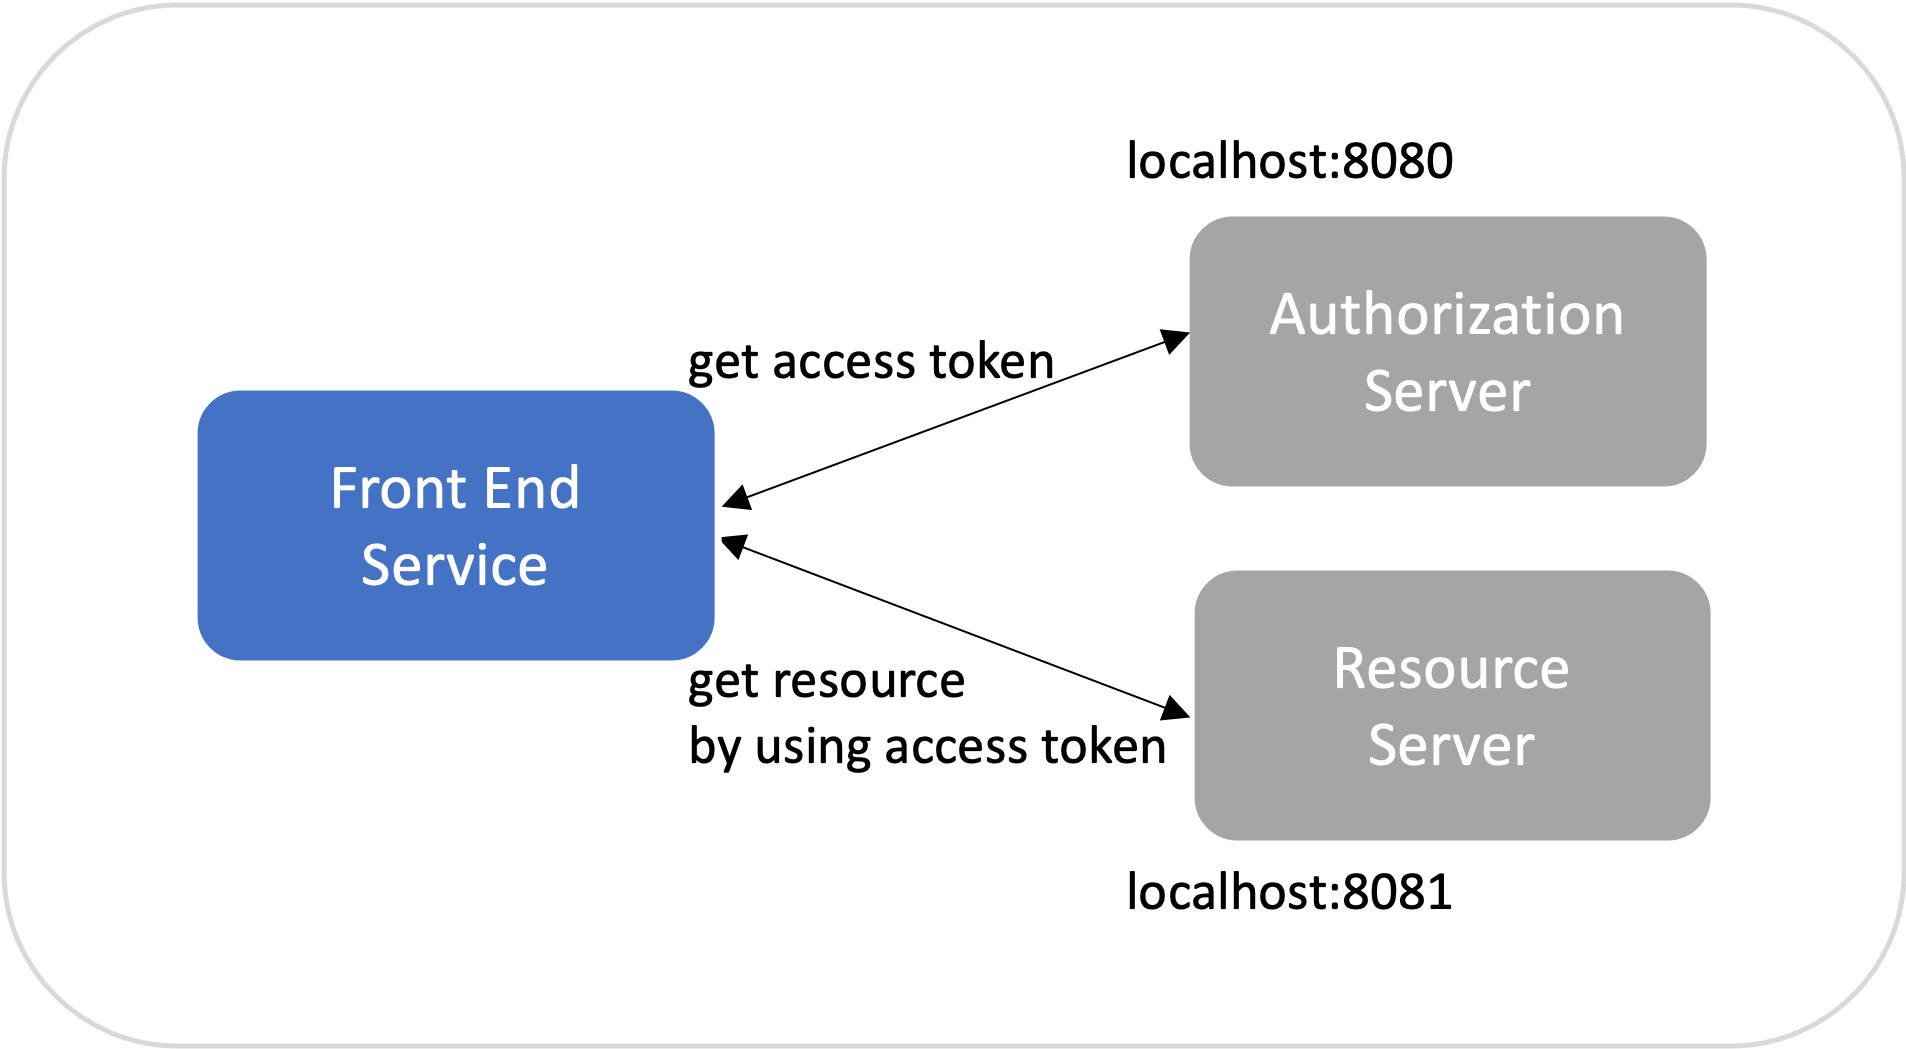
해당 포스트에서 다루는 서비스 구조
- 이번 포스트에선
프론트 엔드 서비스를 구현하였습니다.
주의사항
- 현재 최신
Spring Security에서는Authorization Server구현을 지원하지 않습니다. (Deprecated)
2019/11/14 - Spring Security OAuth 2.0 Roadmap Update
No Authorization Server Support
…
Spring Security’s Authorization Server support was never a good fit. An Authorization Server requires a library to build a product. Spring Security, being a framework, is not in the business of building libraries or products. For example, we don’t have a JWT library, but instead we make Nimbus easy to use. And we don’t maintain our own SAML IdP, CAS or LDAP products.
In 2019, there are plenty of both commercial and open-source authorization servers available. Thus, the Spring Security team has decided to no longer provide support for authorization servers.
UPDATE: We’d like to thank everyone for your feedback on the decision to not support Authorization Server. Due to this feedback and some internal discussions, we are taking another look at this decision. We’ll notify the community on any progress.
1. 로그인 인증 클라이언트 구현
인증시 요청, 응답에 대한 API 명세를 알고 있다는 가정하에 테스트를 먼저 작성하였습니다.
1.1. 구현 코드
import axios from "axios";

const authenticate = async (params) => {
    let result = true;
    try {
        const {data} = await axios.post('http://localhost:8080/oauth/token', {}, {
            headers: {
                'Content-Type': 'application/x-www-form-urlencoded'
            },
            auth: {
                username: 'CLIENT_ID',
                password: 'CLIENT_SECRET'
            },
            params: {
                ...params,
                grant_type: 'password'
            }
        });
        localStorage.setItem('access_token', data['access_token']);
        localStorage.setItem('refresh_token', data['refresh_token']);
        localStorage.setItem('token_type', data['token_type']);
    } catch (error) {
        result = false;
    }
    return result;
};

export default {
    authenticate
};
1.2. 테스트 코드
call axios post with proper params method when authenticate테스트- 전달한 파라미터를 기반으로 API 요청을 수행하였는지 확인합니다.
get true as a result when succeed authentication테스트- axios 요청이 성공한 경우 결과 값이
true인지 확인합니다.
- axios 요청이 성공한 경우 결과 값이
save access token and refresh token when succeed authentication테스트- 스터빙(stubbing) 한 데이터가
localStorage에 저장되었는지 확인합니다.
- 스터빙(stubbing) 한 데이터가
get false as a result when fail authentication테스트- axios 요청이 실패한 경우 결과 값이
true인지 확인합니다.
- axios 요청이 실패한 경우 결과 값이
import axios from "axios";
import AuthenticationClient from "./AuthenticationClient";

describe('test authentication client', () => {

    const params = {
        username: 'Junhyunny',
        password: '123'
    };

    afterEach(() => {
        jest.restoreAllMocks();
    });

    it('call axios post with proper params method when authenticate', async () => {

        // setup
        const spyAxios = jest.spyOn(axios, 'post').mockResolvedValue({
            data: {}
        });

        // action
        await AuthenticationClient.authenticate(params);

        // assert
        expect(spyAxios).toHaveBeenNthCalledWith(1, 'http://localhost:8080/oauth/token', {}, {
            headers: {
                'Content-Type': 'application/x-www-form-urlencoded'
            },
            auth: {
                username: 'CLIENT_ID',
                password: 'CLIENT_SECRET'
            },
            params: {
                ...params,
                grant_type: 'password'
            }
        });
    });

    it('get true as a result when succeed authentication', async () => {

        // setup
        jest.spyOn(axios, 'post').mockResolvedValue({
            data: {}
        });

        // action
        const result = await AuthenticationClient.authenticate(params);

        // assert
        expect(result).toEqual(true);
    });

    it('save access token and refresh token when succeed authentication', async () => {

        // setup
        jest.spyOn(axios, 'post').mockResolvedValue({
            data: {
                access_token: 'access_token',
                refresh_token: 'refresh_token',
                token_type: 'bearer'
            }
        });

        // action
        await AuthenticationClient.authenticate(params);

        // assert
        expect(localStorage.getItem('access_token')).toEqual('access_token');
        expect(localStorage.getItem('refresh_token')).toEqual('refresh_token');
        expect(localStorage.getItem('token_type')).toEqual('bearer');
    });

    it('get false as a result when fail authentication', async () => {

        // setup
        jest.spyOn(axios, 'post').mockRejectedValue({});

        // action
        const result = await AuthenticationClient.authenticate(params);

        // assert
        expect(result).toEqual(false);
    });
});
2. 로그인 화면 구현
2.1. 구현 코드
import {useContext, useState} from "react";
import AuthenticationClient from "../../utils/AuthenticationClient";
import {useNavigate} from "react-router";
import AuthenticationContext from "../../store/AuthenticationContext";

const Login = () => {

    const [isValid, setIsValid] = useState(true);
    const [userId, setUserId] = useState('');
    const [password, setPassword] = useState('');

    const navigate = useNavigate();
    const {setAuthenticate} = useContext(AuthenticationContext);

    const submitHandler = (event) => {
        event.preventDefault();
        if (userId.trim().length <= 0) {
            setIsValid(false);
            return;
        }
        if (password.trim().length <= 0) {
            setIsValid(false);
            return;
        }
        setIsValid(true);
        setUserId('');
        setPassword('');
        AuthenticationClient.authenticate({
            username: userId,
            password: password
        }).then(result => {
            if (result) {
                setAuthenticate(result);
                navigate('/todo');
            }
        });
    };

    const userIdChangeHandler = ({target: {value}}) => {
        setUserId(value);
    };

    const passwordChangeHandler = ({target: {value}}) => {
        setPassword(value);
    };

    return (
        <div>
            <form onSubmit={submitHandler}>
                <input placeholder="USER ID" onChange={userIdChangeHandler} value={userId}/>
                {!isValid && !userId && <p>ID가 유효하지 않습니다.</p>}
                <input placeholder="PASSWORD" onChange={passwordChangeHandler} value={password}/>
                {!isValid && !password && <p>비밀번호가 유효하지 않습니다.</p>}
                <button type="submit">Submit</button>
            </form>
        </div>
    );
};

export default Login;
2.2. 테스트 코드
render elements when rendering테스트- 화면에 필요한 요소(element)들이 화면에 잘 렌더링 되는지 확인합니다.
exists error message when click submit button with empty inputs테스트- 입력 값 없이
Submit버튼을 누르는 경우 에러 메시지가 뜨는지 확인합니다.
- 입력 값 없이
call authenticate method with params and clear inputs when click submit button테스트- 입력 값을 넣고
Submit버튼을 누르면 원하는 파라미터로 인증 요청이 되는지 확인합니다. - 화면에 입력한 값들이 사라지는지 확인합니다.
- 입력 값을 넣고
import {render, screen, waitFor} from '@testing-library/react';
import Login from "./Login";
import userEvent from "@testing-library/user-event";
import AuthenticationClient from "../../utils/AuthenticationClient";
import {MemoryRouter} from "react-router";

const renderingMemoryRouter = (component, path) => {
    return (
        <MemoryRouter initialEntries={path}>
            {component}
        </MemoryRouter>
    );
};

describe('test login', () => {

    describe('test rendering elements', () => {

        it('render elements when rendering', () => {

            // setup, action
            render(renderingMemoryRouter(<Login/>, ['/']));

            // assert
            expect(screen.getByPlaceholderText('USER ID')).toBeInTheDocument();
            expect(screen.getByPlaceholderText('PASSWORD')).toBeInTheDocument();
            expect(screen.getByRole('button', {
                name: 'Submit'
            })).toBeInTheDocument();
            expect(screen.queryByText('ID가 유효하지 않습니다.')).not.toBeInTheDocument();
            expect(screen.queryByText('비밀번호가 유효하지 않습니다.')).not.toBeInTheDocument();
        });
    });

    describe('test user interaction', () => {

        it('exists error message when click submit button with empty inputs', () => {

            // setup
            render(renderingMemoryRouter(<Login/>, ['/']));

            // action
            userEvent.click(screen.getByRole('button', {
                name: 'Submit'
            }));

            // assert
            expect(screen.getByText('ID가 유효하지 않습니다.')).toBeInTheDocument();
            expect(screen.getByText('비밀번호가 유효하지 않습니다.')).toBeInTheDocument();
        });

        it('call authenticate method with params and clear inputs when click submit button', async () => {

            // setup
            const spyAuthenticationClient = jest.spyOn(AuthenticationClient, 'authenticate').mockResolvedValue(true);
            render(renderingMemoryRouter(<Login/>, ['/']));
            userEvent.type(screen.getByPlaceholderText('USER ID'), 'junhyunny');
            userEvent.type(screen.getByPlaceholderText('PASSWORD'), '123');

            // action
            userEvent.click(screen.getByRole('button', {
                name: 'Submit'
            }));

            // assert
            await waitFor(() => {
                expect(spyAuthenticationClient).toHaveBeenNthCalledWith(1, {
                    username: 'junhyunny',
                    password: '123'
                });
            });
            expect(screen.getByPlaceholderText('USER ID').value).toEqual('');
            expect(screen.getByPlaceholderText('PASSWORD').value).toEqual('');
        });
    });
});
3. 인증 정보 전역 Context 구현
3.1. 구현 코드
3.1.1. AuthenticationContext.js
import React from "react";

const AuthenticationContext = React.createContext({
    authenticate: false,
    setAuthenticate: (authenticate) => {},
});

export default AuthenticationContext;
3.1.2. AuthenticateProvider.js
import AuthenticationContext from "./AuthenticationContext";
import {useReducer} from "react";

const defaultAuthenticateState = {
    authenticate: false
};

const authenticateReducer = (state, action) => {
    if (action.type === 'LOGIN') {
        return {
            authenticate: true
        };
    } else if (action.type === 'LOGOUT') {
        return {
            authenticate: false
        };
    }
    return defaultAuthenticateState;
};

const AuthenticateProvider = ({children}) => {

    const [authenticateState, dispatchAuthenticationAction] = useReducer(authenticateReducer, defaultAuthenticateState);

    const setAuthenticate = (isAuthenticated) => {
        dispatchAuthenticationAction({
            type: isAuthenticated ? 'LOGIN' : 'LOGOUT'
        });
    };

    const authenticateContext = {
        authenticate: authenticateState.authenticate,
        setAuthenticate,
    };

    return (
        <AuthenticationContext.Provider value={authenticateContext}>
            {children}
        </AuthenticationContext.Provider>
    );
}

export default AuthenticateProvider;
3.2. 테스트 코드
render children component테스트- Provider 컴포넌트에 전달한 컴포넌트가 정상적으로 렌더링 되는지 확인합니다.
re-render component when context change테스트- Context 정보가 바뀌는 경우 다시 렌더링을 수행하는지 확인합니다.
import AuthenticateProvider from "./AuthenticationProvider";
import {render, screen} from "@testing-library/react";
import App from "../App";
import AuthenticationContext from "./AuthenticationContext";
import {useEffect} from "react";

jest.mock('../App');

describe('test authentication provider', () => {

    afterEach(() => {
        jest.restoreAllMocks();
    });

    it('render children component', () => {

        // set
        App.mockImplementation(() => {
            return (
                <>This is mocked app.</>
            );
        });

        // act
        render(
            <AuthenticateProvider>
                <App/>
            </AuthenticateProvider>
        )

        // verify
        expect(screen.getByText('This is mocked app.')).toBeInTheDocument();
    });

    it('re-render component when context change', () => {

        // set
        App.mockImplementation(({authenticate, setAuthenticate}) => {
            useEffect(() => {
                if (!authenticate) {
                    setAuthenticate(true);
                }
            }, []);
            return (
                <>This is mocked app. {authenticate ? 're-rendering' : 'first rendering'}</>
            );
        });

        // act
        render(
            <AuthenticateProvider>
                <AuthenticationContext.Consumer>
                    {(value) => <App authenticate={value.authenticate} setAuthenticate={value.setAuthenticate}/>}
                </AuthenticationContext.Consumer>
            </AuthenticateProvider>
        );

        // verify
        expect(screen.getByText('This is mocked app. re-rendering')).toBeInTheDocument();
    });
});
4. 화면 라우팅 구현
4.1. 구현 코드
4.1.1. index.js
import React from 'react';
import ReactDOM from 'react-dom';
import './index.css';
import App from './App';
import reportWebVitals from './reportWebVitals';
import {BrowserRouter} from "react-router-dom";
import AuthenticateProvider from "./store/AuthenticationProvider";

ReactDOM.render(
    <React.StrictMode>
        <AuthenticateProvider>
            <BrowserRouter>
                <App/>
            </BrowserRouter>
        </AuthenticateProvider>
    </React.StrictMode>,
    document.getElementById('root')
);

reportWebVitals();
4.1.2. App.js
import Login from "./components/Login/Login";
import {Navigate, Route, Routes} from "react-router-dom";
import TodoList from "./components/Todo/TodoList";
import {useContext} from "react";
import AuthenticationContext from "./store/AuthenticationContext";

function App() {

    const {authenticate} = useContext(AuthenticationContext);

    return (
        <Routes>
            <Route path="/" element={<Navigate to="/login"/>}/>
            <Route path="/login" element={<Login/>}/>
            <Route path="/todo" element={authenticate ? <TodoList/> : <Navigate to="/login"/>}/>
        </Routes>
    );
}

export default App;
4.2. 테스트 코드
redirect to login page when access to root테스트- ’/’ 경로로 접근하는 경우 ‘/login’ 경로로 리다이렉트(redirect) 되는지 확인합니다.
route to todo list page when succeed login테스트- ‘/login’ 경로로 접근하여 로그인 처리시 TODO LIST 화면으로 이동하는지 확인합니다.
route to login page when have not been authenticated테스트- 인증되지 않은 사용자가 ‘/todo’ 경로로 접근하는 경우 로그인 화면으로 이동되는지 확인합니다.
route to login page when have been authenticated테스트- ‘/todo’ 경로로 접근한 사용자가 로그인 처리 후 다시 ‘/todo’ 경로로 변경되는지 확인합니다.
import {render, screen, waitFor} from '@testing-library/react';
import App from './App';
import {MemoryRouter} from "react-router";
import AuthenticationClient from "./utils/AuthenticationClient";
import userEvent from "@testing-library/user-event";
import TodoList from "./components/Todo/TodoList";
import AuthenticateProvider from "./store/AuthenticationProvider";

jest.mock('./components/Todo/TodoList');

const renderingWithProviderRouter = (component, path) => {
    return (
        <AuthenticateProvider>
            <MemoryRouter initialEntries={path}>
                {component}
            </MemoryRouter>
        </AuthenticateProvider>
    );
};

describe('test app', () => {

    afterEach(() => {
        jest.restoreAllMocks();
    });

    it('redirect to login page when access to root', () => {

        // setup, act
        render(renderingWithProviderRouter(<App/>, ['/']));

        expect(screen.getByPlaceholderText('USER ID')).toBeInTheDocument();
    });

    it('route to todo list page when succeed login', async () => {

        // setup
        jest.spyOn(AuthenticationClient, 'authenticate').mockResolvedValue(true);
        TodoList.mockImplementation(() => <div>MOCKED TODO LIST</div>);
        render(renderingWithProviderRouter(<App/>, ['/login']));
        userEvent.type(screen.getByPlaceholderText('USER ID'), 'junhyunny');
        userEvent.type(screen.getByPlaceholderText('PASSWORD'), '123');

        // act
        userEvent.click(screen.getByRole('button', {
            name: 'Submit'
        }));

        // assert
        await waitFor(() => {
            expect(screen.getByText('MOCKED TODO LIST')).toBeInTheDocument();
        });
    });

    it('route to login page when have not been authenticated', () => {

        // setup
        TodoList.mockImplementation(() => <div>MOCKED TODO LIST</div>);

        // act
        render(renderingWithProviderRouter(<App/>, ['/todo']));

        // assert
        expect(screen.getByPlaceholderText('USER ID')).toBeInTheDocument();
    });

    it('route to login page when have been authenticated', async () => {

        // setup
        jest.spyOn(AuthenticationClient, 'authenticate').mockResolvedValue(true);
        TodoList.mockImplementation(() => <div>MOCKED TODO LIST</div>);
        render(renderingWithProviderRouter(<App/>, ['/todo']));
        userEvent.type(screen.getByPlaceholderText('USER ID'), 'junhyunny');
        userEvent.type(screen.getByPlaceholderText('PASSWORD'), '123');

        // act
        userEvent.click(screen.getByRole('button', {
            name: 'Submit'
        }));

        // assert
        await waitFor(() => {
            expect(screen.getByText('MOCKED TODO LIST')).toBeInTheDocument();
        });
    });
});
5. 화면 / 인증 / 리소스 서비스 연동하기
위 작업 내용은 모두 커밋(commit)하고, 구현 완료된 인증 서비스, 리소스 서비스와 연결하면서 변경된 내용만 정리해보겠습니다. 변경된 내용은 위 코드에 반영하지 않았으며, 테스트 코드 레포지토리에서 확인하시길 바랍니다.
5.1. 프론트 엔드 서비스 코드 변경 사항
- CSS 추가
- 보기 좋도록 화면 구성을 일부 변경하였습니다.
- 관련 코드 - Login.module.css, TodoList.module.css
- 로그인 화면 구성, 비밀번호 타입 ‘password’로 변경
- 관련 코드 - Login.js
- 리소스 서비스에 조회한 데이터 렌더링 및 테스트 코드
- 관련 코드 - TodoList.js, TodoList.test.js
- 화면을 리프레시(refresh)하는 경우 컨텍스트 정보 초기화
localStorage에 값 존재 여부를 이용하여 초기값 결정- 관련 코드 - AuthenticationProvider.js
localStorage세팅 데이터 변경- 인증 API 요청 실패시 모두 빈 문자열로 초기화
- 인증 성공시 사용자 이름
localStorage에 추가 - 관련 코드 - AuthenticationClient.js
- API 요청을 위한 Util 파일 생성
- 관련 코드 - HttpClient.js, HttpClient.test.js
5.2. 테스트 결과 화면

TEST CODE REPOSITORY
REFERENCE
- https://junhyunny.github.io/information/json-web-token/
- https://junhyunny.github.io/spring-security/spring-security/
- https://junhyunny.github.io/spring-boot/spring-security/spring-security-example/
- https://spring.io/blog/2019/11/14/spring-security-oauth-2-0-roadmap-update
- https://cotak.tistory.com/108


댓글남기기