
SecurityFilterChain in Spring Security
1. 보안 관련 용어
Spring Security 프레임워크에 대해 알아보기 전에 보안과 관련된 용어에 대해 알아보겠습니다.
- 접근 주체(Principal)
- 보안 시스템이 작동되고 있는 어플리케이션에 접근하려는 사용자
- 인증(Authentication)
- Application 작업을 수행할 수 있는 주체(사용자)임을 증명하는 행위
- Who are you?
- 권한(Authorization)
- 인증된 주체가 application의 동작을 수행할 수 있도록 허락되었는지 확인, 결정하는 행위
- What are you allowed to do?
- 접근 주체는 서버로부터 자신이 누구인지 인증받고, 미리 받은 권한으로 특정 기능을 수행합니다.
2. Servlet Filters in Spring Security
Spring Security 프레임워크는 웹 계층(UI 및 HTTP 백엔드 서비스)에 대한 보안 기능을 서블릿 필터(servlet filter)를 기반으로 제공합니다.
우선 서블릿 필터의 구조에 대해서 먼저 알아보겠습니다.
클라이언트가 서버로 HTTP 요청 시 아래와 같은 필터 계층에 의해 처리됩니다.
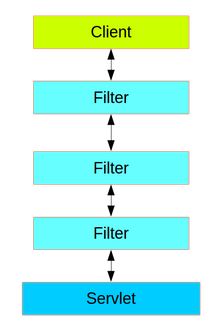
Servlet Filter Chain
- 서블릿 컨테이너는 클라이언트 요청 URL에 근거하여 어떤 필터, 어떤 서블릿을 적용할지 결정합니다.
- 하나의 서블릿은 단일 요청을 처리하며, 필터들의 집합인
필터 체인(filter chain)을 통과 후 실행됩니다. - 사용자 요청은 순서가 지정된 필터들을 차례대로 거치게 됩니다.
3. Spring Security FilterChainProxy
3.1. FilterChainProxy 클래스
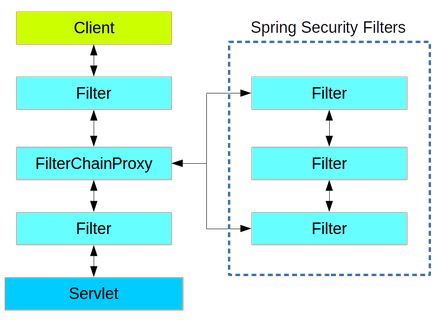
Spring Security 프레임워크는 인증에 필요한 기능들을 하나의 필터로 제공합니다.
FilterChainProxy 클래스를 필터로써 제공하며, 이는 서블릿 필터 체인에 한 개의 필터로 동작합니다.
FilterChainProxy는 서블릿 컨테이너 입장에선 단순히 한 개의 필터지만, 그 내부를 살펴보면 각기 다른 보안 로직을 수행하는 필터들을 리스트로 지니고 있습니다.
FilterChainProxy 클래스
GenericFilterBean클래스를 상속받아서 서블릿 필터 체인에선 한 개의 필터로써 일을 수행합니다.- 내부에서 처리할 필터들은
filterChains리스트에 담아서 사용합니다. filterChains리스트에 담긴 필터 체인 중 먼저 매칭되는 필터 체인을 사용합니다.
public class FilterChainProxy extends GenericFilterBean {

    private List<SecurityFilterChain> filterChains;

    public void doFilter(ServletRequest request, ServletResponse response, FilterChain chain) throws IOException, ServletException {
        // overrided by spring security
    }

    private void doFilterInternal(ServletRequest request, ServletResponse response, FilterChain chain) throws IOException, ServletException {
        // overrided by spring security
    }
}
FilterChainProxy 추상화 이미지
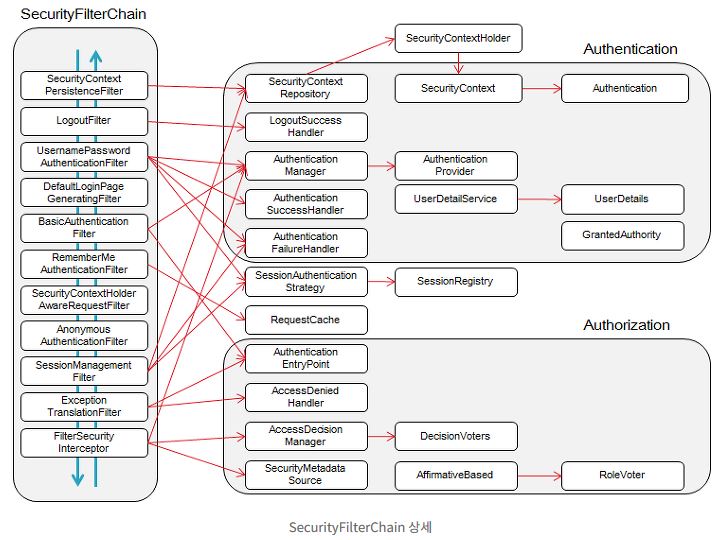
FilterChainProxy 내부 필터들
FilterChainProxy클래스 내부엔 다양한 필터들이 존재하며, 각 필터는 고유한 역할을 수행합니다.
3.2. 요청 별 SecurityFilterChain 매칭 과정
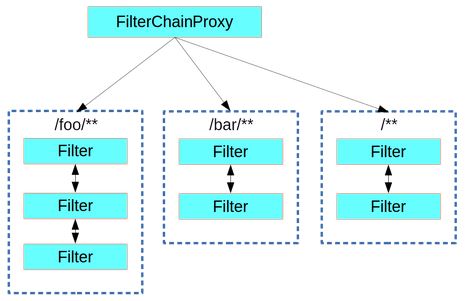
Spring Security 프레임워크에서 사용하는 필터들은 FilterChainProxy 클래스 내부에서 리스트로 담겨서 관리됩니다.
주의할 점은 이 필터들이 낱개로 리스트에 담겨 있는 것이 아니라, SecurityFilterChain이라는 묶음으로 보관된다는 것 입니다.
사용자 요청 URL 경로에 따라 사용되는 필터들이 다른데, 동일한 요청 URL 경로를 처리할 수 있는 필터들은 SecurityFilterChain 인터페이스를 상속한 클래스에 보관됩니다.
요청 별 Spring Security 필터 연결
- 요청 URL 경로에 따라 실행될 필터들이 다릅니다.
- 경로 별로 실행될 필터들의 묶음은
SecurityFilterChain인터페이스를 상속한 클래스에 담겨서 관리됩니다.
FilterChainProxy 클래스 doFilterInternal 메소드
getFilters메소드를 통해 요청을 처리할 필터들을 얻습니다.FilterChainProxy.VirtualFilterChain클래스를 통해 해당 요청에서 실행될 필터들만 실행합니다.
public class FilterChainProxy extends GenericFilterBean {

    private void doFilterInternal(ServletRequest request, ServletResponse response, FilterChain chain) throws IOException, ServletException {
        FirewalledRequest firewallRequest = this.firewall.getFirewalledRequest((HttpServletRequest)request);
        HttpServletResponse firewallResponse = this.firewall.getFirewalledResponse((HttpServletResponse)response);
        List<Filter> filters = this.getFilters((HttpServletRequest)firewallRequest);
        if (filters != null && filters.size() != 0) {
            if (logger.isDebugEnabled()) {
                logger.debug(LogMessage.of(() -> {
                    return "Securing " + requestLine(firewallRequest);
                }));
            }
            FilterChainProxy.VirtualFilterChain virtualFilterChain = new FilterChainProxy.VirtualFilterChain(firewallRequest, chain, filters);
            virtualFilterChain.doFilter(firewallRequest, firewallResponse);
        } else {
            if (logger.isTraceEnabled()) {
                logger.trace(LogMessage.of(() -> {
                    return "No security for " + requestLine(firewallRequest);
                }));
            }
            firewallRequest.reset();
            chain.doFilter(firewallRequest, firewallResponse);
        }
    }
}
FilterChainProxy 클래스 getFilters 메소드
chain.matches(request)- 필터 체인 객체가 이번 요청을 처리할 수 있는지 확인합니다.- 매칭되는 필터 체인을 찾았다면 해당 필터 체인이 지닌 필터들을 반환합니다.
public class FilterChainProxy extends GenericFilterBean {

    private List<Filter> getFilters(HttpServletRequest request) {
        int count = 0;
        Iterator var3 = this.filterChains.iterator();
        SecurityFilterChain chain;
        do {
            if (!var3.hasNext()) {
                return null;
            }
            chain = (SecurityFilterChain)var3.next();
            if (logger.isTraceEnabled()) {
                ++count;
                logger.trace(LogMessage.format("Trying to match request against %s (%d/%d)", chain, count, this.filterChains.size()));
            }
        } while(!chain.matches(request));

        return chain.getFilters();
    }
}
DefaultSecurityFilterChain 클래스
SecurityFilterChain인터페이스를 상속한 기본 필터 체인 클래스입니다.- 각 요청 별로 통과해야하는 필터들에 대한 정보는
RequestMatcher인스턴스에 담겨 있습니다. - 필터링이 필요한 URL 경로 정보는
Spring Security프레임워크 설정을 통해 결정됩니다.@EnableWebSecurity애너테이션이 붙이고,WebSecurityConfigurerAdapter클래스를 상속하여 구현합니다.
package org.springframework.security.web;

import java.util.ArrayList;
import java.util.Arrays;
import java.util.List;
import javax.servlet.Filter;
import javax.servlet.http.HttpServletRequest;
import org.apache.commons.logging.Log;
import org.apache.commons.logging.LogFactory;
import org.springframework.core.log.LogMessage;
import org.springframework.security.web.util.matcher.RequestMatcher;

public final class DefaultSecurityFilterChain implements SecurityFilterChain {

    private static final Log logger = LogFactory.getLog(DefaultSecurityFilterChain.class);
    private final RequestMatcher requestMatcher;
    private final List<Filter> filters;

    public DefaultSecurityFilterChain(RequestMatcher requestMatcher, Filter... filters) {
        this(requestMatcher, Arrays.asList(filters));
    }

    public DefaultSecurityFilterChain(RequestMatcher requestMatcher, List<Filter> filters) {
        logger.info(LogMessage.format("Will secure %s with %s", requestMatcher, filters));
        this.requestMatcher = requestMatcher;
        this.filters = new ArrayList(filters);
    }

    public RequestMatcher getRequestMatcher() {
        return this.requestMatcher;
    }

    public List<Filter> getFilters() {
        return this.filters;
    }

    public boolean matches(HttpServletRequest request) {
        return this.requestMatcher.matches(request);
    }

    public String toString() {
        return this.getClass().getSimpleName() + " [RequestMatcher=" + this.requestMatcher + ", Filters=" + this.filters + "]";
    }
}
4. Spring Security Authentication Process
Spring Security 프레임워크가 사용자 인증을 처리하는 프로세스에 대해서 정리해보았습니다.
이해하기 쉽게 대표적으로 사용되는 클래스들의 코드를 보면서 설명을 이어가겠습니다.
불필요한 코드들은 일부 제거하고 설명하였습니다.
Spring Security 사용자 인증 프로세스 과정
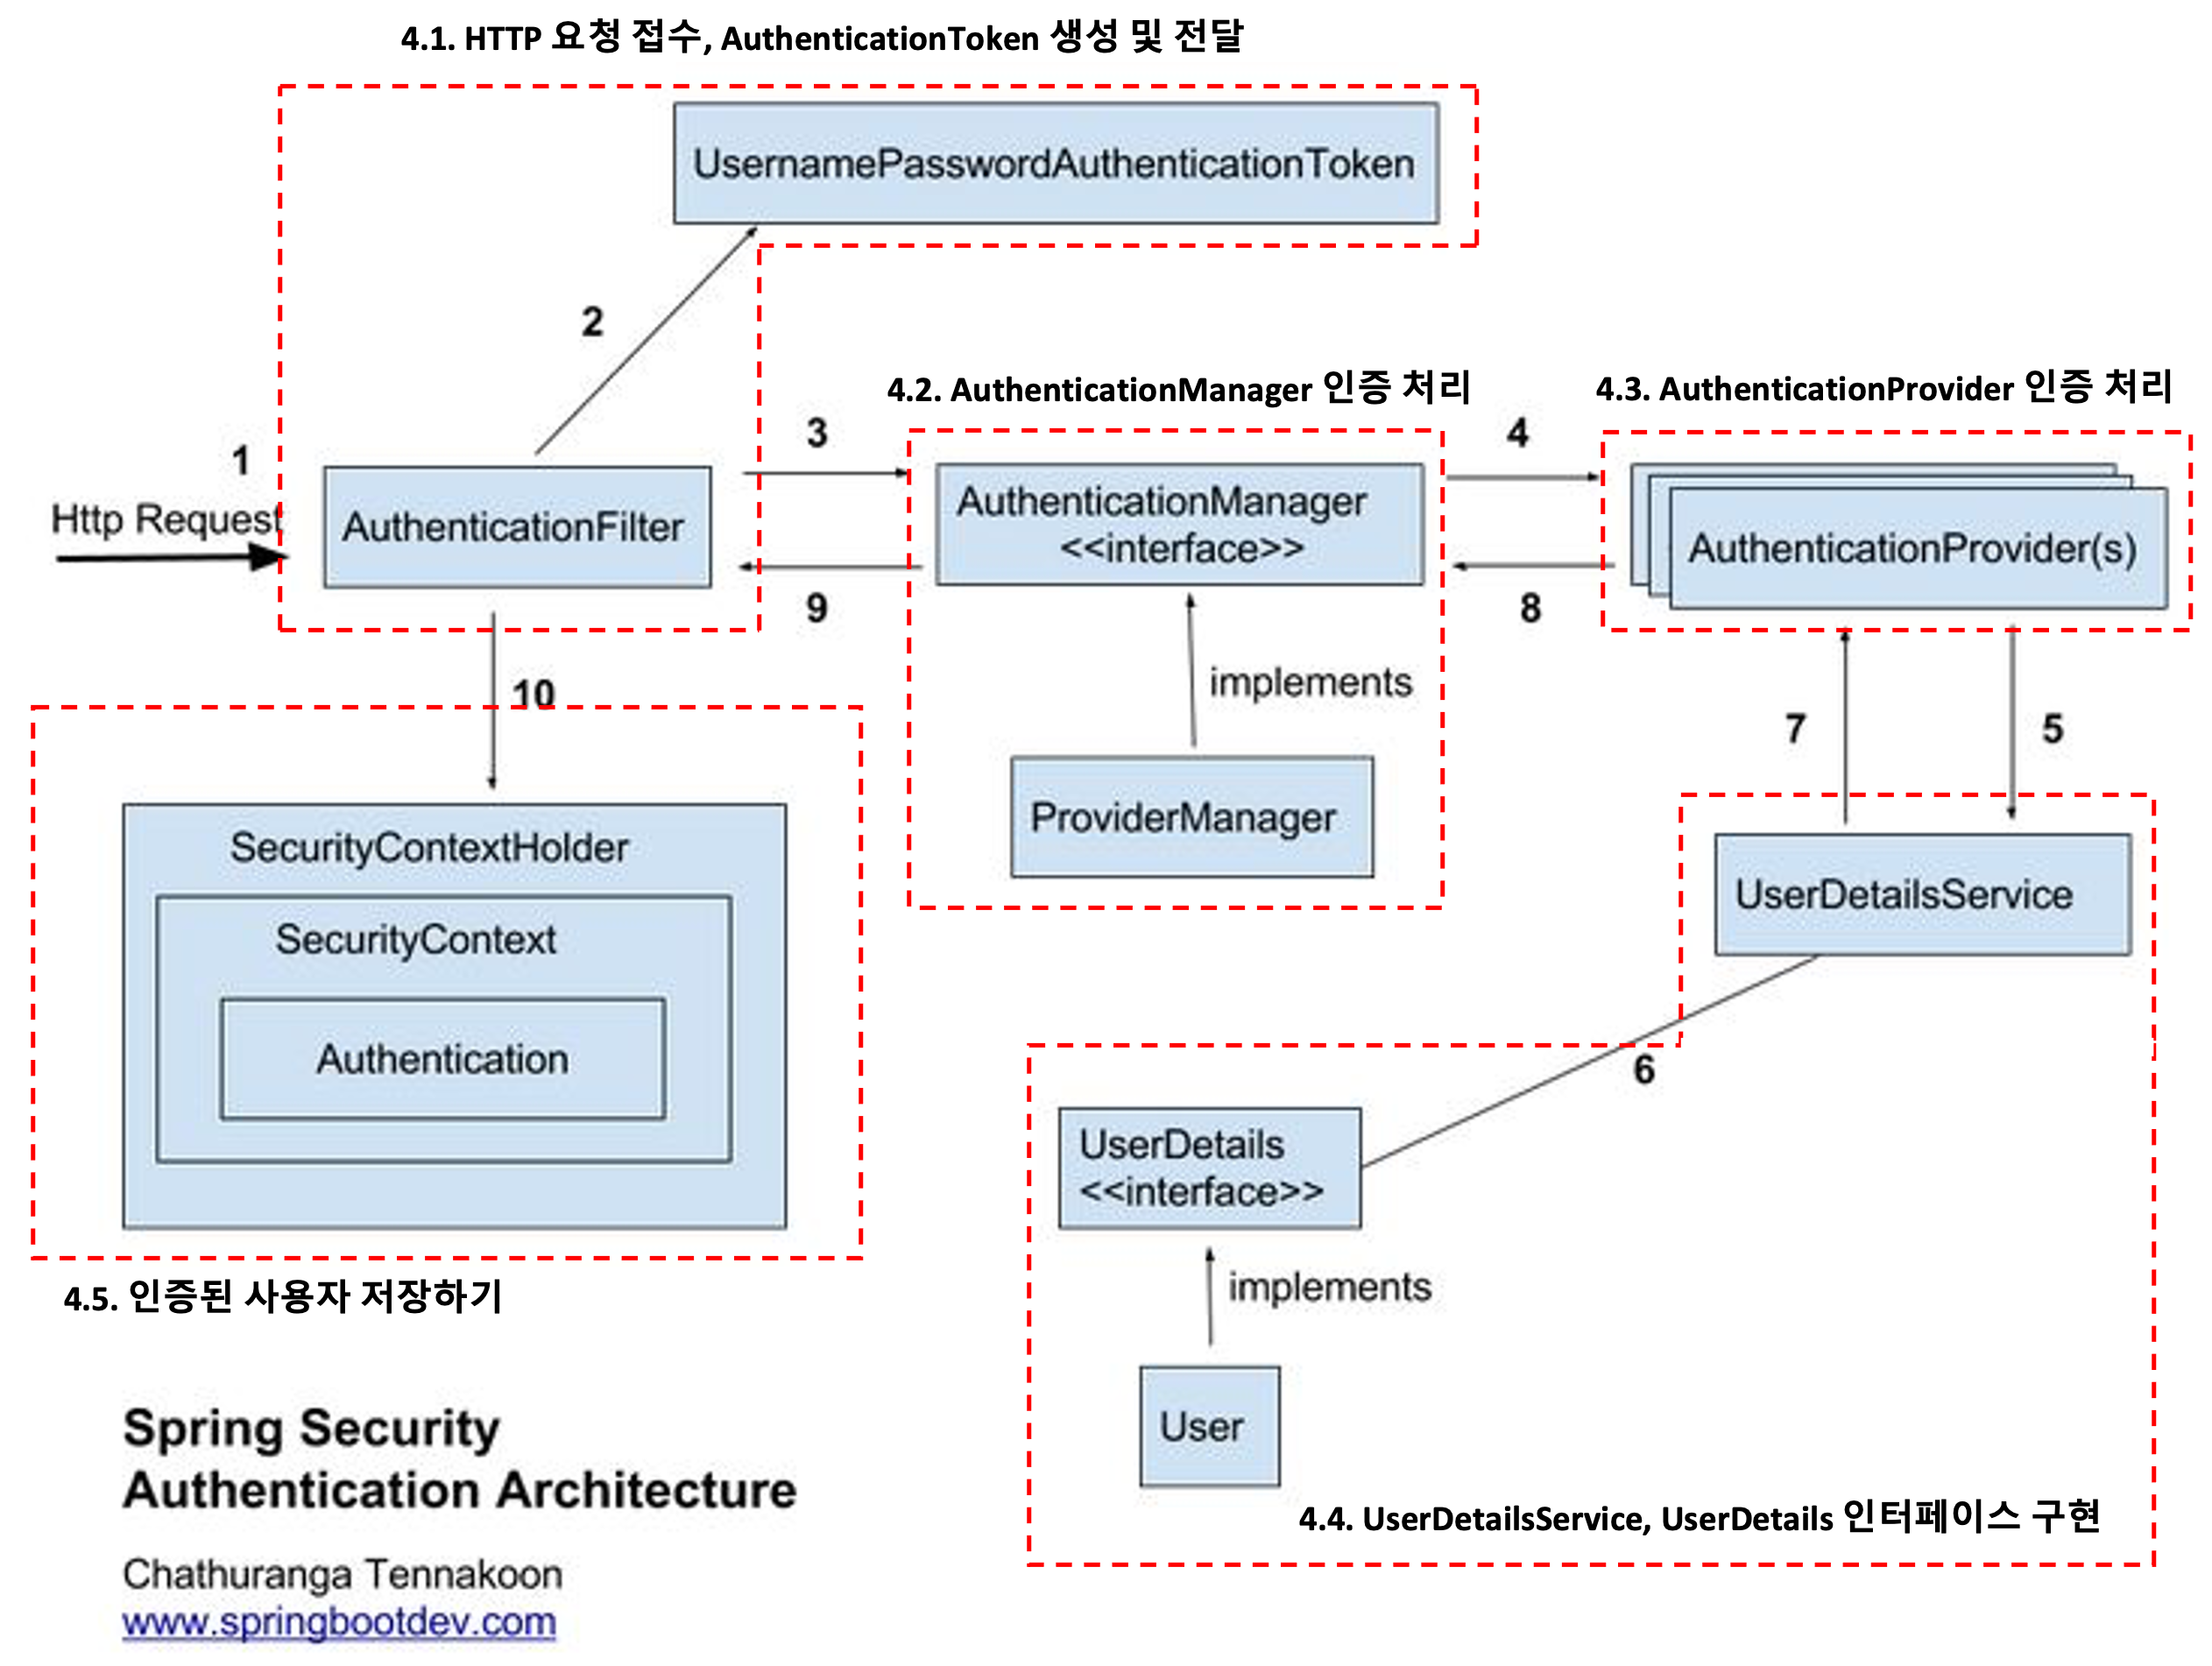
4.1. HTTP 요청 접수, AuthenticationToken 생성 및 전달
- 위 인증 과정을 표현한 이미지에서 1, 2, 3 순번에 대한 내용입니다.
- 사용자 요청이 인증을 위한 필터에게 전달됩니다.
UsernamePasswordAuthenticationFilter클래스를 기준으로 정리하였습니다.
UsernamePasswordAuthenticationFilter 클래스
- 기본적으로
/login경로로 POST 요청 시 처리합니다. username,password를 키 값으로 요청 객체에서 해당되는 값들을 추출합니다.UsernamePasswordAuthenticationToken토큰을 생성합니다.AuthenticationManager에게 토큰을 전달하여 인증을 요청합니다.
public class UsernamePasswordAuthenticationFilter extends AbstractAuthenticationProcessingFilter {

    public static final String SPRING_SECURITY_FORM_USERNAME_KEY = "username";
    public static final String SPRING_SECURITY_FORM_PASSWORD_KEY = "password";

    private static final AntPathRequestMatcher DEFAULT_ANT_PATH_REQUEST_MATCHER = new AntPathRequestMatcher("/login", "POST");

    private String usernameParameter = "username";
    private String passwordParameter = "password";
    private boolean postOnly = true;

    public Authentication attemptAuthentication(HttpServletRequest request, HttpServletResponse response) throws AuthenticationException {
        if (this.postOnly && !request.getMethod().equals("POST")) {
            throw new AuthenticationServiceException("Authentication method not supported: " + request.getMethod());
        } else {
            // 요청 정보에서 사용자 이름과 비밀번호를 추출합니다.
            String username = this.obtainUsername(request);
            username = username != null ? username : "";
            username = username.trim();
            String password = this.obtainPassword(request);
            password = password != null ? password : "";
            // 사용자 인증을 위한 토큰 객체를 생성합니다.
            UsernamePasswordAuthenticationToken authRequest = new UsernamePasswordAuthenticationToken(username, password);
            this.setDetails(request, authRequest);
            // 인증 매니저에게 토큰을 전달하여 인증을 위임합니다.
            return this.getAuthenticationManager().authenticate(authRequest);
        }
    }
}
4.2. AuthenticationManager 인증 처리
- 위 인증 과정을 표현한 이미지에서 4번, 9번 순번에 대한 설명입니다.
- 매니저가 관리하는 프로바이더(provider)들에게 전달받은 토큰을 위임하여 인증을 요청합니다.
ProviderManager클래스를 기준으로 정리하였습니다.
ProviderManager Class
provider.authenticate(authentication)메소드를 통해 매니저가 관리하는 프로바이더들에게 인증을 요청합니다.- 먼저 결과가 나오면 인증을 마치고, 인증된 사용자 정보를 필터에게 반환합니다.
public class ProviderManager implements AuthenticationManager, MessageSourceAware, InitializingBean {

    private AuthenticationEventPublisher eventPublisher;
    private List<AuthenticationProvider> providers;

    public Authentication authenticate(Authentication authentication) throws AuthenticationException {

        // ...

        Authentication result = null;
        Iterator var9 = this.getProviders().iterator();
        while(var9.hasNext()) {
            AuthenticationProvider provider = (AuthenticationProvider)var9.next();
            if (provider.supports(toTest)) {
                // ...
                try {
                    // 인증이 프로바이더에게 인증을 위임합니다.
                    result = provider.authenticate(authentication);
                    if (result != null) {
                        this.copyDetails(authentication, result);
                        break;
                    }
                } catch (InternalAuthenticationServiceException | AccountStatusException var14) {
                    this.prepareException(var14, authentication);
                    throw var14;
                } catch (AuthenticationException var15) {
                    lastException = var15;
                }
            }
        }

        // ...

        if (result != null) {
            if (this.eraseCredentialsAfterAuthentication && result instanceof CredentialsContainer) {
                ((CredentialsContainer)result).eraseCredentials();
            }
            if (parentResult == null) {
                this.eventPublisher.publishAuthenticationSuccess(result);
            }
            return result;
        } else {
            // ...
        }

        // ...
    }
}
4.3. AuthenticationProvider 인증 처리
- 위 인증 과정을 표현한 이미지에서 5번, 8번에 대한 내용입니다.
AbstractUserDetailsAuthenticationProvider와DaoAuthenticationProvider클래스를 기준으로 정리하였습니다.
AbstractUserDetailsAuthenticationProvider 클래스
AuthenticationManager클래스로부터authentication객체를 전달받습니다.determineUsername메소드를 이용해authentication객체로부터 사용자 이름을 추출합니다.retrieveUser메소드를 통해 사용자 정보를 조회합니다.additionalAuthenticationChecks메소드를 통해 추가적인 인증을 처리합니다.
public abstract class AbstractUserDetailsAuthenticationProvider implements AuthenticationProvider, InitializingBean, MessageSourceAware {

    protected MessageSourceAccessor messages = SpringSecurityMessageSource.getAccessor();
    private GrantedAuthoritiesMapper authoritiesMapper = new NullAuthoritiesMapper();

    public Authentication authenticate(Authentication authentication) throws AuthenticationException {

        // ...

        String username = this.determineUsername(authentication);
        UserDetails user = this.userCache.getUserFromCache(username);

        if (user == null) {
            try {
                // 사용자 정보를 조회합니다.
                user = this.retrieveUser(username, (UsernamePasswordAuthenticationToken)authentication);
            } catch (UsernameNotFoundException var6) {
                if (!this.hideUserNotFoundExceptions) {
                    throw var6;
                }
                throw new BadCredentialsException(this.messages.getMessage("AbstractUserDetailsAuthenticationProvider.badCredentials", "Bad credentials"));
            }
        }

        try {
            this.preAuthenticationChecks.check(user);
            // 비밀번호를 통해 사용자 인증을 수행합니다.
            this.additionalAuthenticationChecks(user, (UsernamePasswordAuthenticationToken)authentication);
        } catch (AuthenticationException var7) {
            if (!cacheWasUsed) {
                throw var7;
            }
            cacheWasUsed = false;
            user = this.retrieveUser(username, (UsernamePasswordAuthenticationToken)authentication);
            this.preAuthenticationChecks.check(user);
            this.additionalAuthenticationChecks(user, (UsernamePasswordAuthenticationToken)authentication);
        }

        // ...

        return this.createSuccessAuthentication(principalToReturn, authentication, user);
    }
}
DaoAuthenticationProvider 클래스
retrieveUser메소드를 통해 사용자 정보를 조회합니다.- 빈으로 주입된
userDetailsService객체를 통해 사용자 정보가 존재하는지 조회합니다.
- 빈으로 주입된
additionalAuthenticationChecks메소드를 통해 추가적인 인증을 처리합니다.- 토큰에 담긴
credential정보와 사용자 비밀번호가 같은지passwordEncoder객체를 통해 확인합니다.
- 토큰에 담긴
public class DaoAuthenticationProvider extends AbstractUserDetailsAuthenticationProvider {

    private PasswordEncoder passwordEncoder;
    private UserDetailsService userDetailsService;

    protected void additionalAuthenticationChecks(UserDetails userDetails, UsernamePasswordAuthenticationToken authentication) throws AuthenticationException {
        if (authentication.getCredentials() == null) {
            this.logger.debug("Failed to authenticate since no credentials provided");
            throw new BadCredentialsException(this.messages.getMessage("AbstractUserDetailsAuthenticationProvider.badCredentials", "Bad credentials"));
        } else {
            // 암호화 된 비밀번호를 매칭시켜봅니다.
            String presentedPassword = authentication.getCredentials().toString();
            if (!this.passwordEncoder.matches(presentedPassword, userDetails.getPassword())) {
                this.logger.debug("Failed to authenticate since password does not match stored value");
                throw new BadCredentialsException(this.messages.getMessage("AbstractUserDetailsAuthenticationProvider.badCredentials", "Bad credentials"));
            }
        }
    }

    protected final UserDetails retrieveUser(String username, UsernamePasswordAuthenticationToken authentication) throws AuthenticationException {
        this.prepareTimingAttackProtection();
        try {
            // 개발자가 오버라이드 한 loadUserByUsername 메소드를 통해 사용자를 조회합니다.
            UserDetails loadedUser = this.getUserDetailsService().loadUserByUsername(username);
            if (loadedUser == null) {
                throw new InternalAuthenticationServiceException("UserDetailsService returned null, which is an interface contract violation");
            } else {
                return loadedUser;
            }
        } catch (UsernameNotFoundException var4) {
            this.mitigateAgainstTimingAttack(authentication);
            throw var4;
        } catch (InternalAuthenticationServiceException var5) {
            throw var5;
        } catch (Exception var6) {
            throw new InternalAuthenticationServiceException(var6.getMessage(), var6);
        }
    }
}
4.4. UserDetailsService, UserDetails 인터페이스 구현
- 위 인증 과정을 표현한 이미지에서 6번, 7번에 대한 내용입니다.
Spring Security프레임워크를 사용하는 개발자는 아래 인터페이스를 구현합니다.UserDetailsService인터페이스 - 개발하는 서비스의 리소스로부터 사용자 정보가 있는지 조회합니다.UserDetails인터페이스 - 사용자 정보. 사용자 이름, 비밀번호, 권한 등에 대한 정보를 가집니다.
UserDetailsService 인터페이스
public interface UserDetailsService {
    UserDetails loadUserByUsername(String username) throws UsernameNotFoundException;
}
UserDetails 인터페이스
package org.springframework.security.core.userdetails;

import java.io.Serializable;
import java.util.Collection;
import org.springframework.security.core.GrantedAuthority;

public interface UserDetails extends Serializable {

    Collection<? extends GrantedAuthority> getAuthorities();

    String getPassword();

    String getUsername();

    boolean isAccountNonExpired();

    boolean isAccountNonLocked();

    boolean isCredentialsNonExpired();

    boolean isEnabled();
}
4.5. 인증된 사용자 저장하기
- 위 인증 과정을 표현한 이미지에서 10번에 대한 내용입니다.
AbstractAuthenticationProcessingFilter클래스를 기준으로 정리하였습니다.
AbstractAuthenticationProcessingFilter 클래스
AbstractAuthenticationProcessingFilter클래스를 상속한 클래스에게Authentication객체를 반환받습니다.- 이를 서비스에서 사용할 수 있도록
SessionAuthenticationStrategy클래스에 저장합니다. - 인증 성공 시
SecurityContext클래스에 인증된 결과를 넣고SecurityContextHolder클래스에 담습니다. - 인증 실패 시
SecurityContextHolder클래스를 정리합니다.
public abstract class AbstractAuthenticationProcessingFilter extends GenericFilterBean implements ApplicationEventPublisherAware, MessageSourceAware {

    protected void successfulAuthentication(HttpServletRequest request, HttpServletResponse response, FilterChain chain, Authentication authResult) throws IOException, ServletException {
        SecurityContext context = SecurityContextHolder.createEmptyContext();
        context.setAuthentication(authResult);
        SecurityContextHolder.setContext(context);
        if (this.logger.isDebugEnabled()) {
            this.logger.debug(LogMessage.format("Set SecurityContextHolder to %s", authResult));
        }
        this.rememberMeServices.loginSuccess(request, response, authResult);
        if (this.eventPublisher != null) {
            this.eventPublisher.publishEvent(new InteractiveAuthenticationSuccessEvent(authResult, this.getClass()));
        }
        this.successHandler.onAuthenticationSuccess(request, response, authResult);
    }

    protected void unsuccessfulAuthentication(HttpServletRequest request, HttpServletResponse response, AuthenticationException failed) throws IOException, ServletException {
        SecurityContextHolder.clearContext();
        this.logger.trace("Failed to process authentication request", failed);
        this.logger.trace("Cleared SecurityContextHolder");
        this.logger.trace("Handling authentication failure");
        this.rememberMeServices.loginFail(request, response);
        this.failureHandler.onAuthenticationFailure(request, response, failed);
    }

    private void doFilter(HttpServletRequest request, HttpServletResponse response, FilterChain chain) throws IOException, ServletException {
        if (!this.requiresAuthentication(request, response)) {
            chain.doFilter(request, response);
        } else {
            try {
                // 4.1. HTTP 요청 접수, AuthenticationToken 생성 및 전달에서 UsernamePasswordAuthenticationFilter 클래스의 attemptAuthentication 메소드를 호출하는 위치입니다.
                Authentication authenticationResult = this.attemptAuthentication(request, response);
                if (authenticationResult == null) {
                    return;
                }
                // 인증에 성공한 정보를 세션 정보에 담습니다.
                this.sessionStrategy.onAuthentication(authenticationResult, request, response);
                if (this.continueChainBeforeSuccessfulAuthentication) {
                    chain.doFilter(request, response);
                }
                // SecurityContextHolder 클래스에 인증 정보를 담습니다.
                this.successfulAuthentication(request, response, chain, authenticationResult);
            } catch (InternalAuthenticationServiceException var5) {
                this.logger.error("An internal error occurred while trying to authenticate the user.", var5);
                // 실패에 대한 처리를 수행합니다.
                this.unsuccessfulAuthentication(request, response, var5);
            } catch (AuthenticationException var6) {
                this.unsuccessfulAuthentication(request, response, var6);
            }

        }
    }
}
RECOMMEND NEXT POSTS
- Spring Security JWT OAuth Example
- JWT AuthenticationFilter 만들기
- JWT AuthenticationProvider 만들기
- JWT(Json Web Token) 발행과 재발행
댓글남기기