
Login Page / Authorization based Oauth2 JWT / Resource Service 분할 - Authorization Service
👉 해당 포스트를 읽는데 도움을 줍니다.
👉 이어서 읽기를 추천합니다.
- Login Page / Authorization based Oauth2 JWT / Resource Service 분할 - Front-End Service
- Login Page / Authorization based Oauth2 JWT / Resource Service 분할 - Resource Service
0. 들어가면서
TDD(Test Driven Development)를 연습하면서 로그인 기능을 Spring Security와 함께 구현해보는 것도 좋을 것 같다는 생각이 들었습니다.
이전에 작성했던 Spring Security JWT OAuth Example 글을 참조했는데, 마음에 들지 않는 부분들이 있어서 다시 정리하였습니다.
다시 정리해보려고 하는 내용들은 다음과 같습니다.
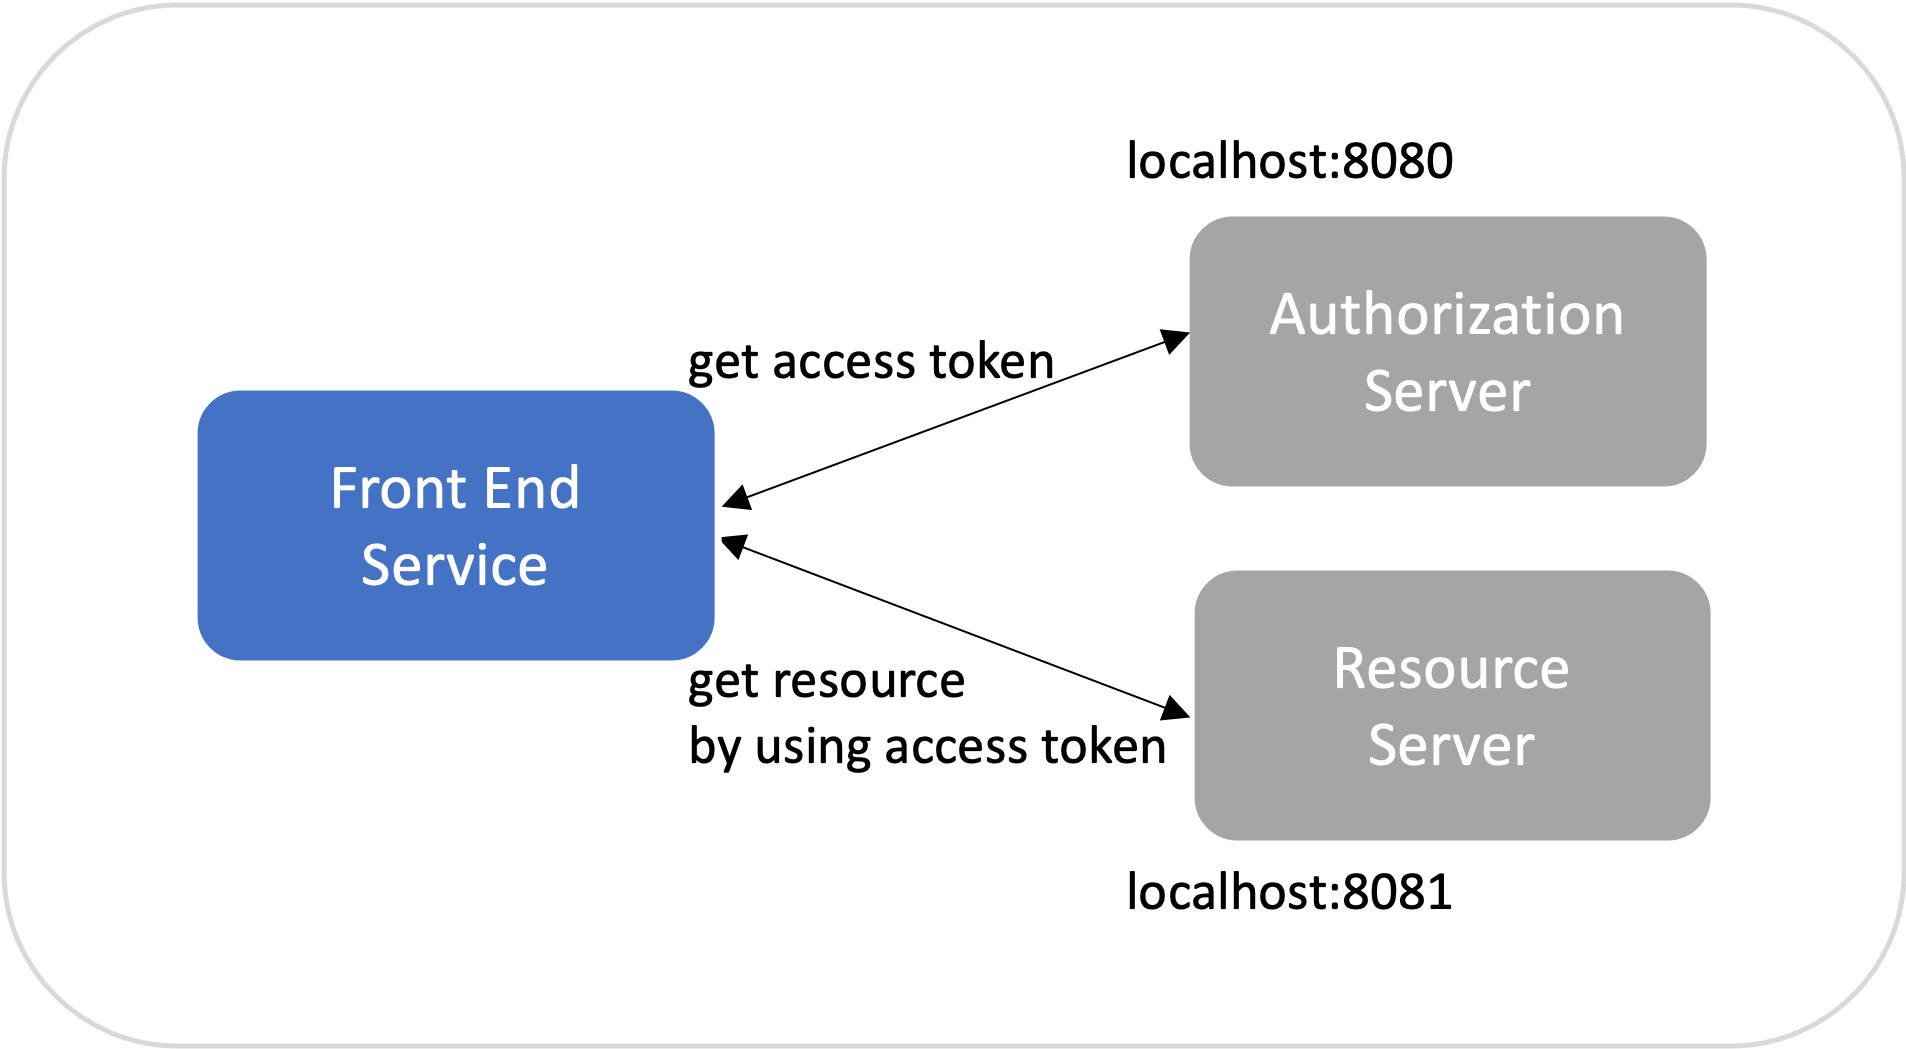
Insomnia 툴(tool)을 이용한 테스트를 실제 로그인 화면으로 변경Authorization Server와Resource Server분리spring-security-oauth2의존성 - 보안 취약점이 발견된 2.3.3.RELEASE 버전 사용 (2.3.5.RELEASE 버전으로 변경)- 선 테스트 코드 작성 후 코드 구현 (RED-GREEN-REFACTORING 사이클 연습)
- 프레임워크 기능에 의존적인 부분은 선 테스트 코드 작성에 실패하였습니다.
Spring Security JWT OAuth Example 서비스 구조
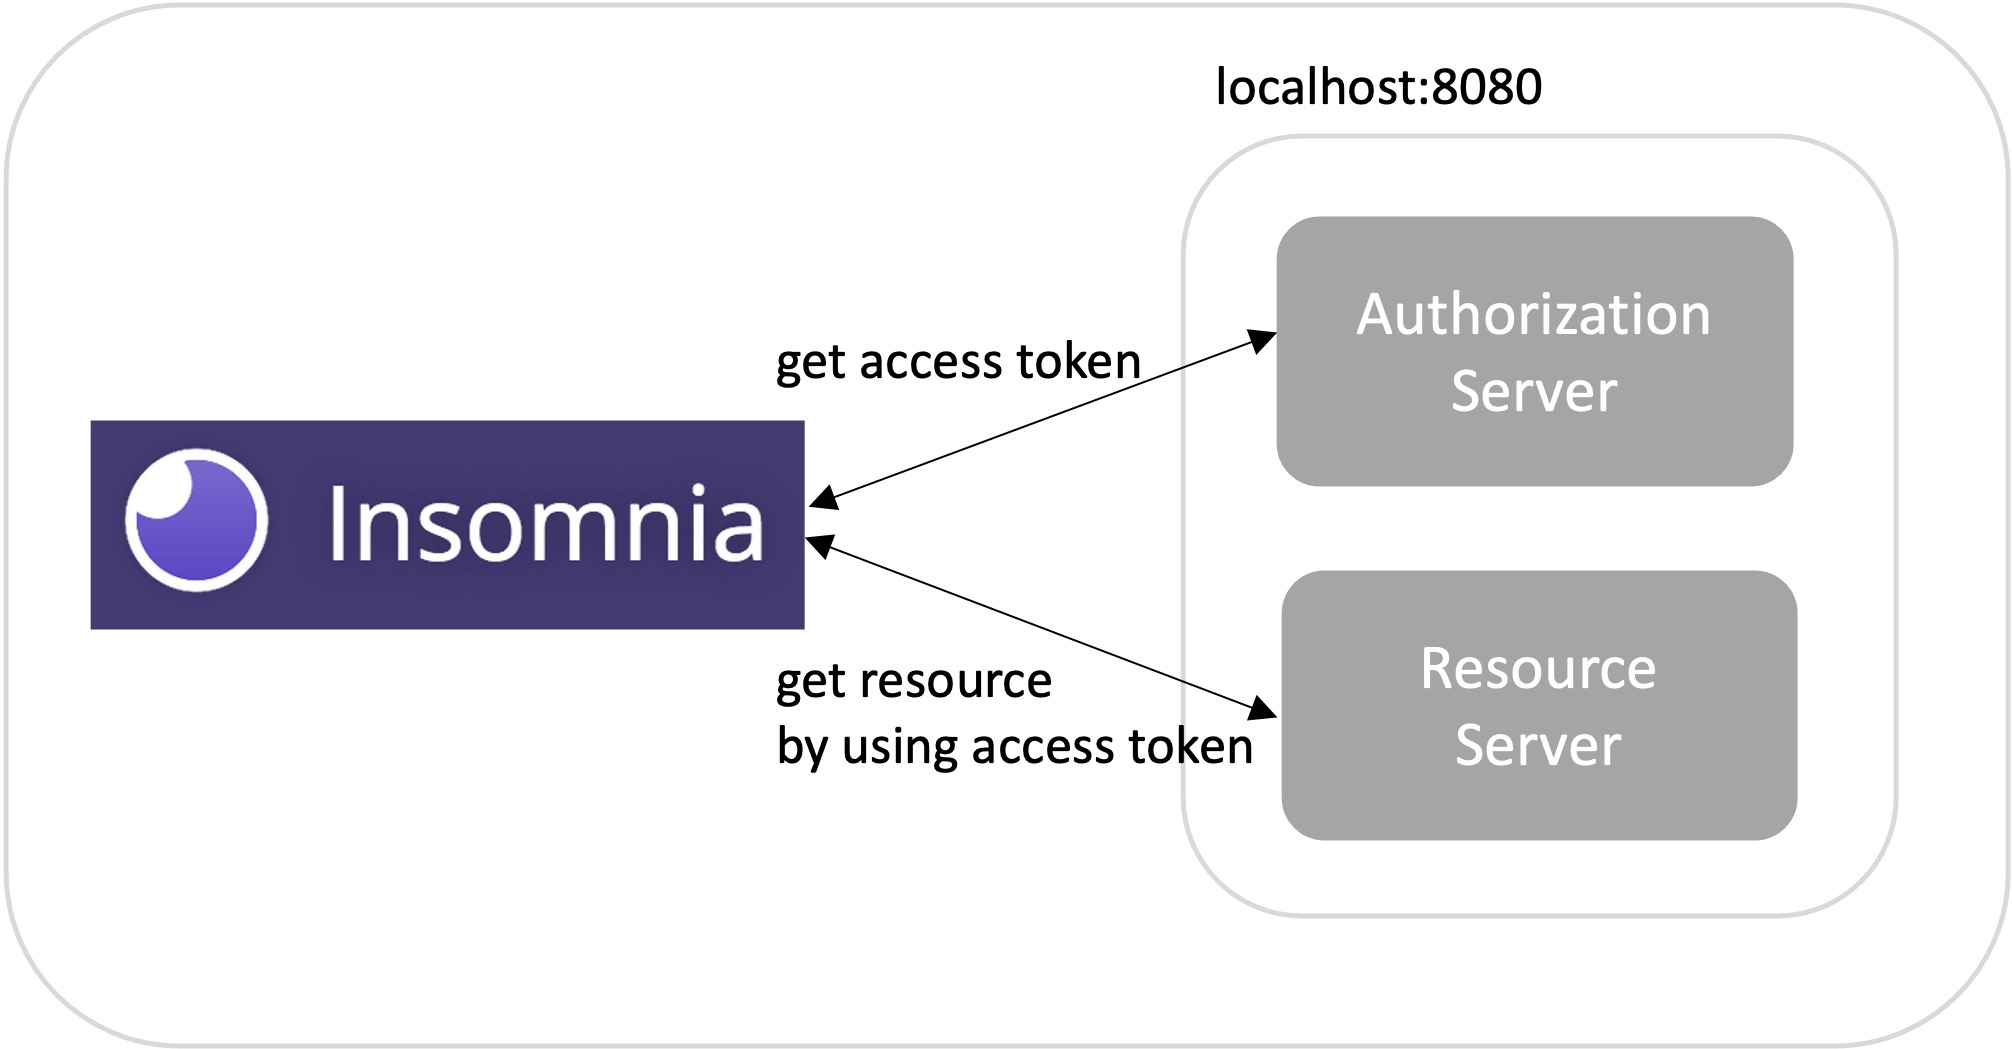
해당 포스트에서 다루는 서비스 구조
- 이번 포스트에선
인증 서비스를 구현하였습니다.
주의사항
- 현재 최신
Spring Security에서는Authorization Server구현을 지원하지 않습니다. (Deprecated)
2019/11/14 - Spring Security OAuth 2.0 Roadmap Update
No Authorization Server Support
…
Spring Security’s Authorization Server support was never a good fit. An Authorization Server requires a library to build a product. Spring Security, being a framework, is not in the business of building libraries or products. For example, we don’t have a JWT library, but instead we make Nimbus easy to use. And we don’t maintain our own SAML IdP, CAS or LDAP products.
In 2019, there are plenty of both commercial and open-source authorization servers available. Thus, the Spring Security team has decided to no longer provide support for authorization servers.
UPDATE: We’d like to thank everyone for your feedback on the decision to not support Authorization Server. Due to this feedback and some internal discussions, we are taking another look at this decision. We’ll notify the community on any progress.
1. 인증 서비스 구조, 설정 및 의존성
1.1. 패키지 구조
.
├── mvnw
├── mvnw.cmd
├── pom.xml
└── src
    ├── main
    │   ├── java
    │   │   └── blog
    │   │       └── in
    │   │           └── action
    │   │               ├── ActionInBlogApplication.java
    │   │               ├── converter
    │   │               │   └── StringListConverter.java
    │   │               ├── entity
    │   │               │   └── Member.java
    │   │               ├── filter
    │   │               │   └── CustomCorsFilter.java
    │   │               ├── repository
    │   │               │   └── MemberRepository.java
    │   │               ├── security
    │   │               │   ├── AuthorizationServer.java
    │   │               │   └── SecurityConfig.java
    │   │               └── service
    │   │                   └── MemberService.java
    │   └── resources
    │       └── application.yml
    └── test
        └── java
            └── blog
                └── in
                    └── action
                        ├── ActionInBlogApplicationTests.java
                        └── controller
                            └── AuthenticationControllerTests.java
1.2. application.yml
server:
  port: 8080
spring:
  h2:
    console:
      enabled: true
      path: /h2-console
  datasource:
    url: jdbc:h2:mem:testdb
    driver-class-name: org.h2.Driver
    username: sa
    password:
1.3. pom.xml - dependencies
   <dependencies>
      <dependency>
         <groupId>org.springframework.boot</groupId>
         <artifactId>spring-boot-starter-data-jpa</artifactId>
      </dependency>

      <dependency>
         <groupId>org.springframework.boot</groupId>
         <artifactId>spring-boot-starter-security</artifactId>
      </dependency>

      <dependency>
         <groupId>org.springframework.boot</groupId>
         <artifactId>spring-boot-starter-web</artifactId>
      </dependency>

      <dependency>
         <groupId>com.h2database</groupId>
         <artifactId>h2</artifactId>
         <scope>runtime</scope>
      </dependency>

      <dependency>
         <groupId>org.springframework.boot</groupId>
         <artifactId>spring-boot-starter-test</artifactId>
         <scope>test</scope>
         <exclusions>
            <exclusion>
               <groupId>org.junit.vintage</groupId>
               <artifactId>junit-vintage-engine</artifactId>
            </exclusion>
         </exclusions>
      </dependency>

      <dependency>
         <groupId>org.springframework.security</groupId>
         <artifactId>spring-security-test</artifactId>
         <scope>test</scope>
      </dependency>

      <dependency>
         <groupId>org.springframework.security.oauth</groupId>
         <artifactId>spring-security-oauth2</artifactId>
         <version>2.3.5.RELEASE</version>
      </dependency>

      <dependency>
         <groupId>org.springframework.security</groupId>
         <artifactId>spring-security-jwt</artifactId>
         <version>1.1.1.RELEASE</version>
      </dependency>

      <dependency>
         <groupId>org.projectlombok</groupId>
         <artifactId>lombok</artifactId>
         <scope>provided</scope>
      </dependency>

        <dependency>
            <groupId>junit</groupId>
            <artifactId>junit</artifactId>
            <version>4.13.1</version>
            <scope>test</scope>
        </dependency>
    </dependencies>
2. Authorization 서비스 구축
Authorization 서비스 구축은 쉽습니다.
두 개의 Configuration 빈(bean)을 만들면 됩니다.
2.1. SecurityConfig 클래스
@EnableWebSecurity애너테이션을 추가합니다.WebSecurityConfigurerAdapter클래스를 상속받습니다.configure(AuthenticationManagerBuilder auth)메소드- AuthenticationManagerBuilder 객체에 사용자 인증시 필요한 AuthenticationProvider 혹은 UserDetailsService를 설정합니다.
- 임시 사용자 정보를 메모리에 등록합니다.
package blog.in.action.security;

// ...

@RequiredArgsConstructor
@Configuration
@EnableWebSecurity
public class SecurityConfig extends WebSecurityConfigurerAdapter {

    private final MemberService memberService;

    @Bean
    public JwtAccessTokenConverter jwtAccessTokenConverter() {
        return new JwtAccessTokenConverter();
    }

    @Bean
    public PasswordEncoder passwordEncoder() {
        return new BCryptPasswordEncoder();
    }

    @Bean
    @Override
    public AuthenticationManager authenticationManagerBean() throws Exception {
        return super.authenticationManagerBean();
    }

    @Override
    protected void configure(AuthenticationManagerBuilder auth) throws Exception {
        auth.userDetailsService(memberService);
        auth.inMemoryAuthentication().withUser("Junhyunny").password(passwordEncoder().encode("123")).authorities("ADMIN");
    }
}
2.2. AuthorizationServer 클래스
@EnableAuthorizationServer애너테이션을 추가합니다.AuthorizationServerConfigurerAdapter클래스를 상속받습니다.configure(ClientDetailsServiceConfigurer clients)메소드- 메모리에만 올려 사용하는 임시
client정보를 추가합니다. - 해당 클라이언트는
password,refresh_token을 이용하여access_token을 발급받을 수 있습니다. - 임시
client정보이므로 매번 신규client추가를 위해서는 별도 데이터 소스 연결이 필요합니다. - OAuth2.0 and Dynamic Client Registration (using the Spring Security OAuth legacy stack)
- 메모리에만 올려 사용하는 임시
configure(AuthorizationServerEndpointsConfigurer endpoints)메소드- 사용자 인증을 위한
AuthenticationManager을 등록합니다. - JWT 토큰 발급을 위한
TokenEnhancerChain을 등록합니다. TokenEnhancerChain을 등록하지 않으면 일반 토큰이 발급됩니다.
- 사용자 인증을 위한
package blog.in.action.security;

// ...

import java.util.Arrays;

@RequiredArgsConstructor
@Configuration
@EnableAuthorizationServer
public class AuthorizationServer extends AuthorizationServerConfigurerAdapter {

    private String clientId = "CLIENT_ID";

    private String clientSecret = "CLIENT_SECRET";

    private int ACCESS_TOKEN_VALID_SECONDS = 10 * 60 * 24;

    private int REFRESH_TOKEN_VALID_SECONDS = 60 * 60 * 24;

    private final PasswordEncoder passwordEncoder;

    private final AuthenticationManager authenticationManager;

    private final JwtAccessTokenConverter jwtAccessTokenConverter;

    @Override
    public void configure(ClientDetailsServiceConfigurer clients) throws Exception {
        clients.inMemory()
                .withClient(clientId)//
                .secret(passwordEncoder.encode(clientSecret))//
                .authorizedGrantTypes("password", "refresh_token")//
                .scopes("read")//
                .accessTokenValiditySeconds(ACCESS_TOKEN_VALID_SECONDS)// access token 유효 시간 등록
                .refreshTokenValiditySeconds(REFRESH_TOKEN_VALID_SECONDS);// refresh token 유효 시간 등록
    }

    @Override
    public void configure(AuthorizationServerEndpointsConfigurer endpoints) throws Exception {
        TokenEnhancerChain tokenEnhancerChain = new TokenEnhancerChain();
        tokenEnhancerChain.setTokenEnhancers(Arrays.asList(jwtAccessTokenConverter)); // JWT Converter 등록
        endpoints.authenticationManager(authenticationManager)//
                .tokenEnhancer(tokenEnhancerChain);
    }
}
3. 사용자 인증 테스트 코드
givenImproperInfo_whenGetAccessToken_thenBadRequest테스트- 등록되지 않은 사용자로 토큰 요청 시
400 Bad Request응답을 받습니다.
- 등록되지 않은 사용자로 토큰 요청 시
givenProperInfo_whenGetAccessToken_thenAuthorized테스트- 정상적인 정보로 토큰 요청 시
access_token,refresh_token,token_type을 전달받습니다.
- 정상적인 정보로 토큰 요청 시
package blog.in.action.controller;

// ...

@RunWith(SpringRunner.class)
@WebAppConfiguration
@SpringBootTest(classes = ActionInBlogApplication.class)
public class AuthenticationControllerTests {

    @Autowired
    private WebApplicationContext webApplicationContext;

    private MockMvc mockMvc;

    @Before
    public void setup() {
        mockMvc = MockMvcBuilders
                .webAppContextSetup(webApplicationContext)
                .apply(springSecurity())
                .build();
    }

    @Test
    public void givenImproperInfo_whenGetAccessToken_thenBadRequest() throws Exception {

        MultiValueMap<String, String> params = new LinkedMultiValueMap<>();
        params.add("grant_type", "password");
        params.add("username", "testUser");
        params.add("password", "12345");

        mockMvc.perform(post("/oauth/token")
                        .params(params)
                        .with(httpBasic("CLIENT_ID", "CLIENT_SECRET"))
                        .accept("application/json;charset=UTF-8"))
                .andExpect(status().isBadRequest());
    }

    @Test
    public void givenProperInfo_whenGetAccessToken_thenAuthorized() throws Exception {

        MultiValueMap<String, String> params = new LinkedMultiValueMap<>();
        params.add("grant_type", "password");
        params.add("username", "Junhyunny");
        params.add("password", "123");

        ResultActions result = mockMvc.perform(post("/oauth/token")
                        .params(params)
                        .with(httpBasic("CLIENT_ID", "CLIENT_SECRET"))
                        .accept("application/json;charset=UTF-8"))
                .andExpect(status().isOk())
                .andExpect(content().contentType("application/json;charset=UTF-8"));

        String resultString = result.andReturn().getResponse().getContentAsString();

        JacksonJsonParser jsonParser = new JacksonJsonParser();
        Map<String, Object> parsedMap = jsonParser.parseMap(resultString);
        assertThat(parsedMap.get("access_token")).isNotNull();
        assertThat(parsedMap.get("refresh_token")).isNotNull();
        assertThat(parsedMap.get("token_type")).isEqualTo("bearer");
    }
}
4. 화면 / 인증 / 리소스 서비스 연동 결과
위 작업 내용은 모두 커밋(commit)하고, 구현 완료된 인증 서비스, 리소스 서비스와 연결하면서 변경된 내용만 정리해보겠습니다. 테스트를 모두 통과하였기에 쉽게 연결될 것으로 기대했지만, 리소스 서비스와 연결시에 예상치 못한 에러를 만났습니다. 해당 사항에 구체적인 내용은 다음 포스트를 통해 정리해보겠습니다. 변경된 내용은 위 코드에 반영하지 않았으며, 테스트 코드 레포지토리에서 확인하시길 바랍니다.
4.1. 인증 서비스 코드 변경 사항
- JWT 토큰을 변경하는 빈에 Sign Key를 지정해주고, 부가적인 기능을 호출합니다.(afterPropertiesSet 메소드)
- 관련 코드 - SecurityConfig.java
4.2. 테스트 결과 화면

댓글남기기