Create ALB and TargetGroup in AWS with Terraform
RECOMMEND POSTS BEFORE THIS
0. 들어가면서
이전 글에서 테라폼을 사용해 VPC를 구성하는 방법에 대해 정리했다. 이번 글은 기존 VPC를 기준으로 ALB(Application LoadBalancer)와 타겟 그룹(target group)을 구성하는 방법에 대해 정리했다. 이 글에선 VPC, 서브넷(subnet), 라우트 테이블(route table), 게이트웨이(gateway) 등에 대해선 다루지 않기 때문에 이전 글을 참고하길 바란다.
1. Expected Infra in AWS
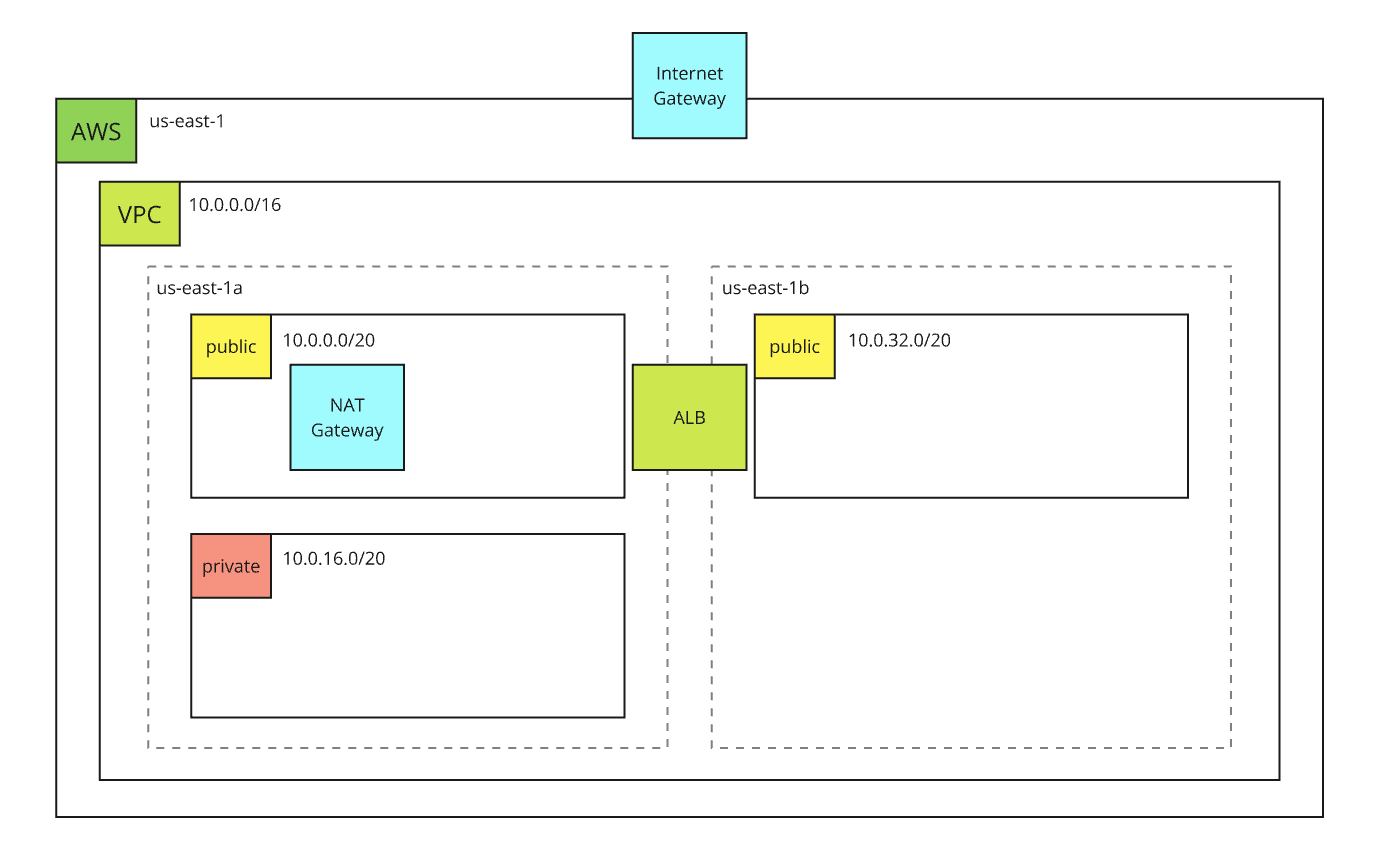
테라폼을 사용해 구성할 ALB, 타겟 그룹은 다음과 같다.
- ALB는 퍼블릭 서브넷에 위치한다.
- AZ(Availability Zone)이 서로 다른 서브넷이 2개 필요하다.
- 타겟 그룹을 하나 만든다.
- 타겟 그룹은 이전에 생성한 VPC 내부 인스턴스들을 기준으로 동작한다.

2. Project structure
프로젝트 구성은 다음과 같다. 이전 글을 기준으로 다음과 같은 자원이 추가된다.
- load-balancer.tf
- security-group.tf
.
├── gateway.tf
├── load-balancer.tf
├── provider.tf
├── route-table.tf
├── security-group.tf
├── subnet.tf
├── terraform.tfvars
├── variable.tf
└── vpc.tf
3. Security Group
먼저 시큐리티 그룹을 하나 생성한다. 이 시큐리티 그룹은 외부에서 로드 밸런서로 접근할 때 필요한 규칙이다. security-group.tf 파일에 정의한다.
- ingress
- 외부에서 로드 밸런서로 접근할 때 규칙이다.
- 모든 접근 트래픽을 허용한다.
- egress
- 로드 밸런서에서 외부로 나갈 때 규칙이다.
- 모든 트래픽을 허용한다.
resource "aws_security_group" "junhyunny_alb_sg" {
  vpc_id      = aws_vpc.junhyunny_vpc.id
  description = "${var.project_name}-alb-sg"
  name        = "${var.project_name}-alb-sg"
  ingress {
    from_port = 80
    to_port   = 80
    protocol  = "tcp"
    cidr_blocks = ["0.0.0.0/0"]
  }
  egress {
    from_port = 0
    to_port   = 0
    protocol  = "-1"
    cidr_blocks = ["0.0.0.0/0"]
  }
}
4. Load Balancer and target group
로드 밸런서와 타겟 그룹에 대한 내용은 load-balancer.tf 파일에 정의한다. 먼저 로드 밸런서 리소스 코드를 살펴보자.
- 노출 여부
- 외부 노출이 필요하기 때문에 internal 값을 false 로 지정한다.
- 로드 밸런서 타입
- application 타입을 사용한다.
- 시큐리티 그룹
- 위에서 정의한 junhyunny_alb_sg 시큐리티 그룹을 적용한다.
- 서브넷
- 이전 글에서 생성한 퍼블릭 서브넷 public_subnet_1, public_subnet_2 에 배포한다.
resource "aws_lb" "junhyunny_alb" {
  internal           = false
  load_balancer_type = "application"
  security_groups = [aws_security_group.junhyunny_alb_sg.id]
  subnets = [aws_subnet.public_subnet_1.id, aws_subnet.public_subnet_2.id]
  tags = {
    Name = "${var.project_name}-alb"
  }
}
타겟 그룹은 다음과 같이 정의힌다.
- 포트
- 8080 사용한다.
- 프로토콜
- HTTP 프로토콜을 사용한다.
- VPC
- 이전 글에서 생성한 VPC를 대상으로 적용한다.
- 타겟 타입
- instance 으로 지정한다.
- VPC에 배포된 EC2 인스턴스를 대상으로 동작한다.
resource "aws_alb_target_group" "junhyunny_alb_target_group" {
  name        = "${var.project_name}-alb-target-group"
  port        = "8080"
  protocol    = "HTTP"
  vpc_id      = aws_vpc.junhyunny_vpc.id
  target_type = "instance"

  health_check {
    path     = "/"
    protocol = "HTTP"
    interval = 30
    timeout  = 5
  }
}
리스너 규칙을 지정한다.
- 로드 밸런서 ARN(AWS Resource Name)
- 해당 리스너 규칙을 사용할 로드 밸런서를 지정한다.
- 위에서 정의한 로드 밸런서의 arn 값을 사용한다.
- 포트
- 80 포트를 사용한다.
- 프로토콜
- HTTP 프로토콜을 사용한다.
- 타입
- forward 타입을 사용한다.
- 타겟 그룹
- 해당 리스너 규칙을 통해 트래픽이 연결될 타겟 그룹을 지정한다.
- 위에서 정의한 타겟 그룹의 arn 값을 사용한다.
resource "aws_lb_listener" "junhyunny_alb_listener" {
  load_balancer_arn = aws_lb.junhyunny_alb.arn
  port              = "80"
  protocol          = "HTTP"
  default_action {
    type             = "forward"
    target_group_arn = aws_alb_target_group.junhyunny_alb_target_group.arn
  }
}
위와 같은 인프라 설정은 리스너 규칙과 타겟 그룹을 지정을 통해 외부에서 로드 밸런서의 80 포트로 접근하는 트래픽은 타겟 그룹에 속한 인스턴스의 8080 포트로 연결된다.
마지막으로 인프라 배포가 완료되면 로드 밸런서의 DNS(Domain Name Server)를 확인할 수 있도록 output 블럭을 정의한다.
output "alb-dns" {
  value = aws_lb.junhyunny_alb.dns_name
}
9. Apply Terraform
위에서 코드로 정의한 인프라를 테라폼으로 적용한다. 필자는 파워 유저(power user)이기 때문에 클라이언트 액세스(access)를 위해 임시로 획득한 환경 변수를 터미널 세션에 준비한다.
$ export AWS_ACCESS_KEY_ID=ABCDEFGHIJKLEMNOPQRSTUVWXYZ
$ export AWS_SECRET_ACCESS_KEY=ABCDEFGHIJKLEMNOPQRSTUVWXYZ/1234567890/BCDE
$ export AWS_SESSION_TOKEN=ABCDEFG ... 1234567890
terraform apply 명령어를 사용해 AWS 클라우드에 인프라 변경 사항을 적용한다.
$ terraform apply

Terraform used the selected providers to generate the following execution plan. Resource actions are indicated with the following symbols:
  + create

Terraform will perform the following actions:

  # aws_security_group.junhyunny_alb_sg will be created
  + resource "aws_security_group" "junhyunny_alb_sg" {
      + arn                    = (known after apply)
      + description            = "junhyunny-demo-alb-sg"
      + egress                 = [
          + {
              + cidr_blocks      = [
                  + "0.0.0.0/0",
                ]
              + from_port        = 0
              + ipv6_cidr_blocks = []
              + prefix_list_ids  = []
              + protocol         = "-1"
              + security_groups  = []
              + self             = false
              + to_port          = 0
                # (1 unchanged attribute hidden)
            },
        ]
      + id                     = (known after apply)
      + ingress                = [
          + {
              + cidr_blocks      = [
                  + "0.0.0.0/0",
                ]
              + from_port        = 80
              + ipv6_cidr_blocks = []
              + prefix_list_ids  = []
              + protocol         = "tcp"
              + security_groups  = []
              + self             = false
              + to_port          = 80
                # (1 unchanged attribute hidden)
            },
        ]
      + name                   = "junhyunny-demo-alb-sg"
      + name_prefix            = (known after apply)
      + owner_id               = (known after apply)
      + revoke_rules_on_delete = false
      + tags_all               = (known after apply)
      + vpc_id                 = (known after apply)
    }

  ...

Changes to Outputs:
  + alb-dns = (known after apply)

Do you want to perform these actions?
  Terraform will perform the actions described above.
  Only 'yes' will be accepted to approve.

  Enter a value: yes
테라폼 작업이 완료되면 터미널에 ALB DNS 주소를 확인할 수 있다.
...

Apply complete! Resources: 16 added, 0 changed, 0 destroyed.

Outputs:

alb-dns = "tf-lb-20240913202006675800000003-83453087.us-east-1.elb.amazonaws.com"
해당 DNS 주소로 접근하면 브라우저에서 다음 화면을 볼 수 있다. 아직 EC2 인스턴스가 없기 때문에 서버가 요청에 처리할 준비가 되지 않았다는 503 Service Unavailable 에러를 확인할 수 있다.

CLOSING
다음은 EC2 인스턴스를 배포해 로드 밸런서에 연결하는 방법에 대해 정리할 예정이다.

댓글남기기