


스프링(spring) 서버 CORS(Cross Origin Resource Sharing) 헤더 추가하기
RECOMMEND POSTS BEFORE THIS
0. 들어가면서
CORS(Cross Origin Resource Sharing) 글 마지막에 CORS 정책 위반 에러를 방지할 수 있는 방법을 두 가지 소개했다.
- 프론트엔드 서비스의 프록시 기능을 사용하여 교차 호출이 발생하지 않도록 우회
- 백엔드 서비스에서 CORS 허용 헤더를 응답
이번 글은 스프링 부트 서버에서 CORS 정책 처리를 위해 헤더를 설정하는 방법을 다룬다. 간단하게 프론트엔드 서비스를 함께 구성하여 CORS 에러가 발생하는 케이스와 정상 처리 케이스를 살펴본다. 여러 개의 서버 애플리케이션을 동시에 띄워서 여러 가지 방법으로 CORS 헤더를 구성하는 방법에 대해 알아본다. 이 글의 프론트엔드 예제는 VueJs를 사용했다. Jekyll 문법과 충돌이 있기 때문에 { { someValue } }으로 표기된 코드는 띄어쓰기를 붙여야지 정상적으로 동작한다.
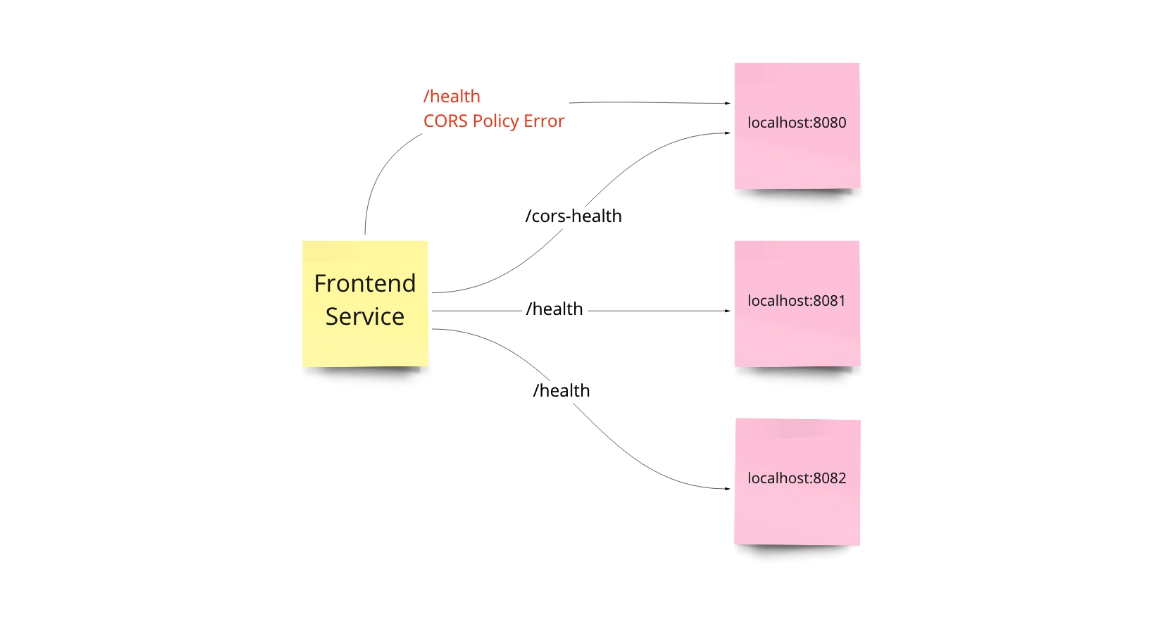
1. Frontend application
각 버튼 별로 어떤 동작을 하는지 간단히 살펴보자.
- Error 버튼
http://localhost:8080/health경로 요청을 보낸다.CORS응답 헤더를 반환하지 않으므로 에러가 발생한다.
- Annotation 버튼
http://localhost:8080/cors-health경로 요청을 보낸다.- 해당 경로는
@CrossOrigin애너테이션 적용으로 정상 작동한다.
- Configure 버튼
http://localhost:8081/health경로 요청을 보낸다.- 해당 서비스는 전역 CORS 설정 적용으로 정상 작동한다.
- Filter 버튼
http://localhost:8082/health경로로 요청을 보낸다.- 해당 서비스는 CORS 처리를 위한 필터 적용으로 정상 작동한다.
프론트엔드 코드는 아래와 같다. axios 모듈을 사용하여 API 요청을 수행한다. 상대 경로(relative path) URI를 사용하면 페이지 출처 서비스로 요청을 보내고, 절대 경로(absolute path) URI를 사용하면 해당 호스트로 직접 요청을 보낸다. 이 글의 예제는 서버 도메인을 직접 사용하기 때문에 브라우저가 스프링 애플리케이션 서버로 요청을 직접 보낸다.
<template>
  <div class="wrapper">
    <h1>Check CORS(Cross Origin Resource Sharing)</h1>
    <div class="message flex-center" :class="{error: isError}">
      <p>{ { response } }</p>
    </div>
    <div class="button-group flex-center">
      <div class="buttons flex-center">
        <button @click="requestError()">Error</button>
        <button @click="requestAnnotation()">Annotation</button>
      </div>
      <div class="buttons flex-center">
        <button @click="requestConfigure()">Configure</button>
        <button @click="requestFilter()">Filter</button>
      </div>
    </div>
  </div>
</template>

<script>
import axios from 'axios'

export default {
  data() {
    return {
      response: 'Waiting',
      isError: false
    }
  },
  methods: {
    requestError() {
      this.requestApi('http://localhost:8080/health')
    },
    requestAnnotation() {
      this.requestApi('http://localhost:8080/cors-health')
    },
    requestConfigure() {
      this.requestApi('http://localhost:8081/health')
    },
    requestFilter() {
      this.requestApi('http://localhost:8082/health')
    },
    requestApi(url) {
      axios.get(url)
          .then((res) => {
            this.response = res.data
            this.isError = false
          })
          .catch((error) => {
            this.response = error.message
            this.isError = true
          })
    }
  }
}
</script>

<style scoped>
/* some styles */
</style>
2. Backend applications
위에서 언급한 것처럼 서버 애플리케이션은 3개 존재한다. 서비스 별로 CORS 정책을 처리하기 위한 각기 다른 방법을 사용한다. 각 애플리케이션에서 사용한 방법들을 살펴보자.
2.1. Using @CrossOrigin annotation
8080 포트 서비스에서 처리한 방식은 스프링 프레임워크가 제공하는 @CrossOrigin 애너테이션을 사용했다. @CrossOrigin 애너테이션을 살펴보자.
- @CrossOrigin 애너테이션의 적용 대상은 클래스와 메서드이다.
- ElementType.TYPE - 클래스, 인터페이스, 열거 타입에 사용 가능
- ElementType.METHOD - 메서드에 사용 가능
- CORS 헤더 설정에 필요한 값들을 지정할 수 있다.
- origins - 허용하는 출처 리스트
- originPatterns - 허용하는 출처 패턴 리스트
- allowedHeaders - 허용하는 헤더 리스트
- methods - 허용하는 메서드 리스트
package org.springframework.web.bind.annotation;

import java.lang.annotation.Documented;
import java.lang.annotation.ElementType;
import java.lang.annotation.Retention;
import java.lang.annotation.RetentionPolicy;
import java.lang.annotation.Target;
import org.springframework.core.annotation.AliasFor;

@Target({ElementType.TYPE, ElementType.METHOD})
@Retention(RetentionPolicy.RUNTIME)
@Documented
public @interface CrossOrigin {
    /** @deprecated */
    @Deprecated
    String[] DEFAULT_ORIGINS = new String[]{"*"};
    /** @deprecated */
    @Deprecated
    String[] DEFAULT_ALLOWED_HEADERS = new String[]{"*"};
    /** @deprecated */
    @Deprecated
    boolean DEFAULT_ALLOW_CREDENTIALS = false;
    /** @deprecated */
    @Deprecated
    long DEFAULT_MAX_AGE = 1800L;

    @AliasFor("origins")
    String[] value() default {};

    @AliasFor("value")
    String[] origins() default {};

    String[] originPatterns() default {};

    String[] allowedHeaders() default {};

    String[] exposedHeaders() default {};

    RequestMethod[] methods() default {};

    String allowCredentials() default "";

    long maxAge() default -1L;
}
해당 애너테이션을 컨트롤러 객체의 메서드에 추가한다.
- /health 경로에서 “It occurs CORS policy error.” 응답 메시지를 반환한다.
- /cors-health 경로에는 @CrossOrigin 애너테이션을 적용한다.
- 출처가
http://localhost인 경우에 교차 출처 요청에 대한 허가 응답 헤더를 전달한다. - “It’s okay because of @CrossOrigin annotation.” 응답 메시지를 반환한다.
- 출처가
package blog.in.action.controller;

import org.springframework.web.bind.annotation.CrossOrigin;
import org.springframework.web.bind.annotation.GetMapping;
import org.springframework.web.bind.annotation.RequestMapping;
import org.springframework.web.bind.annotation.RestController;

@RestController
public class CorsController {

    @GetMapping("/health")
    public String health() {
        return "It occurs CORS policy error.";
    }

    @CrossOrigin(origins = "http://localhost")
    @GetMapping("/cors-health")
    public String healthCorsAnnotation() {
        return "It's okay because of @CrossOrigin annotation.";
    }
}
2.2. Using global CORS configuration
8081 포트 서비스에서 처리한 방식을 살펴본다. 전역 CORS 설정을 통해 해당 서비스로 오는 요청에 대한 CORS 응답 헤더 생성을 결정한다. WebMvcConfigurer 인터페이스를 확장해서 addCorsMappings 메서드를 재정의한다. 메서드 내부에 CORS 정책을 작성한다.
- @EnableWebMvc 애너테이션으로 WebMVC 기능을 위한 설정임을 표시한다.
- WebMvcConfigurer 인터페이스를 구현하고 addCorsMappings 메서드를 재정의한다.
- 다음과 같은 CORS 정책을 작성한다.
/health경로에 대해 적용한다.GET메서드로 오는 요청은 CORS 헤더 생성을 허용한다.http://localhost출처에서 오는 요청은 CORS 헤더 생성을 허용한다.- 클라이언트에서 사전(preflight) 요청 결과를 저장하는 시간을 3초로 지정한다.
package blog.in.action.config;

import org.springframework.context.annotation.Configuration;
import org.springframework.web.servlet.config.annotation.CorsRegistry;
import org.springframework.web.servlet.config.annotation.EnableWebMvc;
import org.springframework.web.servlet.config.annotation.WebMvcConfigurer;

@Configuration
@EnableWebMvc
public class WebConfig implements WebMvcConfigurer {

    @Override
    public void addCorsMappings(CorsRegistry registry) {
        registry.addMapping("/health")
                .allowedMethods("GET")
                .allowedOrigins("http://localhost")
                .maxAge(3000);
    }
}
그리고 다음과 같은 컨트롤러 객체를 구현한다.
/health경로에서 “It’s okay because of global CORS configuration.” 응답 메시지를 반환한다.
package blog.in.action.controller;

import org.springframework.web.bind.annotation.GetMapping;
import org.springframework.web.bind.annotation.RestController;

@RestController
public class CorsController {

    @GetMapping("/health")
    public String health() {
        return "It's okay because of global CORS configuration.";
    }
}
2.3. Using CorsFilter
마지막으로 8082 포트 서비스의 처리 방법을 살펴보자. CORS 처리를 위한 필터를 생성하고 해당 서비스로 오는 요청에 대한 CORS 응답 헤더 생성을 제어한다. CORS 필터 빈(bean) 객체를 만들어 반환한다.
- CORS 정책을 위한 CorsConfiguration 객체를 생성한다.
GET메서드로 오는 요청은 CORS 헤더 생성을 허용한다.http://localhost출처에서 오는 요청은 CORS 헤더 생성을 허용한다.
- UrlBasedCorsConfigurationSource 객체를 생성한다.
/health경로에 위에서CORS설정을 적용한다.
package blog.in.action.config;

import org.springframework.boot.web.servlet.FilterRegistrationBean;
import org.springframework.context.annotation.Bean;
import org.springframework.context.annotation.Configuration;
import org.springframework.web.cors.CorsConfiguration;
import org.springframework.web.cors.UrlBasedCorsConfigurationSource;
import org.springframework.web.filter.CorsFilter;

@Configuration
public class WebConfig {

    @Bean
    public FilterRegistrationBean corsFilter() {

        CorsConfiguration config = new CorsConfiguration();
        config.setAllowCredentials(false);
        config.addAllowedOrigin("http://localhost");
        config.addAllowedHeader("*");
        config.addAllowedMethod("GET");

        UrlBasedCorsConfigurationSource source = new UrlBasedCorsConfigurationSource();
        source.registerCorsConfiguration("/health", config);

        FilterRegistrationBean bean = new FilterRegistrationBean(new CorsFilter(source));
        bean.setOrder(0);
        return bean;
    }
}
아래와 같은 컨트롤러 객체를 만든다.
/health경로에서 “It’s okay because of CORS filter.” 응답 메시지를 반환한다.
package blog.in.action.controller;

import org.springframework.web.bind.annotation.GetMapping;
import org.springframework.web.bind.annotation.RestController;

@RestController
public class CorsController {

    @GetMapping("/health")
    public String health() {
        return "It's okay because of CORS filter.";
    }
}
3. Verify
예제 확인을 위한 서비스가 총 4개이기 때문에 도커 컴포즈(docker-compose)를 사용한다.
$ docker-compose up -d
...
Creating 2021-01-15-cors-example_backend_1           ... done
Creating 2021-01-15-cors-example_backend-filter_1    ... done
Creating 2021-01-15-cors-example_frontend_1          ... done
Creating 2021-01-15-cors-example_backend-configure_1 ... done
브라우저에서 http://localhost:8080 서버에 접속하여 각 버튼을 눌러보면서 응답 헤더 값을 확인한다.

CLOSING
예제 코드는 이 레포지토리 링크를 참조하길 바란다. 예시에서 사용한 서비스들은 각각 다음과 같다.
frontend폴더 - 프론트엔드 서비스backend폴더 - 포트번호 8080 서비스backend-configure폴더 - 포트번호 8081 서비스backend-filter폴더 - 포트번호 8082 서비스
댓글남기기