

유레카(Eureka) 서버/클라이언트와 FeignClient 연동하기
RECOMMEND POSTS BEFORE THIS
1. Practice
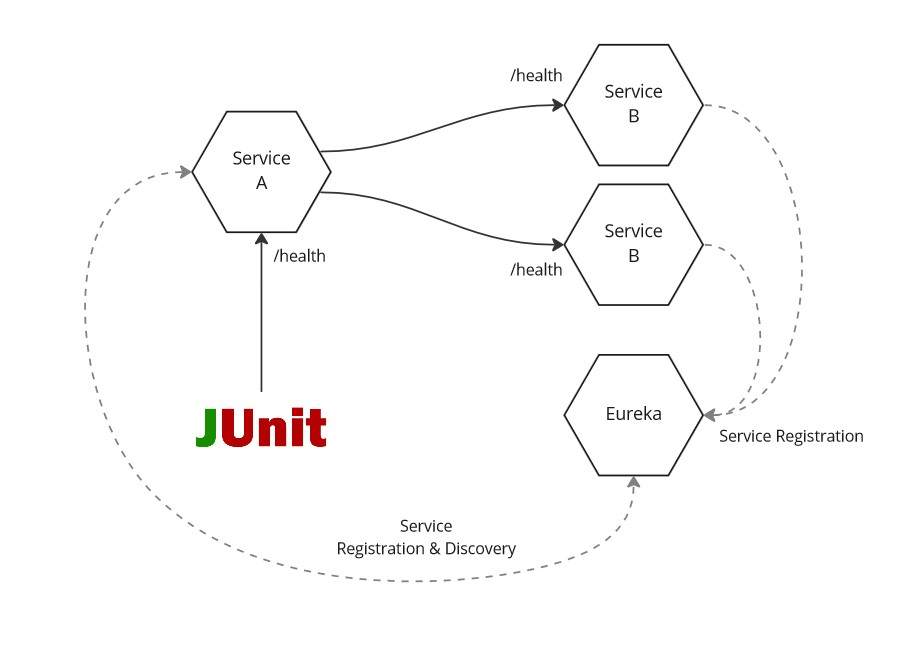
FeignClient와 Eureka를 함께 사용하는 예제이다. Eureka 서버와 클라이언트를 만들어 연결하는 예제는 스프링 클라우드 넷플릭스 유레카(Spring Cloud Netflix Eureka) 글을 참고한다. 다음과 같은 연습 환경을 구축했다.
Eureka서버가 클라이언트 서비스들을 관리한다.서비스A인스턴스 1개,서비스B인스턴스 2개를 관리한다.
- 클라이언트 서비스들은 서로 간의 통신을 위해
FeignClient를 사용한다. - 사용자는
서비스A로 API 요청을 수행한다.- 사용자 역할은
JUnit프레임워크를 사용한 테스트 코드로 대체한다. 100회 API 요청을 반복 수행한다.
- 사용자 역할은
서비스A는 요청을 처리하는 과정 중간에서비스B에게 API 요청을 수행한다.서비스B는 자신의 포트(port) 정보와 상태를 응답한다.
서비스A는 응답받은서비스B의 상태와 자신의 상태를 사용자에게 함께 전달한다.
1.1. Setup Service A
다음 작업들은 서비스A 모듈에서 수행한다. application YAML 파일에 다음과 같은 설정을 추가한다.
- 포트 번호는 8080으로 고정한다.
Eureka클라이언트로서a-service-as-client이름을 사용한다.
server:
  port: 8080
spring:
  application:
    name: a-service-as-client
eureka:
  client:
    register-with-eureka: true
    fetch-registry: true
    service-url:
      defaultZone: http://eureka-service:8761/eureka/
HealthClient 인터페이스는 FeignClient다. 이름을 Eureka 서버에 등록된 클라이언트 이름으로 지정한다. FeignClient는 해당 이름을 가진 Eureka 클라이언트에게 API 요청을 수행한다. Eureka 클라이언트 이름을 사용하면 별도의 URL 정보가 필요 없다.
FeignClient를 사용하면 자동으로b-service-as-client서비스에게 요청을 수행한다.
package cloud.in.action.client;

import cloud.in.action.domain.Health;
import org.springframework.cloud.openfeign.FeignClient;
import org.springframework.web.bind.annotation.GetMapping;

@FeignClient(name = "b-service-as-client")
public interface HealthClient {

    @GetMapping(path = "/health")
    Health health();
}
HealthController 컨트롤러는 테스트를 위한 엔드포인다. 현재 자신의 상태와 클라이언트로부터 받은 서비스B 상태를 함께 전달한다.
package cloud.in.action.controller;

import cloud.in.action.client.HealthClient;
import cloud.in.action.domain.Health;
import org.springframework.core.env.Environment;
import org.springframework.web.bind.annotation.GetMapping;
import org.springframework.web.bind.annotation.RestController;

import java.util.Arrays;
import java.util.List;

@RestController
public class HealthController {

    private final Environment environment;
    private final HealthClient healthClient;

    public HealthController(Environment environment, HealthClient healthClient) {
        this.environment = environment;
        this.healthClient = healthClient;
    }

    @GetMapping("/health")
    public List<Health> health() {
        int port = Integer.parseInt(environment.getProperty("local.server.port"));
        Health healthOfServiceA = Health.builder()
                .serviceName("SERVICE-A")
                .port(port)
                .status("OK")
                .build();
        Health healthOfServiceB = healthClient.health();
        return Arrays.asList(healthOfServiceA, healthOfServiceB);
    }
}
main 메서드가 정의된 AServiceApplication 클래스에 다음과 같은 애너테이션들을 추가한다.
FeignClient를 사용하기 위해@EnableFeignClients애너테이션을 추가한다.Eureka서버에 등록하기 위해@EnableEurekaClient애너테이션을 추가한다.
package cloud.in.action;

import org.springframework.boot.SpringApplication;
import org.springframework.boot.autoconfigure.SpringBootApplication;
import org.springframework.cloud.netflix.eureka.EnableEurekaClient;
import org.springframework.cloud.openfeign.EnableFeignClients;

@EnableFeignClients
@EnableEurekaClient
@SpringBootApplication
public class AServiceApplication {

    public static void main(String[] args) {
        SpringApplication.run(AServiceApplication.class, args);
    }

}
1.2. Setup Service B
다음 작업들은 서비스B 모듈에서 수행한다. application YAML 파일에 다음과 같은 설정을 추가한다.
0으로 지정하여 임의의 포트 번호를 사용한다.Eureka클라이언트로서b-service-as-client이름을 사용한다.
server:
  port: 0
spring:
  application:
    name: b-service-as-client
eureka:
  client:
    register-with-eureka: true
    fetch-registry: true
    service-url:
      defaultZone: http://eureka-service:8761/eureka/
HealthController 클래스에 현재 자신의 상태를 반환하는 엔드포인트를 만든다.
package cloud.in.action.controller;

import cloud.in.action.domain.Health;
import org.springframework.core.env.Environment;
import org.springframework.web.bind.annotation.GetMapping;
import org.springframework.web.bind.annotation.RestController;

@RestController
public class HealthController {

    private final Environment environment;

    public HealthController(Environment environment) {
        this.environment = environment;
    }

    @GetMapping("/health")
    public Health health() {
        int port = Integer.parseInt(environment.getProperty("local.server.port"));
        return Health.builder()
                .serviceName("SERVICE-B")
                .port(port)
                .status("OK")
                .build();
    }
}
main 메서드가 정의된 BServiceApplication 클래스에 애너테이션을 추가한다.
Eureka서버에 등록하기 위해@EnableEurekaClient애너테이션을 추가한다.
package cloud.in.action;

import org.springframework.boot.SpringApplication;
import org.springframework.boot.autoconfigure.SpringBootApplication;
import org.springframework.cloud.netflix.eureka.EnableEurekaClient;

@EnableEurekaClient
@SpringBootApplication
public class BServiceApplication {

    public static void main(String[] args) {
        SpringApplication.run(BServiceApplication.class, args);
    }

}
2. Test
도커 컴포즈(docker compose)로 테스트 환경을 구축한다. YAML 파일을 다음과 같이 정의한다.
version: "3.9"
services:
  eureka-service:
    build: ./eureka
    ports:
      - "8761:8761"
  a-service:
    build: ./a-service
    ports:
      - "8080:8080"
  b-service:
    build: ./b-service
서비스B는 두 개의 인스턴스가 필요하다. --scale 옵션을 통해 인스턴스 2개로 실행한다.
$ docker-compose up -d --scale b-service=2
...
[+] Running 4/4
 - Container 2021-03-08-spring-cloud-netflix-eureka-b-service-2       Started                        1.6s
 - Container 2021-03-08-spring-cloud-netflix-eureka-eureka-service-1  Started                        0.9s
 - Container 2021-03-08-spring-cloud-netflix-eureka-a-service-1       Started                        1.1s
 - Container 2021-03-08-spring-cloud-netflix-eureka-b-service-1       Started                        0.7s
이제 사용자 역할을 맡은 테스트 코드를 살펴보자.
서비스A에게 상태 정보를 100회 요청한다.- 응답 정보를 서비스 이름, 포트 정보로 그룹핑(grouping)한다.
- 각 서비스로부터 몇 번 응답받았는지 로그를 통해 확인한다.
package cloud.in.action;

import cloud.in.action.domain.Health;
import lombok.extern.slf4j.Slf4j;
import org.junit.jupiter.api.Test;
import org.springframework.beans.factory.annotation.Autowired;
import org.springframework.boot.test.context.SpringBootTest;
import org.springframework.cloud.openfeign.FeignClient;
import org.springframework.web.bind.annotation.GetMapping;

import java.util.ArrayList;
import java.util.List;
import java.util.Map;
import java.util.stream.Collectors;

@FeignClient(name = "test-client", url = "http://localhost:8080")
interface TestClient {

    @GetMapping(path = "/health")
    List<Health> health();
}

@Slf4j
@SpringBootTest
class AServiceApplicationTests {

    @Autowired
    TestClient testClient;

    @Test
    void health_check() {

        List<Health> healthList = new ArrayList<>();
        for (int index = 0; index < 100; index++) {
            healthList.addAll(testClient.health());
        }

        Map<String, List<Health>> result = healthList.stream()
                .collect(
                        Collectors.groupingBy(
                                (health) -> String.format("%s:%s", health.getServiceName(), health.getPort())
                        )
                );

        result.entrySet()
                .stream()
                .forEach((entry) -> {
                    log.info(String.format("Response count from (%s) - %s", entry.getKey(), entry.getValue().size()));
                });
    }
}
테스트를 실행하면 다음과 같은 로그를 볼 수 있다.
서비스A로부터 100회 응답을 받는다.- 두 개의
서비스B로부터 각 50회씩 응답을 받는다. 포트 번호를 통해 서로 다른 인스턴스로 요청을 보내고 응답 받은 것을 확인할 수 있다.
2023-02-05 11:26:59.818  INFO 12080 --- [           main] c.in.action.AServiceApplicationTests     : Response count from (SERVICE-B:43283) - 50
2023-02-05 11:26:59.818  INFO 12080 --- [           main] c.in.action.AServiceApplicationTests     : Response count from (SERVICE-B:44105) - 50
2023-02-05 11:26:59.818  INFO 12080 --- [           main] c.in.action.AServiceApplicationTests     : Response count from (SERVICE-A:8080) - 100
CLOSING
상태 정보에 포트 정보를 추가한 이유는 자동으로 이뤄지는 부하 분산(load balance)에 대해 이야기하고 싶었기 때문이다. 테스트 수행 결과를 보면 서비스A는 두 개의 서비스B에게 고르게 요청을 분산한 것을 볼 수 있다. FeignClient와 Eureka 컴포넌트를 함께 사용하면 자동으로 부하 분산이 이뤄진다.
FeignClient는 내부에Ribbon이라는 클라이언트 사이드 로드 밸런서 라이브러리를 사용하고 있다.Ribbon라이브러리는Eureka서버를 통해 각 서비스로의 요청 횟수를 판단할 수 있다.
댓글남기기