


리눅스(Linux) MariaDB 호스트(host) 추가
RECOMMEND POSTS BEFORE THIS
0. 들어가면서
이번 글에서는 MariaDB 서버에 새로운 사용자 정보를 등록하는 방법과 외부에서 접속하는 데 발생했던 문제를 해결한 방법을 공유해 보려 한다. 테스트 환경은 다음과 같다.
- VMware
- Ubuntu-20.04.2.0
1. 사용자 등록하기
간단한 명령어로 사용자 정보를 등록할 수 있다.
- user_id - 사용자 ID
- host_name - 허용하는 호스트 정보
- password - 사용자 비밀번호
MariaDB [(none)]> create user 'user_id'@'host_name' identified by 'password';
등록된 사용자 정보를 확인해 보자. 두 개의 사용자가 등록된 것을 볼 수 있다.
Welcome to the MariaDB monitor.  Commands end with ; or \g.
Your MariaDB connection id is 40
Server version: 10.3.29-MariaDB-0ubuntu0.20.04.1 Ubuntu 20.04

Copyright (c) 2000, 2018, Oracle, MariaDB Corporation Ab and others.

Type 'help;' or '\h' for help. Type '\c' to clear the current input statement.

MariaDB [(none)]> create user jun@'%' identified by '1234';
Query OK, 0 rows affected (0.000 sec)

MariaDB [(none)]> select user, password, host, plugin from mysql.user;
+------+-------------------------------------------+-----------+-----------------------+
| user | password                                  | host      | plugin                |
+------+-------------------------------------------+-----------+-----------------------+
| root | *A4B6157319038724E3560894F7F932C8886EBFCF | localhost | mysql_native_password |
| jun  | *A4B6157319038724E3560894F7F932C8886EBFCF | %         |                       |
+------+-------------------------------------------+-----------+-----------------------+
2 rows in set (0.000 sec)
flush privileges 명령어로 변경된 사용자 정보를 반영한다.
MariaDB [(none)]> flush privileges;
Query OK, 0 rows affected (0.000 sec)
변경된 내용이 잘 반영되었는지 추가된 사용자로 접속해 보자.
$ mysql -u jun -p
Enter password:
Welcome to the MariaDB monitor.  Commands end with ; or \g.
Your MariaDB connection id is 41
Server version: 10.3.29-MariaDB-0ubuntu0.20.04.1 Ubuntu 20.04

Copyright (c) 2000, 2018, Oracle, MariaDB Corporation Ab and others.

Type 'help;' or '\h' for help. Type '\c' to clear the current input statement.
2. 데이터베이스 접근 제어
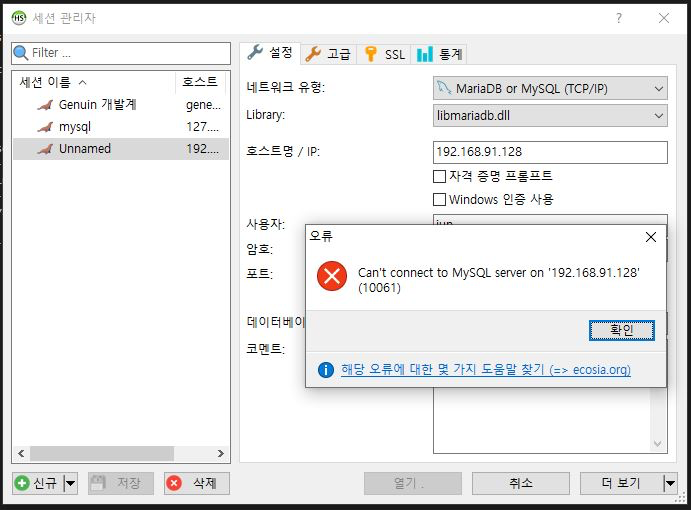
설치한 데이터베이스에 접근하면 다음과 같은 에러가 발생한다. host 정보를 '%'로 지정하여 모든 IP 주소에서 접근을 허용했는데 이상했다.
Can’t connect to MySQL server on ‘IP Address’(10061)
netstat -lntp 명령어로 문제의 원인을 확인할 수 있다. Local Address의 IP 주소가 0.0.0.0이라면 모든 인터페이스를 허용하겠다는 의미지만, 127.0.0.1이라면 자기 자신에서만 호출할 수 있는 상태다.
- 현재 3306 포트(port)를 사용하는 프로세스 정보를 보면 Local Address가
127.0.0.1IP 주소이므로 로컬 호스트만 접근할 수 있는 상태다.
$ netstat -lntp | grep 3306

(Not all processes could be identified, non-owned process info will not be shown, you would have to be root to see it all.)
tcp        0      0 127.0.0.1:3306          0.0.0.0:*               LISTEN      -
모든 IP 주소에 대해 접근을 허가하기 위해 설정 파일을 변경한다.
$ sudo vi /etc/mysql/mariadb.conf.d/50-server.cnf
50-server.cnf 설정에서 bind-address 항목 값을 0.0.0.0으로 변경한다.
#
# These groups are read by MariaDB server.
# Use it for options that only the server (but not clients) should see
#
# See the examples of server my.cnf files in /usr/share/mysql

# this is read by the standalone daemon and embedded servers
[server]

# this is only for the mysqld standalone daemon
[mysqld]

#
# * Basic Settings
#
user                    = mysql
pid-file                = /run/mysqld/mysqld.pid
socket                  = /run/mysqld/mysqld.sock
#port                   = 3306
basedir                 = /usr
datadir                 = /var/lib/mysql
tmpdir                  = /tmp
lc-messages-dir         = /usr/share/mysql
#skip-external-locking

# Instead of skip-networking the default is now to listen only on
# localhost which is more compatible and is not less secure.
bind-address            = 127.0.0.1
서비스를 재시작한다.
$ sudo systemctl restart mysqld
netstat -lntp 명령어로 IP 정보를 다시 확인한다.
$ sudo netstat -lntp | grep 3306

tcp        0      0 0.0.0.0:3306            0.0.0.0:*               LISTEN      4758/mysqld
정상적으로 데이터베이스 연결이 이루어지는 것을 확인할 수 있다.

댓글남기기