


Java Atomic 클래스
0. 들어가면서
자바(Java)는 멀티 스레드 환경에서 스레드 안전성(thread safety)을 위해 Atomic 키워드가 붙은 클래스를 제공한다. 이 클래스들은 java.util.concurrent.atomic 패키지에 위치한다. Atomic이라는 키워드가 붙은 것처럼 원자적 연산(atomic operation)이라는 개념과 연관 있어 보인다. 이 개념을 먼저 살펴보겠다.
1. Atomic Operation
원자성(atomicity) - 어떤 것이 더 이상 쪼개질 수 없는 성질을 말한다.
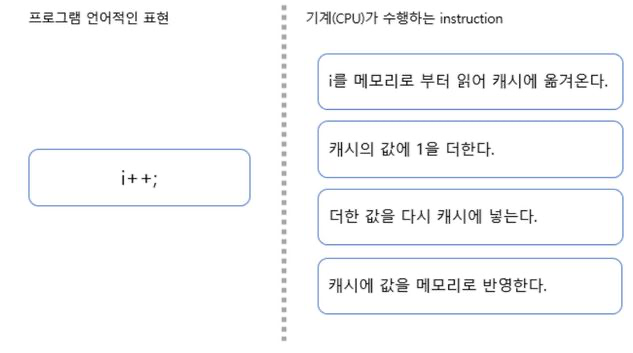
원자적인 연산은 “더는 쪼개질 수 없는 연산”을 의미한다. 코드를 봤을 때 한 줄이더라도 실제로는 원자적인 연산이 아닐 수 있다. 가장 대표적인 예시가 단항 연산자 ++이다.
- 코드가 한 줄이더라도 기계어로 변경되면 원자적이지 않은 연산이 될 수 있다.
- 이런 현상은 프로세스 내 스레드들이 변수를 사용해 데이터를 공유하기 때문에 발생한다.
2. Atomic Classes
자바는 동시성 문제를 해결하기 위한 기능을 제공한다. 그중 하나가 Atomic 계열 클래스이며, 이번 글에서는 대표적인 AtomicInteger 클래스를 살펴본다.
volatile키워드가 붙은value변수에 데이터를 저장한다.volatile키워드가 붙었기 때문에 CPU 캐시가 아닌 메인 메모리에서 직접 데이터를 읽는다.
public class AtomicInteger extends Number implements java.io.Serializable {

    private static final long serialVersionUID = 6214790243416807050L;

    /*
     * This class intended to be implemented using VarHandles, but there
     * are unresolved cyclic startup dependencies.
     */
    private static final jdk.internal.misc.Unsafe U = jdk.internal.misc.Unsafe.getUnsafe();
    private static final long VALUE = U.objectFieldOffset(AtomicInteger.class, "value");

    private volatile int value;

    // ...

    /**
     * Atomically sets the value to {@code newValue}
     * if the current value {@code == expectedValue},
     * with memory effects as specified by {@link VarHandle#compareAndSet}.
     *
     * @param expectedValue the expected value
     * @param newValue the new value
     * @return {@code true} if successful. False return indicates that
     * the actual value was not equal to the expected value.
     */
    public final boolean compareAndSet(int expectedValue, int newValue) {
        return U.compareAndSetInt(this, VALUE, expectedValue, newValue);
    }

    // ...
}
Atomic 클래스가 어떻게 원자성을 보장하는지 이해하려면 CAS(compare and swap) 메커니즘에 대해 이해해야 한다. 위키(wiki)는 다음과 같이 정의하고 있다.
CAS(Compare-And-Swap)
In computer science, compare-and-swap (CAS) is an atomic instruction used in multithreading to achieve synchronization. It compares the contents of a memory location with a given value and, only if they are the same, modifies the contents of that memory location to a new given value.
간단히 설명하면 다음과 같이 동작한다.
- 이전 값(old value)과 새로운 값(new value)을 전달한다.
- 이전 값과 현재 메모리에 저장된 데이터가 같은 경우에 새로운 값으로 메모리의 데이터를 변경한다.
- 성공 여부에 따라 true, false 값을 반환한다.
Atomic 클래스들은 compareAndSet이라는 메서드를 사용한다. 이름에서 볼 수 있듯이 CAS 메커니즘을 구현했을 것이라 예상할 수 있다. AtomicInteger 클래스를 기준으로 내부 메서드를 살펴보자. 아래 살펴볼 두 메서드 모두 Unsafe 객체에게 동작을 위임한다.
getAndSet메서드는 이전 값을 반환하고 새로운 값을 메모리에 업데이트한다.compareAndSet메서드는 이전 값을 새로운 값으로 변경하고 성공 여부를 반환한다. 메모리에 저장된 값과expectedValue변수의 값이 같은 경우에만 완료된다.
public class AtomicInteger extends Number implements java.io.Serializable {

    // ...

    /**
     * Atomically sets the value to {@code newValue} and returns the old value,
     * with memory effects as specified by {@link VarHandle#getAndSet}.
     *
     * @param newValue the new value
     * @return the previous value
     */
    public final int getAndSet(int newValue) {
        return U.getAndSetInt(this, VALUE, newValue);
    }

    /**
     * Atomically sets the value to {@code newValue}
     * if the current value {@code == expectedValue},
     * with memory effects as specified by {@link VarHandle#compareAndSet}.
     *
     * @param expectedValue the expected value
     * @param newValue the new value
     * @return {@code true} if successful. False return indicates that
     * the actual value was not equal to the expected value.
     */
    public final boolean compareAndSet(int expectedValue, int newValue) {`
        return U.compareAndSetInt(this, VALUE, expectedValue, newValue);
    }

    // ...
}
그렇다면 Unsafe 클래스는 어떤 동작을 할까?
compareAndSetInt메서드- 네이티브(native) 기능이고, 내부적으로 원자적인 업데이트를 수행한다.
getAndSetInt메서드compareAndSet메서드를 반복 수행하여 변경에 성공하면 이전 값을 반환한다.
public final class Unsafe {

    // ...

    /**
     * Atomically exchanges the given value with the current value of
     * a field or array element within the given object {@code o}
     * at the given {@code offset}.
     *
     * @param o object/array to update the field/element in
     * @param offset field/element offset
     * @param newValue new value
     * @return the previous value
     * @since 1.8
     */
    @HotSpotIntrinsicCandidate
    public final int getAndSetInt(Object o, long offset, int newValue) {
        int v;
        do {
            v = getIntVolatile(o, offset);
        } while (!weakCompareAndSetInt(o, offset, v, newValue));
        return v;
    }

    /**
     * Atomically updates Java variable to {@code x} if it is currently
     * holding {@code expected}.
     *
     * <p>This operation has memory semantics of a {@code volatile} read
     * and write.  Corresponds to C11 atomic_compare_exchange_strong.
     *
     * @return {@code true} if successful
     */
    @HotSpotIntrinsicCandidate
    public final native boolean compareAndSetInt(Object o, long offset,
                                                 int expected,
                                                 int x);
    // ...
}
자바는 동시성을 제어하기 위해 synchronized 키워드를 제공한다. 이미 동시성 제어 기능이 있음에도 Atomic 클래스를 제공하는 이유는 성능 때문이라는 글을 읽은 기억이 난다. 정말 성능에 차이가 있는지 직접 살펴보겠다. 컴퓨터 사양(spec)은 다음과 같다.
- 2019년형 MacBook
- 2.4 GHz 8코어 Intel Core i9
- 32GB 2667 MHz DDR4
먼저 synchronized 키워드를 사용한 코드를 살펴보자. 동시성 문제가 발생할 수 있는 NormalInteger 클래스를 생성한다. CompletableFuture 클래스를 사용해 두 개의 스레드를 경합시킨다. 한 스레드는 값을 증가시키고, 다른 스레드는 값을 감소시킨다. 성능을 확인하기 위해 총 소요 시간과 최종 값을 확인한다.
package blog.in.action;

import lombok.Getter;
import lombok.extern.slf4j.Slf4j;
import org.junit.jupiter.api.Test;

import java.util.concurrent.CompletableFuture;

@Getter
class NormalInteger {
    private volatile int value;

    NormalInteger(int value) {
        this.value = value;
    }

    public synchronized void increase() {
        value++;
    }

    public synchronized void decrease() {
        value--;
    }
}

@Slf4j
public class SynchronizeTest {

    final int limit = Integer.MAX_VALUE / 10;
    NormalInteger normalInteger;

    @Test
    void test() {
        normalInteger = new NormalInteger(0);

        long start = System.currentTimeMillis();

        var increaseThread = CompletableFuture.runAsync(() -> {
            for (int index = 0; index < limit; index++) {
                normalInteger.increase();
            }
        });
        var decreaseThread = CompletableFuture.runAsync(() -> {
            for (int index = 0; index < limit; index++) {
                normalInteger.decrease();
            }
        });

        increaseThread.join();
        decreaseThread.join();
        long end = System.currentTimeMillis();
        log.info("operation time: {}", (end - start));
        log.info("value: {}", normalInteger.getValue());
    }
}
테스트 실행 결과는 다음과 같다.
- 총 소요 시간은 16.4초 정도다.
- 최종 값은 0으로 정상적인 동기화가 이루어졌음을 확인할 수 있다.
21:26:57.557 [main] INFO blog.in.action.SynchronizeTest - operation time: 16393
21:26:57.559 [main] INFO blog.in.action.SynchronizeTest - value: 0
이번에는 AtomicInteger 클래스를 사용해 봤다. 위와 마찬가지로 CompletableFuture 클래스를 사용해 두 개의 스레드를 경합시킨다. 한 스레드는 값을 증가시키고, 다른 스레드는 값을 감소시킨다. 총 소요 시간과 최종 값을 확인한다.
package blog.in.action;

import lombok.extern.log4j.Log4j2;
import org.junit.jupiter.api.Test;

import java.util.concurrent.CompletableFuture;
import java.util.concurrent.atomic.AtomicInteger;

@Log4j2
public class AtomicIntegerTest {

    final int limit = Integer.MAX_VALUE / 10;
    AtomicInteger atomicInteger;

    @Test
    void test() {
        atomicInteger = new AtomicInteger(0);

        long start = System.currentTimeMillis();

        var increaseThread = CompletableFuture.runAsync(() -> {
            for (int index = 0; index < limit; index++) {
                atomicInteger.incrementAndGet();
            }
        });
        var decreaseThread = CompletableFuture.runAsync(() -> {
            for (int index = 0; index < limit; index++) {
                atomicInteger.decrementAndGet();
            }
        });

        increaseThread.join();
        decreaseThread.join();
        long end = System.currentTimeMillis();
        log.info("operation time: {}", (end - start));
        log.info("value: {}", atomicInteger.get());
    }
}
테스트 결과를 살펴보자.
- 총 소요 시간은 8862ms이다. synchronized 키워드를 사용했을 때보다 2배 정도 빠름을 확인할 수 있다.
- 최종 값은 0으로 정상적인 동기화가 이루어졌음을 확인할 수 있다.
21:29:46.742 [main] INFO blog.in.action.AtomicIntegerTest - operation time: 8862
21:29:46.744 [main] INFO blog.in.action.AtomicIntegerTest - value: 0
댓글남기기