


테라폼(Terraform) 소개
0. 들어가면서
데브옵스(DevOps, Development and Operations)나 인프라스트럭처(infrastructure) 엔지니어는 아니지만, 테라폼에 관련된 공부를 할 필요가 생겼다. 이번 글에선 자동화 프로비저닝(provisioning) 도구인 테라폼(terraform)을 가볍게 소개한다.
1. Provisioning
테라폼을 소개하기 전에 먼저 프로비저닝의 개념에 대해 알아본다.
프로비저닝은 IT 인프라를 생성하고 설정하는 프로세스
자세히 들여다보면 다음과 같이 분류할 수 있다.
- 서버 프로비저닝(Server Provisioning)
- 물리적 혹은 가상화 된 하드웨어를 세팅하는 프로세스이다.
- 운영체제, 애플리케이션 등을 설치한다.
- 미들웨어, 네트워크, 스토리지 컴포넌트 등을 연결한다.
- 새 시스템을 생성하고, 비즈니스 요구 사항에 따라 정의된 시스템 상태를 만드는 모든 작업이다.
- 클라우드 프로비저닝(Cloud Provisioning)
- 조직의 클라우드 환경에 인프라스트럭처를 생성하는 작업이다.
- 필요한 리소스, 서비스 그리고 애플리케이션을 클라우드에 세팅하는 프로세스이다.
- 사용자 프로비저닝(User Provisioning)
- 사용자 책임 수준에 따라 적절한 권한을 부여하는 작업이다.
- 전자 메일, 데이터베이스 또는 네트워크 환경 내의 서비스냐 애플리케이션에 대한 사용 권한을 부여한다.
- 사용자 액세스를 권한을 부여하거나 취소한다.
2. Pain Points of Infrastructure Team
시스템도 현대화가 진행되면서 많은 레거시 인프라들이 클라우드(cloud) 환경으로 이전되고 있다. 신속한 서비스 배포, 비즈니스적인 확장성과 유연성 확보, 비용 등의 문제로 클라우드 전환은 계속될 것으로 보인다. 대표적인 클라우드 제공자(cloud provider)인 AWS(Amazon Web Service)는 웹 화면에서 간단한 클릭만으로 인프라를 구축할 수 있다.
하지만 클라우드 인프라 구축은 보기와 다르게 마냥 쉬운 작업이 아니다. 나는 인프라 엔지니어 업무 경험은 없지만, 작은 인프라를 구축할 때도 필요한 리소스들을 만들고 연결하는 작업이 많다는 사실을 최근 느끼고 있다. 또한 클라우드 프로바이더가 제공하는 컴포넌트와 네트워크 인프라에 대한 이해도가 떨어지면 이는 더 어렵게 느껴진다. 인프라 엔지니어들도 업무를 수행할 때 다음과 같은 어려움들 있는 것으로 보이다.
- 웹 콘솔을 통해 수작업하면 실수가 잦다.
- 빠뜨리는 리소스, 팀 컨벤션에 맞지 않는 태그나 보안 규칙 등
- 이전 작업자의 업무 수행 내용을 현재 작업자가 추적하기 어렵다.
- 각 서비스 인프라마다 어떤 리소스들이 사용되고 연결되어 있는지 관리의 어려움
- 머신 이미지(machine image)에 어떤 작업이 되어 있는지 확이하기 어려움
- 인프라에 문제가 발생하면 언제 누구의 작업이 원인인지 찾기 어렵다.
- 비슷한 구성의 인프라를 구축하는데 이를 계속 반복 작업한다.
- 각기 다른 지역(region)마다 같은 인프라를 구축
- 다른 서비스를 위한 같은 인프라를 구축
- 다른 계정(개발, 스테이징, 운영)마다 같은 인프라를 구축
조직 규모가 커지고 사용하는 인프라 자원 수가 늘어날수록 관리의 어려움이 생긴다. 클라우드 인프라 작업에 대한 내용을 문서로 정리하거나 관리하는 것도 일이다. 문서를 작성하거나 업데이트 할 시간도 부족한다.
3. What is Terraform?
테라폼은 인프라 엔지니어들의 문제들을 해결하기 위해 등장한 도구이다. 테라폼은 두 문장으로 가장 잘 설명할 수 있다.
- Automated Provisioning
- 프로비저닝 작업을 자동화할 수 있다.
- Infrastructure as Code
- 인프라스트럭처를 코드로 정의할 수 있다.

3.1. What does Terraform make it better?
테라폼을 사용하면 인프라를 코드로 정의할 수 있다. 코드로 인프라를 작성한다는 것은 단순한 변화인 듯 보이지만, 많은 것들이 개선된다.
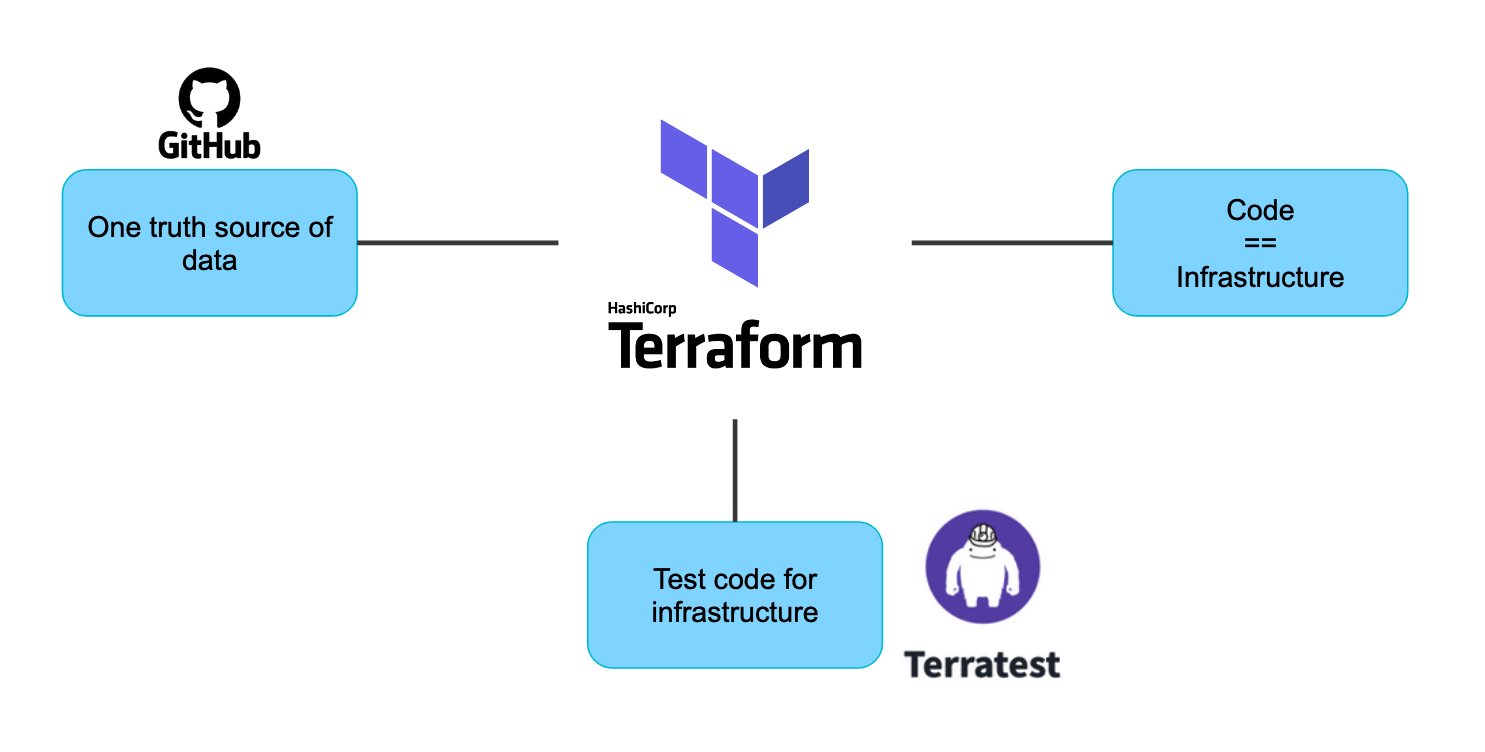
- 단일 진실 공급원(single source of truth)
- 코드로 인프라를 구축할 수 있기 때문에 Github 같은 형상 관리 도구를 통해 협업할 수 있다.
- 인프라의 리소스 변경 이력을 추적할 수 있다.
- 커밋(commit) 이력 등을 통해 인프라 변경 작업에 대한 의도를 파악할 수 있다.
- 잘못된 인프라 작업이 이뤄지기 전에 리뷰 등을 통해 미리 문제를 파악할 수 있다.
- 테스트 코드 작성 가능
- 인프라를 정의한 코드를 검증하기 위한 테스트 코드를 작성할 수 있다.
- 테스트 코드는 자동화 된 파이프라인을 통해 실행되며 잘못된 인프라 리소스의 배포를 사전에 방지할 수 있다.
- Terratest, Terrascan, TestInfra, Terraform-Compliance, Kitchen Terraform 등이 있다.
- 프로그램 언어로서의 장점
- IDE(Integrated Development Environment)에서 텍스트 기반으로 작업 정보를 검색할 수 있다.
- 변수, 모듈(module), 자료구조 같은 프로그래밍적 요소와 리팩토링을 통해 반복 작업을 줄일 수 있다.
- 코드 자체가 인프라스트럭처를 표현하고 있으므로 별도의 문서 작업이 불필요하다.
- 간단한 코드 변경과 적용으로 인프라를 유연하게 변경할 수 있다.
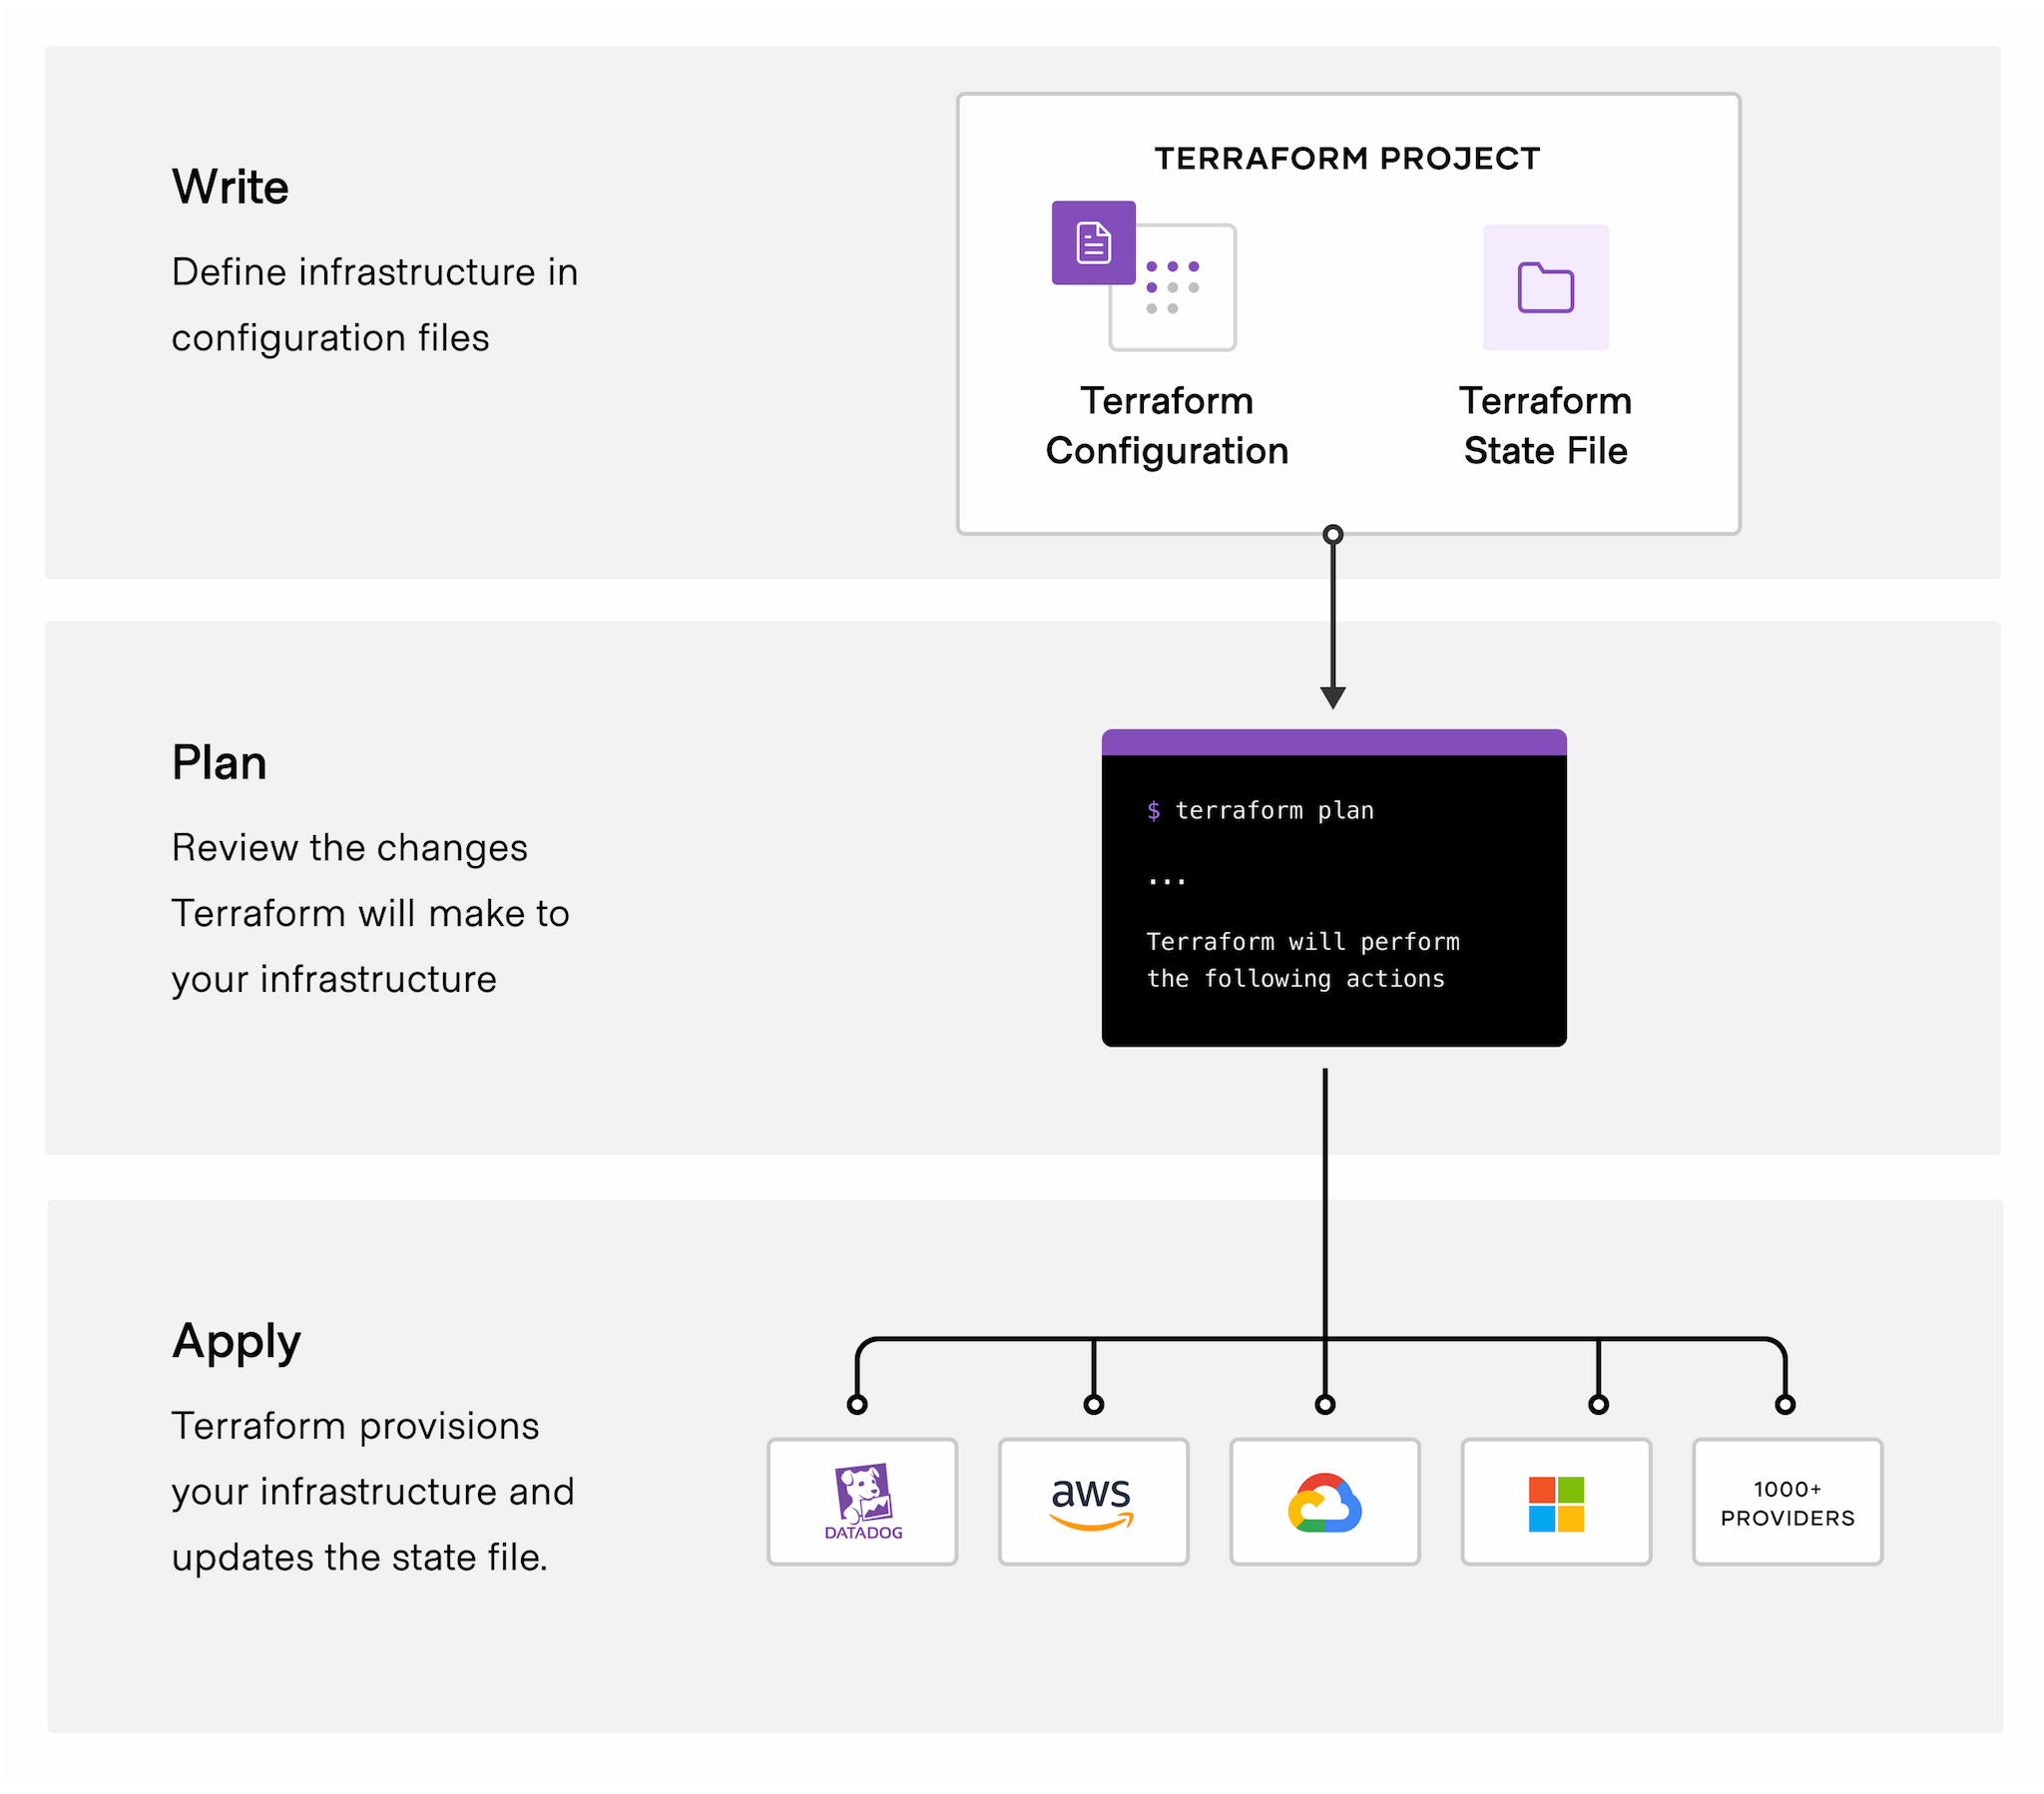
3.2. How to use Terraform?
테라폼은 여러 명령어를 제공하지만, 가장 많이 사용되는 프로세스를 기준으로 알아본다.
- Write code
- HCL(Hashicorp Configuration Language) 문법을 사용한다.
- 코드로 원하는 모습의 인프라스트럭처를 정의한다.
- Init
terraform init명령어를 실행한다.- 사용하려고 정의한 클라우드 제공자를 위한 플러그인을 다운로드 받는다.
- Plan(Dry-Run)
terraform plan명령어를 실행한다.- 코드로 정의한 인프라스트럭처를 미리 실행시켜본다.
- 실제 클라우드에 반영하는 것은 아니며 인프라에 어떤 부분이 변하는지 미리 확인하는 단계이다.
- Apply
terraform apply명령어를 실행한다.- 코드로 정의한 인프라스트럭처를 실제 클라우드에 반영한다.
tfstate파일과 실제 클라우드의 리소스 상태를 비교하여 변경 내용만 반영한다.
4. Example
간단한 예시 코드를 통해 동작 과정을 살펴본다. 테라폼 설치 과정은 포스트에서 별도로 다루지 않는다.
4.1. Write code
다음과 같이 인프라 상태를 정의한다.
provider블록- 클라우드 제공자는 AWS 이다.
- AWS에 접근하기 위한 키 정보를 함께 작성한다.
variable블록- 코드에서 사용할 변수들을 정의한다.
resource블록example이라는 이름의 AWS 인스턴스 리소스를 생성한다.- EC2 컨테이너 중 우분투(ubuntu) 머신 이미지를 사용한다.
- 인스턴스 타입을
t2.micro로 정한다. - 태그 이름을
example-ec2로 정한다.
output블록- 인스턴스 생성 후 결과 정보를 출력한다.
variable "AWS_ACCESS_KEY" {
  default = "your access key"
}
variable "AWS_SECRET_KEY" {
  default = "your secret key"
}
variable "AWS_SESSION_TOKEN" {
  default = "your session token"
}

provider "aws" {
  access_key = var.AWS_ACCESS_KEY
  secret_key = var.AWS_SECRET_KEY
  token      = var.AWS_SESSION_TOKEN
  region     = "us-east-1"
}

resource "aws_instance" "example" {
  ami = "ami-13be557e"
  instance_type = "t2.micro"

  tags = {
    Name = "example-ec2"
  }
}

output "new-instance-public-ip" {
    value = aws_instance.example.public_ip
}
4.2. Init
init 명령어를 통해 해당 프로젝트 경로를 초기화한다.
- AWS 접속을 위한 플러그인을 설치한다.
$ terraform init

Initializing the backend...

Initializing provider plugins...
- Finding latest version of hashicorp/aws...
- Installing hashicorp/aws v5.1.0...
- Installed hashicorp/aws v5.1.0 (signed by HashiCorp)

Terraform has created a lock file .terraform.lock.hcl to record the provider
selections it made above. Include this file in your version control repository
so that Terraform can guarantee to make the same selections by default when
you run "terraform init" in the future.

Terraform has been successfully initialized!

You may now begin working with Terraform. Try running "terraform plan" to see
any changes that are required for your infrastructure. All Terraform commands
should now work.

If you ever set or change modules or backend configuration for Terraform,
rerun this command to reinitialize your working directory. If you forget, other
commands will detect it and remind you to do so if necessary.
4.3. Plan
plan 명령어를 통해 리소스 변경 내용을 파악한다.
- 인스턴스 생성에 대한 정보가 출력된다.
+항목은 새로 추가되는 자원이다.
- 많은 정보들을 리소스 배포 후 확인할 수 있다.
$ terraform plan

Terraform used the selected providers to generate the following execution plan. Resource actions are indicated with the following symbols:
  + create

Terraform will perform the following actions:

  # aws_instance.example will be created
  + resource "aws_instance" "example" {
      + ami                                  = "ami-13be557e"
      + arn                                  = (known after apply)
      + associate_public_ip_address          = (known after apply)
      + availability_zone                    = (known after apply)
      + cpu_core_count                       = (known after apply)
      + cpu_threads_per_core                 = (known after apply)
      + disable_api_stop                     = (known after apply)
      + disable_api_termination              = (known after apply)
      + ebs_optimized                        = (known after apply)
      + get_password_data                    = false
      + host_id                              = (known after apply)
      + host_resource_group_arn              = (known after apply)
      + iam_instance_profile                 = (known after apply)
      + id                                   = (known after apply)
      + instance_initiated_shutdown_behavior = (known after apply)
      + instance_state                       = (known after apply)
      + instance_type                        = "t2.micro"
      + ipv6_address_count                   = (known after apply)
      + ipv6_addresses                       = (known after apply)
      + key_name                             = (known after apply)
      + monitoring                           = (known after apply)
      + outpost_arn                          = (known after apply)
      + password_data                        = (known after apply)
      + placement_group                      = (known after apply)
      + placement_partition_number           = (known after apply)
      + primary_network_interface_id         = (known after apply)
      + private_dns                          = (known after apply)
      + private_ip                           = (known after apply)
      + public_dns                           = (known after apply)
      + public_ip                            = (known after apply)
      + secondary_private_ips                = (known after apply)
      + security_groups                      = (known after apply)
      + source_dest_check                    = true
      + subnet_id                            = (known after apply)
      + tags                                 = {
          + "Name" = "example-ec2"
        }
      + tags_all                             = {
          + "Name" = "example-ec2"
        }
      + tenancy                              = (known after apply)
      + user_data                            = (known after apply)
      + user_data_base64                     = (known after apply)
      + user_data_replace_on_change          = false
      + vpc_security_group_ids               = (known after apply)
    }

Plan: 1 to add, 0 to change, 0 to destroy.

Changes to Outputs:
  + new-instance-public-ip = (known after apply)

───────────────────────────────────────────────────────────────────────────────────────────────────────────────────────────────────────────────────────────────

Note: You didn't use the -out option to save this plan, so Terraform can't guarantee to take exactly these actions if you run "terraform apply" now.
4.4. Apply
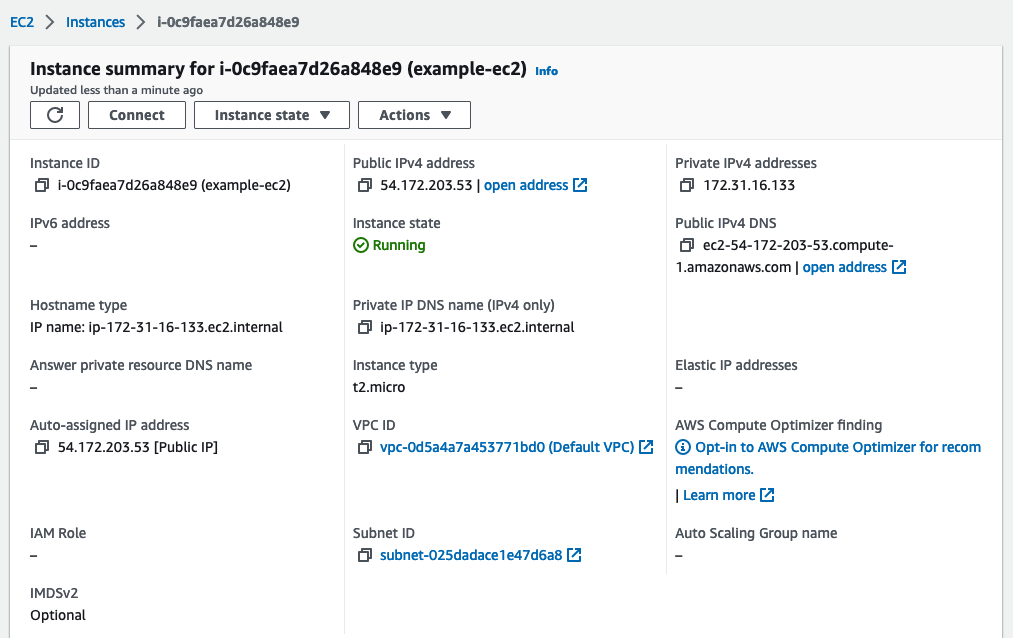
apply 명령어를 통해 인스턴스를 배포한다. 1분 가량 소요되어 EC2 컨테이너가 생성된다.
- 생성된 인스턴스의 공개 IP는 54.172.203.53 이다.
$ terraform apply

Terraform used the selected providers to generate the following execution plan. Resource actions are indicated with the following symbols:
  + create

Terraform will perform the following actions:

  # aws_instance.example will be created
  + resource "aws_instance" "example" {
      + ami                                  = "ami-13be557e"
      + arn                                  = (known after apply)
      + associate_public_ip_address          = (known after apply)
      + availability_zone                    = (known after apply)
      + cpu_core_count                       = (known after apply)
      + cpu_threads_per_core                 = (known after apply)
      + disable_api_stop                     = (known after apply)
      + disable_api_termination              = (known after apply)
      + ebs_optimized                        = (known after apply)
      + get_password_data                    = false
      + host_id                              = (known after apply)
      + host_resource_group_arn              = (known after apply)
      + iam_instance_profile                 = (known after apply)
      + id                                   = (known after apply)
      + instance_initiated_shutdown_behavior = (known after apply)
      + instance_state                       = (known after apply)
      + instance_type                        = "t2.micro"
      + ipv6_address_count                   = (known after apply)
      + ipv6_addresses                       = (known after apply)
      + key_name                             = (known after apply)
      + monitoring                           = (known after apply)
      + outpost_arn                          = (known after apply)
      + password_data                        = (known after apply)
      + placement_group                      = (known after apply)
      + placement_partition_number           = (known after apply)
      + primary_network_interface_id         = (known after apply)
      + private_dns                          = (known after apply)
      + private_ip                           = (known after apply)
      + public_dns                           = (known after apply)
      + public_ip                            = (known after apply)
      + secondary_private_ips                = (known after apply)
      + security_groups                      = (known after apply)
      + source_dest_check                    = true
      + subnet_id                            = (known after apply)
      + tags                                 = {
          + "Name" = "example-ec2"
        }
      + tags_all                             = {
          + "Name" = "example-ec2"
        }
      + tenancy                              = (known after apply)
      + user_data                            = (known after apply)
      + user_data_base64                     = (known after apply)
      + user_data_replace_on_change          = false
      + vpc_security_group_ids               = (known after apply)
    }

Plan: 1 to add, 0 to change, 0 to destroy.

Changes to Outputs:
  + new-instance-public-ip = (known after apply)

Do you want to perform these actions?
  Terraform will perform the actions described above.
  Only 'yes' will be accepted to approve.

  Enter a value: yes

aws_instance.example: Creating...
aws_instance.example: Still creating... [10s elapsed]
aws_instance.example: Still creating... [20s elapsed]
aws_instance.example: Still creating... [30s elapsed]
aws_instance.example: Still creating... [40s elapsed]
aws_instance.example: Still creating... [50s elapsed]
aws_instance.example: Still creating... [1m0s elapsed]
aws_instance.example: Creation complete after 1m6s [id=i-0c9faea7d26a848e9]

Apply complete! Resources: 1 added, 0 changed, 0 destroyed.

Outputs:

new-instance-public-ip = "54.172.203.53"
AWS Web Console
- 코드로 정의한 리소스가 생성된 것을 확인할 수 있다.
CLOSING
테라폼을 공부하면서 다음과 같은 인상을 받았다.
- 테라폼이라는 도구 자체는 배우고 사용하기에 큰 어려움은 없다.
- 정확하고 효율적인 인프라 구성을 위해선 AWS 같은 클라우드 제공자에 대한 공부가 더 필요할 것 같다.
- 모듈이라는 개념을 통해 인프라 코드를 재사용하는데, 재사용성을 높이고 결합도를 줄이기 위한 연구와 고민이 필요하다.
맡은 업무가 인프라 엔지니어가 아니기 때문에 딥-다이브(deep-dive)할 생각은 없지만, 기왕 배운 지식들은 차근차근 블로그에 정리할 생각이다. 생각보다 재밌는 요소가 많아서 공부하는게 즐거웠다.
TEST CODE REPOSITORY
RECOMMEND NEXT POSTS
- [테라폼(Terraform) AWS VPC 생성하기][create-vpc-in-aws-with-terraform-link]
REFERENCE
- https://www.redhat.com/en/topics/automation/what-is-provisioning
- https://developer.hashicorp.com/terraform/intro
- https://www.hashicorp.com/blog/testing-hashicorp-terraform
- https://www.slideshare.net/minkyukim77/packer-terraform-vault-101859832
- https://sendbird.com/ko/blog/infrastructure-management-using-terraform
- https://helloworld.kurly.com/blog/terraform-adventure/
댓글남기기