

How to return blob image in Spring
RECOMMEND POSTS BEFORE THIS
- How to test image upload in React
- How to test file upload in Spring
- How to save image into PostgreSQL with Spring
0. 들어가면서
How to save image into PostgreSQL with Spring 포스트에선 이미지를 데이터베이스 BLOB 형태로 저장하는 방법에 대해 정리했습니다. 이번 포스트에선 BLOB으로 저장된 이미지를 브라우저 표시하는 방법에 대해 정리하였습니다. 실습을 위한 개발 환경은 다음과 같습니다.
- 코틀린(kotlin)
- 스프링 부트(spring boot) 3.0.7
- JPA
- H2
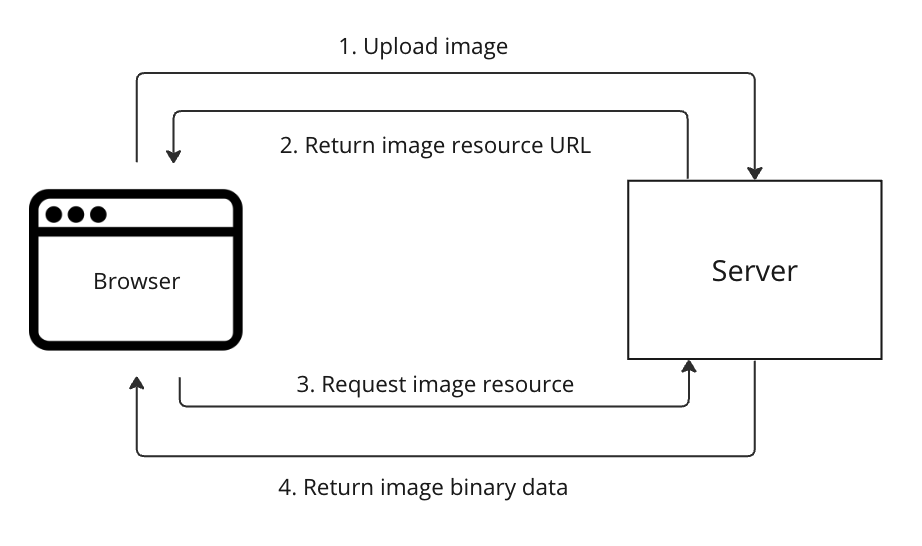
이번 포스트는 브라우저에서 이미지를 다운로드 받는 방법에 대해서만 집중적으로 다룹니다. 이미지를 업로드하는 기능이나 데이터베이스에 저장하는 방법은 이전 글들을 참고하시길 바랍니다. 이미지 반환 작업은 두 단계로 거쳐 이뤄집니다. 서버가 이미지 바이너리(binary)를 클라이언트로 그대로 내려주고 JavaScript로 이를 처리하는 방법도 있지만, 코드 복잡성을 줄이고 캐시 컨트롤(cache control) 적용을 위해 리소스 URL을 전달하는 방식을 사용했습니다.
- 클라이언트는 이미지 업로드합니다.
- 서버는 이미지 리소스 URL 경로를 응답합니다.
- 클라이언트는
img태그에서src속성으로 이미지 리소스 URL 경로를 참조합니다. - 서버는 해당 URL 정보를 바탕으로 데이터베이스에서 바이너리 데이터를 조회 후 반환합니다.
1. Return Image Resource URL
파일을 업로드하고 데이터베이스에 이미지 바이너리 데이터를 저장하는 기능은 이미 구현되어 있다고 가정합니다. 해당 저장된 데이터를 기반으로 이미지 리소스 URL 정보를 만들어 반환합니다. 전달받은 URL 정보를 바탕으로 데이터베이스를 조회합니다.
1.1. FileEntity Class
엔티티 클래스는 다음과 같은 모습을 가집니다.
- 바이너리 데이터를 저장할 수 있는 엔티티 클래스입니다.
- 바이너리 데이터는 바이트 배열 형태로 저장합니다.
- 데이터베이스마다 동작이 다르므로 추가적으로 필요한 컬럼 정보를 추가합니다.
- resourceLocation 메서드
- 메서드 파리미터로 전달받은 호스트 이름을 기준으로 리소스 위치 URL를 만들어 반환합니다.
- 엔티티 ID, 이름이 사용됩니다.
package action.`in`.blog.domain

import jakarta.persistence.*
import org.hibernate.annotations.JdbcType
import org.hibernate.type.descriptor.jdbc.VarbinaryJdbcType

@Entity
class FileEntity(
    @Id
    @GeneratedValue(strategy = GenerationType.IDENTITY)
    val id: Long = 0,
    val contentType: String,
    val name: String,
    @Lob
    @JdbcType(value = VarbinaryJdbcType::class)
    @Column(columnDefinition = "bytea")
    val binaryData: ByteArray
) {
    fun resourceLocation(hostname: String) = "$hostname/api/files/$id/images/$name"
}
1.2. FileController Class
hostname변수 값은 application.yml 파일 설정으로 지정합니다.- 이번 포스트에서 지정된 값은
http://localhost:8080입니다.
- 이번 포스트에서 지정된 값은
- 업로드 된 파일을 데이터베이스에 바이너리 형식으로 저장합니다.
- 저장된 엔티티 정보를 기준으로 이미지 리소스 URL 위치를 만들어 반환합니다.
package action.`in`.blog.controller

import action.`in`.blog.domain.FileEntity
import action.`in`.blog.repository.FileRepository
import org.springframework.beans.factory.annotation.Value
import org.springframework.web.bind.annotation.PostMapping
import org.springframework.web.bind.annotation.RequestMapping
import org.springframework.web.bind.annotation.RestController
import org.springframework.web.multipart.MultipartFile
import java.util.*

@RestController
@RequestMapping("/api/files")
class FileController(
    @Value("\${hostname}")
    private val hostname: String,
    private val fileRepository: FileRepository
) {

    @PostMapping
    fun uploadFiles(file: MultipartFile): String {
        val entity = FileEntity(
            name = UUID.randomUUID().toString(),
            contentType = file.contentType ?: "image/jpeg",
            binaryData = file.bytes,
        )
        fileRepository.save(entity)
        return entity.resourceLocation(hostname)
    }
}
2. Set Image Source
간단하게 타임리프(thymeleaf)를 사용해 페이지를 구성하였습니다. JavaScript 코드에 대한 설명은 가독성을 위해 주석으로 작성하였습니다.
<html lang="ko">
<head>
    <meta charset="UTF-8">
    <meta content="width=device-width, user-scalable=no, initial-scale=1.0, maximum-scale=1.0, minimum-scale=1.0"
          name="viewport">
    <meta content="ie=edge" http-equiv="X-UA-Compatible">
    <title>Document</title>
    <style>
        .container {
            margin: 10px;
            border: 1px solid lightgray;
            border-radius: 5px;
            width: 50%;
            display: flex;
            flex-direction: column;
        }

        .container input {
            margin-top: 10px;
            margin-bottom: 10px;
        }
    </style>
</head>
<body>
<div class="container">
    <input accept="image/*" id="image-input" type="file">
    <img alt="image" id="image" src="/images/default-image.jpg">
</div>
</body>
<script>
    const input = document.getElementById("image-input");
    const image = document.getElementById("image")
    // 이미지 파일을 선택하면 input 엘리먼트의 onchange 콜백 함수가 실행됩니다.
    input.onchange = function (event) {
        const file = event.target.files[0];
        // 선택된 이미지가 있는지 확인합니다.
        if (file) {
            // 이미지 파일을 폼 데이터에 담아 업로드합니다.
            const formData = new FormData();
            formData.append("file", file);
            fetch('/api/files', {
                method: 'POST',
                body: formData,
            })
                .then(res => res.text())
                // 응답으로 받은 리소스 위치 URL로 이미지 태그 src 속성의 값을 변경합니다.
                .then(url => image.src = url);
        }
    };
</script>
</html>
3. Return Image Binary
이미지 태그의 src 속성에 값이 설정되면 브라우저는 서버로 리소스 요청을 보냅니다. 상대 주소라면 해당 페이지를 받은 서버로 보내고, 절대 주소라면 해당 서버로 요청을 보냅니다. 서버는 클라이언트가 이미지를 다운로드 받을 수 있도록 엔드-포인트(end-point)를 준비합니다. 이번 예제에선 getImage 메서드를 만들어 이미지를 클라이언트에게 내려줍니다.
- 경로 변수(path variable)로 받은 아이디로 파일 정보를 데이터베이스에서 조회합니다.
- 이 예제에서 파일 이름은 사용되지 않지만, Content-Disposition 헤더에 사용하는 등의 용도로 사용할 수 있습니다.
- 데이터베이스에서 조회한 정보를 기반으로 다음과 같은 응답 데이터를 반환합니다.
- 컨텐츠 타입을 설정합니다.
- 헤더에 캐시 컨트롤을 추가힙니다. URL 값이 변경되지 않는다면
max-age로 지정한 시간동안 이미지를 캐시로 사용합니다. 단위는 초(second) 입니다. - 바이너리 데이터는 ByteArrayResource 인스턴스에 담아서 반환합니다.
package action.`in`.blog.controller

import action.`in`.blog.domain.FileEntity
import action.`in`.blog.repository.FileRepository
import jakarta.persistence.EntityNotFoundException
import org.springframework.beans.factory.annotation.Value
import org.springframework.core.io.ByteArrayResource
import org.springframework.http.HttpHeaders
import org.springframework.http.MediaType
import org.springframework.http.ResponseEntity
import org.springframework.web.bind.annotation.*
import org.springframework.web.multipart.MultipartFile
import java.util.*

@RestController
@RequestMapping("/api/files")
class FileController(
    @Value("\${hostname}")
    private val hostname: String,
    private val fileRepository: FileRepository
) {

    @PostMapping
    fun uploadFiles(file: MultipartFile): String {
        val entity = FileEntity(
            name = UUID.randomUUID().toString(),
            contentType = file.contentType ?: "image/jpeg",
            binaryData = file.bytes,
        )
        fileRepository.save(entity)
        return entity.resourceLocation(hostname)
    }

    @GetMapping("/{id}/images/{name}")
    fun getImage(
        @PathVariable id: Long,
        @PathVariable name: String
    ): ResponseEntity<ByteArrayResource> {
        val result = fileRepository.findById(id).orElseThrow {
            EntityNotFoundException("entity not found when ID is $id")
        }
        return ResponseEntity.ok()
            .contentType(MediaType.parseMediaType(result.contentType))
            .header(HttpHeaders.CACHE_CONTROL, "max-age=2592000")
            .body(ByteArrayResource(result.binaryData))
    }
}
3.1. Unit Test
요즘 응답 데이터는 보통 JSON 형식을 사용하기 때문에 컨트롤러 테스트에서 jsonPath 메서드를 많이 사용합니다. 바이트 배열 형식의 데이터 반환 여부를 테스트하기 위해선 MvcResult 클래스를 사용하거나 content 메서드를 사용합니다. FileRepository 인스턴스를 테스트 더블(test double)로 사용합니다.
package action.`in`.blog.controller

import action.`in`.blog.domain.FileEntity
import action.`in`.blog.repository.FileRepository
import org.junit.jupiter.api.BeforeEach
import org.junit.jupiter.api.Test
import org.mockito.Mockito.mock
import org.mockito.Mockito.`when`
import org.springframework.test.web.servlet.MockMvc
import org.springframework.test.web.servlet.request.MockMvcRequestBuilders.get
import org.springframework.test.web.servlet.result.MockMvcResultMatchers.*
import org.springframework.test.web.servlet.setup.MockMvcBuilders
import java.util.*

class FileControllerTest {

    lateinit var fileRepository: FileRepository
    lateinit var sut: MockMvc

    @BeforeEach
    fun setUp() {
        fileRepository = mock(FileRepository::class.java)
        sut = MockMvcBuilders.standaloneSetup(
            FileController("http://localhost:8080", fileRepository)
        ).build()
    }

    @Test
    fun getImage() {

        `when`(fileRepository.findById(1))
            .thenReturn(
                Optional.of(
                    FileEntity(1L, "image/jpeg", "fileName", "binaryData".toByteArray())
                )
            )


        sut.perform(
            get("/api/files/1/images/fileName")
        )
            .andExpect(status().isOk)
            .andExpect(header().string("CACHE-CONTROL", "max-age=2592000"))
            .andExpect(content().contentType("image/jpeg"))
            .andExpect(content().bytes("binaryData".toByteArray()))
    }
}
4. Result
애플리케이션을 실행 후 http://localhost:8080에 접속하면 다음처럼 동작하는 모습을 확인할 수 있습니다.
댓글남기기