


프로토타입 패턴 (Prototype Pattern)
1. Prototype Pattern
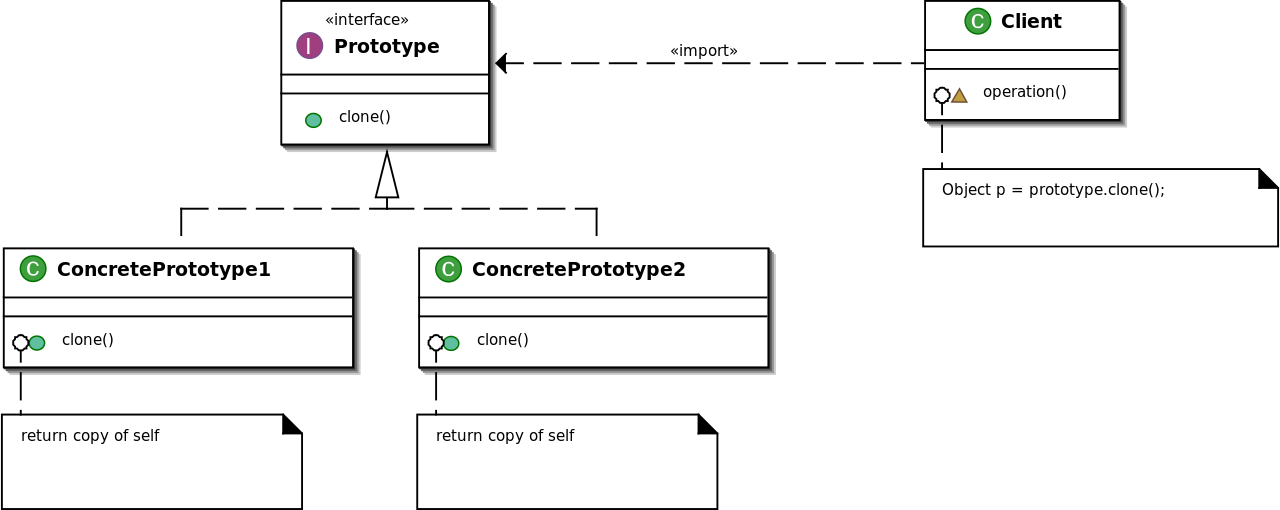
“프로토타입”이라는 이름처럼 원본을 두고 복사하여 사용하는 방법이다. 이미 생성된 인스턴스로 자신을 닮은 새로운 인스턴스를 복사해내어 사용한다. 새로운 객체를 일반적인 방법(생성자)으로 생성할 때 비용이 큰 경우 이용할 수 있는 디자인 패턴이다. 프로토타입 패턴을 구성하는 요소들은 다음과 같다.
- Prototype
- 자신을 복제하는데 필요한 기능을 명세한 인터페이스
- ConcretePrototype
- 인터페이스에 명세한 기능을 구현한 클래스
- Client
- 원형(prototype)에게 자기 복사를 요청하는 클래스
다음과 같은 상황에 프로토타입 패턴을 활용할 수 있다.
- 인스턴스 생산 비용이 높은 경우 사용할 수 있다.
- 종류가 많아서 클래스로 정리할 수 없는 경우 사용할 수 있다.
- 클래스로부터 인스턴스 생성이 어려운 경우 사용할 수 있다.
핵심은 clone 메서드이며 구현에 주의해야 한다.
- 순환 참조(circular reference)가 있는 경우 구현이 어렵다.
- 얕은 복사(shallow copy)와 깊은 복사(deep copy) 문제에 주의해야 한다.
- 생성자처럼 객체를 초기화하여 사용할 수 없다.
2. Example
간단한 예시 코드를 통해 개념을 정리해보자. 좋은 예시가 떠오르지 않은 클래스로부터 인스턴스 생성이 어려운 경우는 제외했다. Prototype 인터페이스 역할로 Java에서 제공하는 Cloneable 인터페이스를 사용했다.
인스턴스 생산 비용이 높은 경우 프로토타입 패턴을 활용한 사례를 살펴보자. 데이터베이스에서 데이터를 매번 조회해서 사용하는 것은 큰 비용이 필요하다. 조회용(read-only) 데이터로 사용한다면 프로토타입 패턴을 사용하는 것도 좋다.
- fetch_data_only_first_time 메서드
- 프로토타입 패턴을 사용하는 경우 최초 한번만 조회 후 이를 복사하여 사용한다.
- fetch_data_every_times 메서드
- 프로토타입 패턴을 사용하지 않는 경우 매번 데이터베이스에서 조회한다.
package blog.in.action;

import lombok.AllArgsConstructor;
import lombok.Getter;
import lombok.NoArgsConstructor;
import lombok.Setter;
import lombok.extern.slf4j.Slf4j;
import org.junit.jupiter.api.BeforeEach;
import org.junit.jupiter.api.Test;
import org.springframework.beans.factory.annotation.Autowired;
import org.springframework.boot.test.autoconfigure.orm.jpa.DataJpaTest;
import org.springframework.data.jpa.repository.JpaRepository;

import javax.persistence.Entity;
import javax.persistence.GeneratedValue;
import javax.persistence.GenerationType;
import javax.persistence.Id;
import java.util.ArrayList;
import java.util.List;
import java.util.Optional;

import static org.hamcrest.MatcherAssert.assertThat;
import static org.hamcrest.Matchers.equalTo;

interface ItemRepository extends JpaRepository<Item, Long> {

    Optional<Item> findFirstByName(String name);
}

@Slf4j
@DataJpaTest
public class SearchDataTests {

    @Autowired
    ItemRepository itemRepository;

    @BeforeEach
    void beforeEach() {
        itemRepository.save(new Item("Hello World"));
    }

    @Test
    void fetch_data_only_first_time() throws CloneNotSupportedException {
        long start = System.currentTimeMillis();
        Optional<Item> optional = itemRepository.findFirstByName("Hello World");
        Item item = optional.orElseThrow();
        List<Item> list = new ArrayList<>();
        for (int index = 0; index < 10000; index++) {
            list.add(item.clone());
        }
        assertThat(list.size(), equalTo(10000));
        log.info(String.format("total running time - %s", System.currentTimeMillis() - start));
    }

    @Test
    void fetch_data_every_times() {
        long start = System.currentTimeMillis();
        List<Item> list = new ArrayList<>();
        for (int index = 0; index < 10000; index++) {
            Optional<Item> optional = itemRepository.findFirstByName("Hello World");
            Item item = optional.orElseThrow();
            list.add(item);
        }
        assertThat(list.size(), equalTo(10000));
        log.info(String.format("total running time - %s", System.currentTimeMillis() - start));
    }
}

@Getter
@Setter
@AllArgsConstructor
@NoArgsConstructor
@Entity
class Item implements Cloneable {

    @Id
    @GeneratedValue(strategy = GenerationType.AUTO)
    private Long id;
    private String name;

    public Item(String name) {
        this.name = name;
    }

    @Override
    protected Item clone() throws CloneNotSupportedException {
        return new Item(this.id, this.name);
    }
}
실행 결과를 로그로 살펴보자. fetch_data_only_first_time 메서드 수행 결과 79ms 소요된다.
Hibernate: call next value for hibernate_sequence
Hibernate: insert into item (name, id) values (?, ?)
Hibernate: select item0_.id as id1_0_, item0_.name as name2_0_ from item item0_ where item0_.name=? limit ?
2023-04-01 01:17:44.575  INFO 81794 --- [           main] blog.in.action.SearchDataTests           : total running time - 79
fetch_data_every_times 메서드 수행 결과 1071ms 소요된다.
Hibernate: call next value for hibernate_sequence
Hibernate: insert into item (name, id) values (?, ?)
Hibernate: select item0_.id as id1_0_, item0_.name as name2_0_ from item item0_ where item0_.name=? limit ?
Hibernate: select item0_.id as id1_0_, item0_.name as name2_0_ from item item0_ where item0_.name=? limit ?
...
Hibernate: select item0_.id as id1_0_, item0_.name as name2_0_ from item item0_ where item0_.name=? limit ?
Hibernate: select item0_.id as id1_0_, item0_.name as name2_0_ from item item0_ where item0_.name=? limit ?
2023-04-01 01:19:37.165  INFO 82119 --- [           main] blog.in.action.SearchDataTests           : total running time - 1071
두번째 사례로 사용자가 특정 소프트웨어를 사용해 도형을 그렸을 때 이를 복사하는 경우를 살펴보자. 점, 선 등을 사용해 도형을 표현하였지만, 임의로 그려졌기 때문에 점, 선이라는 클래스에서 다시 객체를 생성하기 어렵다.
- 사용자가 임의로 그렸기 때문에 임의의 값을 가지고 있는 도형 객체가 생성된다.
- 원본 도형을 복사하는 경우 서로 다른 객체이므로 각 도형의 변경이 서로에게 영향이 없도록 복사되어야 한다.
위와 같은 상황을 고려한 프로토타입 패턴 적용이 필요하다. 다음과 같은 Point 클래스를 생성한다.
- Point 클래스는 x, y 좌표로 구성된다.
- clone 메서드에서 새로운 Point 객체를 만들어 반환한다.
@Getter
@Setter
class Point implements Cloneable {

    private int x;
    private int y;

    public Point(int x, int y) {
        this.x = x;
        this.y = y;
    }

    @Override
    protected Point clone() throws CloneNotSupportedException {
        return new Point(x, y);
    }

    @Override
    public String toString() {
        return "[x: " + x + ", y: " + y + "]";
    }
}
다음 아래와 같은 Line 클래스를 생성한다. Line 클래스는 2개의 Point 클래스로 구성된다.
- clone 메서드에서 새로운 Line 객체를 만들어 반환한다.
- Point 객체를 복사하여 새로운 객체로 할당한다. 깊은 복사를 수행한다.
class Line implements Cloneable {

    private Point point1;
    private Point point2;

    public Line(Point point1, Point point2) {
        this.point1 = point1;
        this.point2 = point2;
    }

    public Point getFirstPoint() {
        return point1;
    }

    public Point getSecondPoint() {
        return point2;
    }

    @Override
    protected Line clone() throws CloneNotSupportedException {
        return new Line(point1.clone(), point2.clone());
    }

    @Override
    public String toString() {
        return "[point1: " + point1 + ", point2: " + point2 + "]";
    }
}
이번엔 Shape 클래스를 살펴보자. Shape 클래스는 여러 개의 Line 클래스로 구성된다.
- clone 메서드에서 새로운 Shape 객체를 만들어 반환한다.
- 새로운 리스트 객체를 만들고 Line 객체를 복사하여 담는다. 깊은 복사를 수행한다.
class Shape implements Cloneable {

    private List<Line> lines;

    public Shape() {
        this.lines = new ArrayList<>();
    }

    public Shape(List<Line> lines) {
        this.lines = lines;
    }

    public void addLine(Line line) {
        this.lines.add(line);
    }

    public Line getLineAtIndex(int index) {
        return this.lines.get(index);
    }

    @Override
    protected Shape clone() throws CloneNotSupportedException {
        List<Line> lineList = new ArrayList<>();
        for (Line line : this.lines) {
            lineList.add(line.clone());
        }
        return new Shape(lineList);
    }


    @Override
    public String toString() {
        StringBuilder builder = new StringBuilder();
        for (Line line : lines) {
            builder.append("line: ").append(line).append("\n");
        }
        return builder.toString();
    }
}
테스트 코드를 통해 위에서 작성한 객체들에 프로토타입 패턴이 잘 적용되었는지 살펴보자.
- 사용자가 임의로 그린 도형
originShape객체를 만든다. - clone 메서드를 이용해
originShape객체를 복사한다. - 복사된
clonedShape객체의 정보를 변경한다. 첫번째 선의 두번째 점의 좌표를 변경한다. - 두 도형의 데이터가 서로 다른지 확인하고 로그를 살펴본다.
@Slf4j
public class CloneMaterialExample {

    @Test
    void clone_material() throws CloneNotSupportedException {

        Shape originShape = new Shape();
        originShape.addLine(new Line(new Point(0, 0), new Point(0, 1)));
        originShape.addLine(new Line(new Point(0, 1), new Point(1, 1)));
        originShape.addLine(new Line(new Point(1, 1), new Point(1, 0)));
        originShape.addLine(new Line(new Point(1, 0), new Point(0, 0)));


        Shape clonedShape = originShape.clone();


        Line line = clonedShape.getLineAtIndex(0);
        Point secondPoint = line.getSecondPoint();
        secondPoint.setX(-1);
        secondPoint.setY(-1);
        assertThat(originShape.getLineAtIndex(0).getSecondPoint().getX(), not(-1));
        assertThat(originShape.getLineAtIndex(0).getSecondPoint().getY(), not(-1));
        log.info("origin shape -\n{}", originShape);
        log.info("cloned shape -\n{}", clonedShape);
    }
}
로그를 통해 객체 복사가 정상적으로 처리되었는지 살펴보자.
- 복사한 도형의 값을 변경하였으므로 원본과 데이터가 다르다.
- 복사한 도형의 변경이 원본에 영향을 끼치지 않음을 확인할 수 있다.
01:48:22.194 [main] INFO blog.in.action.CloneMaterialExample - origin shape -
line: [point1: [x: 0, y: 0], point2: [x: 0, y: 1]]
line: [point1: [x: 0, y: 1], point2: [x: 1, y: 1]]
line: [point1: [x: 1, y: 1], point2: [x: 1, y: 0]]
line: [point1: [x: 1, y: 0], point2: [x: 0, y: 0]]

01:48:22.205 [main] INFO blog.in.action.CloneMaterialExample - cloned shape -
line: [point1: [x: 0, y: 0], point2: [x: -1, y: -1]]
line: [point1: [x: 0, y: 1], point2: [x: 1, y: 1]]
line: [point1: [x: 1, y: 1], point2: [x: 1, y: 0]]
line: [point1: [x: 1, y: 0], point2: [x: 0, y: 0]]
댓글남기기