


빌더 패턴(Builder Pattern)
0. 들어가면서
빌더 패턴(builder pattern)에 관련된 글들을 읽어보면 서로 다른 이야기를 하는 경우가 있다. 원인을 찾아보니 유명한 저서인 GoF 디자인 패턴, Effective Java에서 빌더 패턴을 서로 다른 관점에서 이야기하고 있었다. 이번 글에선 두 책에서 설명하는 내용들을 나눠 정리했다.
1. Builder Pattern in GoF Design Pattern
Separate the construction of a complex object from its representation so that the same construction process can create different representations. [GoF, p97] Parse a complex representation, create one of several targets.
직역하자면 복잡한 객체 생성을 표현으로부터 분리한다.이다. GoF 디자인 패턴에서는 어떤 방식으로 객체의 생성을 표현으로부터 분리하는지 확인해보자.
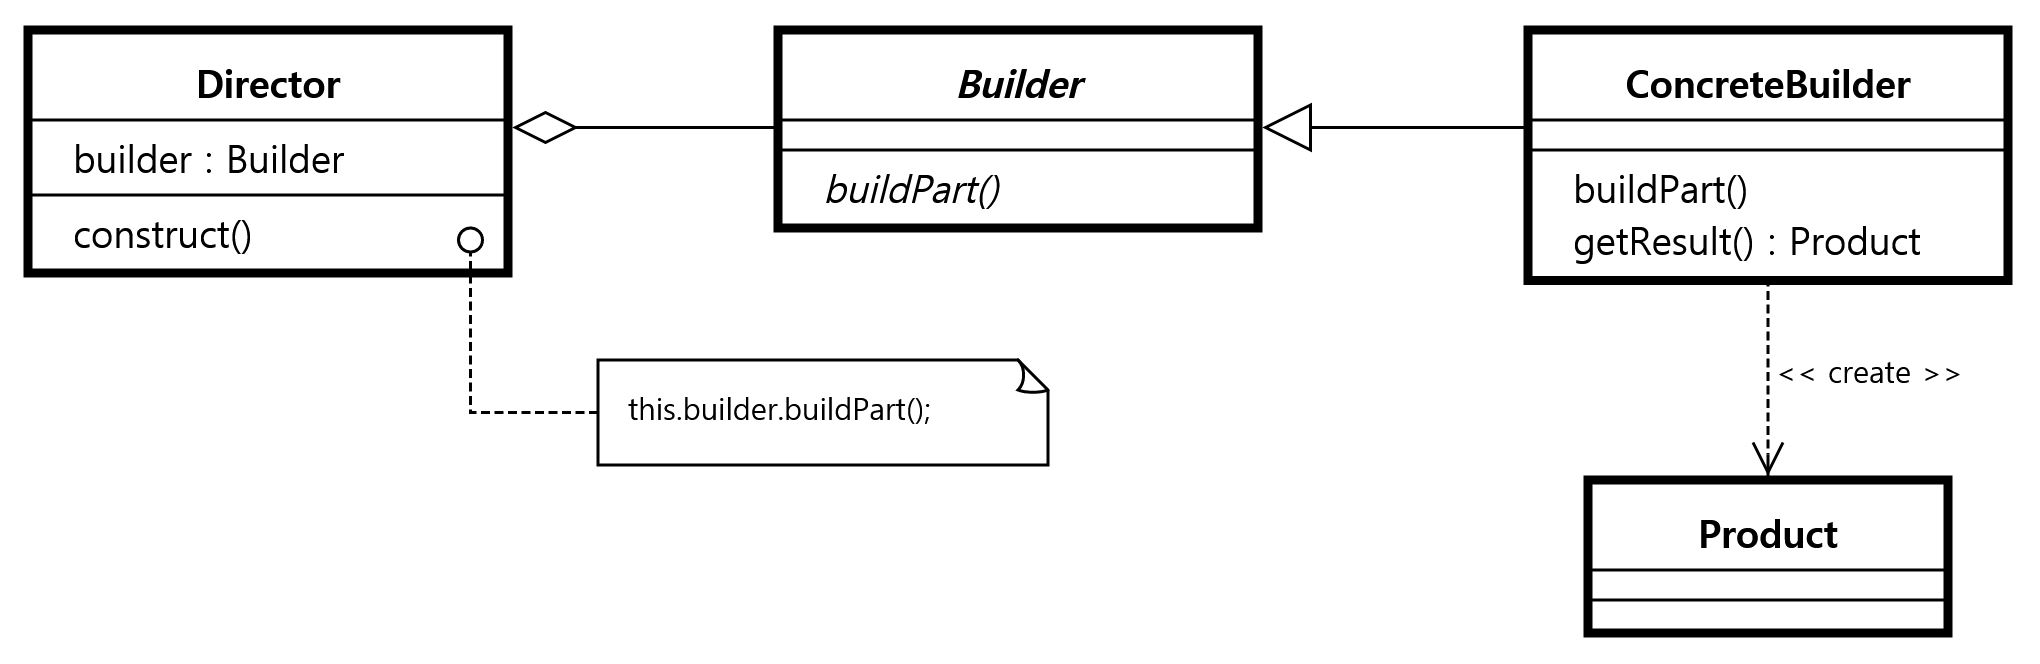
- 디렉터(Director) 클래스
- Builder를 이용해 Product를 만드는 클래스
- 프로덕트(Product) 클래스
- Director가 Builder로 만들어낸 결과
- 빌더(Builder) 인터페이스
- Product를 만드는 방법을 정의하고 있는 인터페이스
- 구현 빌더(ConcreteBuilder) 클래스
- Builder 인터페이스를 구현한 클래스
- Product를 만드는 방법을 구체적으로 구현
GoF 디자인 패턴에서 이야기하는 빌더 패턴은 다음과 같은 장점을 갖는다.
- 제품에 대한 내부 표현을 다양하게 변화할 수 있다.
- 생성과 표현에 필요한 코드를 분리할 수 있다.
- 복합 객체(Product)를 생성하는 절차를 조금 더 세밀하게 나눌 수 있다.
예제 코드를 통해 살펴보자. 다음과 같은 이넘(enum) 클래스들이 존재한다. 필요한 CPU, RAM 정보를 이넘 객체로 선언한다.
enum CPU {
    INTEL_I3, INTEL_I5, INTEL_I7;
}

enum RAM {
    SAMSUNG_8, SAMSUNG_16, SAMSUNG_32;
}
LabtopDirector 클래스는 디렉터 역할을 수행한다. 빌더를 사용해 각 성능에 맞는 랩톱(Labtop) 객체를 생성 후 반환한다.
class LabtopDirector {

    private final LabtopBuilder builder;

    public LabtopDirector(LabtopBuilder builder) {
        this.builder = builder;
    }

    public Labtop getLowSpecLabtop() {
        builder.setCpu(CPU.INTEL_I3);
        builder.setRam(RAM.SAMSUNG_8);
        return builder.getLabtop();
    }

    public Labtop getMiddleSpecLabtop() {
        builder.setCpu(CPU.INTEL_I5);
        builder.setRam(RAM.SAMSUNG_16);
        return builder.getLabtop();
    }

    public Labtop getHighSpecLabtop() {
        builder.setCpu(CPU.INTEL_I3);
        builder.setRam(RAM.SAMSUNG_32);
        return builder.getLabtop();
    }
}
Labtop 클래스는 생성하고 싶은 프로덕트에 해당한다. 필요에 따라 클래스 내 멤버 변수가 추가, 제거될 수 있다.
class Labtop {

    private CPU cpu;

    private RAM ram;

    public CPU getCpu() {
        return cpu;
    }

    public void setCpu(CPU cpu) {
        this.cpu = cpu;
    }

    public RAM getRam() {
        return ram;
    }

    public void setRam(RAM ram) {
        this.ram = ram;
    }
}
LabtopBuilder 인터페이스는 빌더 패턴에서 빌더 인터페이스를 담당한다. 랩톱 객체에 필요한 부품들을 추가하는 기능을 명시하고 있다.
- 필요한 부품 종류에 따라 메서드가 추가, 제거될 수 있다.
- 조립할 부품을 모두 모았으면 객체를 만들어 반환하는 기능을 명시하고 있다.
interface LabtopBuilder {

    void setCpu(CPU cpu);

    void setRam(RAM ram);

    Labtop getLabtop();
}
ConcreteBuilder 클래스는 빌더 인터페이스를 구현한 클래스다. 전달받은 부품들을 조립해 랩톱 객체를 만들어 반환한다.
class ConcreteLabtopBuilder implements LabtopBuilder {

    private CPU cpu;

    private RAM ram;

    @Override
    public void setCpu(CPU cpu) {
        this.cpu = cpu;
    }

    @Override
    public void setRam(RAM ram) {
        this.ram = ram;
    }

    @Override
    public Labtop getLabtop() {
        Labtop labtop = new Labtop();
        labtop.setCpu(cpu);
        labtop.setRam(ram);
        return labtop;
    }
}
이제 마지막으로 빌더 패턴을 통해 객체를 생성해보자. LabtopDirector 객체는 필요한 성능을 가진 랩톱 객체를 만들어 반환한다.
public class GofBuilderPattern {

    public static void main(String[] args) {
        LabtopDirector director = new LabtopDirector(new ConcreteLabtopBuilder());
        Labtop lowSpecLabtop = director.getLowSpecLabtop();
        System.out.println("CPU: " + lowSpecLabtop.getCpu() + ", RAM: " + lowSpecLabtop.getRam());
        Labtop highSpecLabtop = director.getHighSpecLabtop();
        System.out.println("CPU: " + highSpecLabtop.getCpu() + ", RAM: " + highSpecLabtop.getRam());
    }
}
2. Builder Pattern of Effective Java
In summary, the Builder pattern is a good choice when designing classes whose constructors or static factories would have more than a handful of parameters, especially if many of the parameters are optional or of identical type.
직역하자면 생성자나 정적 팩토리에 파라미터가 많은 경우 사용하기 좋다.이다. Effective Java에서 이야기하는 생성자나 정적 팩토리에 파라미터가 많은 경우 어떤 문제점이 있는지 살펴보면서 빌더 패턴의 활용성을 살펴본다.
점층적 생성자(incremental constructor) 방식은 생성자를 오버로딩(Overloading)하여 사용하는 방법이다. 생성자의 멤버 변수가 많아질수록 생성자의 종류가 많아진다.
public class EffectiveJavaBuilderPatttern {
    public static void main(String[] args) {
        Rectangular rectangular = new Rectangular(300, 200, 0, 25);
    }
}

class Rectangular {

    private final int width;
    private final int height;
    private final int padding;
    private final int margin;

    public Rectangular(int width, int height) {
        this(width, height, 0, 0);
    }

    public Rectangular(int width, int height, int margin) {
        this(width, height, margin, 0);
    }

    public Rectangular(int width, int height, int margin, int padding) {
        this(width, height, margin, padding);
    }

    public Rectangular(int width, int height, int margin, int padding) {
        this.width = width;
        this.height = height;
        this.margin = margin;
        this.padding = padding;
    }
}
이 부분에 다음과 같은 불편함이 발생한다.
- 불필요한 값 설정이 발생한다.
- 객체 생성 시 필수인 값 width, height 이 외에 padding 값이 필요한데 반드시 margin 값에 0 을 넣어줘야 한다.
- 생성자가 많아질수록 생성자에 값을 설정하는 코드의 의도를 파악하기 어려워진다.
- 객체 생성 시 생성자에 숫자들이 들어가면서 어떤 항목에 어떤 값을 추가하는지 코드만 봐서 확인하기 힘들다.
public class EffectiveJavaBuilderPatttern {
    public static void main(String[] args) {
        Rectangular rectangular = new Rectangular(300, 200, 0, 25);
    }
}
자바 빈(java bean) 패턴은 점층적 생성자(incremental constructor) 패턴의 문제점을 해결하기 위한 방법이다. 세터(setter) 메서드를 이용해 필요한 값들을 설정한다. 가독성이 좋아지고 불필요한 생성자 오버로딩이 필요 없어진다.
class Rectangular {

    private final int width;
    private final int height;
    private int padding;
    private int margin;

    public Rectangular(int width, int height) {
        this.width = width;
        this.height = height;
    }

    public int getPadding() {
        return padding;
    }

    public void setPadding(int padding) {
        this.padding = padding;
    }

    public int getMargin() {
        return margin;
    }

    public void setMargin(int margin) {
        this.margin = margin;
    }

    public int getWidth() {
        return width;
    }

    public int getHeight() {
        return height;
    }
}
이 방법의 불편함은 다음과 같다.
- 객체 일관성(consistency)이 깨진다.
- 1회의 호출로 객체 생성이 끝나지 않고, 생성한 객체에 값을 변경한다.
- 세터 메서드가 존재하기 때문에 변경 불가능(immutable)한 객체를 만들 수 없다.
public class EffectiveJavaBuilderPatttern {
    public static void main(String[] args) {
        Rectangular rectangular = new Rectangular(300, 200);
        rectangular.setMargin(0);
        rectangular.setMargin(25);
    }
}
2.3. Builder Pattern of Effective Java
마지막으로 Effective Java의 빌더 패턴을 통해 객체를 생성하는 방법이다. 생성자의 접근 제어자를 private으로 설정하여 외부에서 해당 객체를 만들 때 반드시 빌더 패턴을 사용하도록 만든다. 세터 메서드는 존재하지 않으므로 생성한 객체의 상태를 변경하지 못 한다.
public class EffectiveJavaBuilderPatttern {
    public static void main(String[] args) {
        NutritionFacts cocaCola = new NutritionFacts
                .Builder(240, 8) // 필수값 입력
                .calories(100)
                .sodium(35)
                .carbohydrate(27)
                .build();
    }
}

// Effective Java의 Builder Pattern
class NutritionFacts {

    private final int servingSize;
    private final int servings;
    private final int calories;
    private final int fat;
    private final int sodium;
    private final int carbohydrate;

    public static class Builder {

        // Required parameters(필수 인자)
        private final int servingSize;
        private final int servings;

        // Optional parameters - initialized to default values(선택적 인자는 기본값으로 초기화)
        private int calories = 0;
        private int fat = 0;
        private int carbohydrate = 0;
        private int sodium = 0;

        public Builder(int servingSize, int servings) {
            this.servingSize = servingSize;
            this.servings = servings;
        }

        public Builder calories(int val) {
            calories = val;
            return this; // 이렇게 하면 . 으로 체인을 이어갈 수 있다.
        }

        public Builder fat(int val) {
            fat = val;
            return this;
        }

        public Builder carbohydrate(int val) {
            carbohydrate = val;
            return this;
        }

        public Builder sodium(int val) {
            sodium = val;
            return this;
        }

        public NutritionFacts build() {
            return new NutritionFacts(this);
        }
    }

    private NutritionFacts(Builder builder) {
        servingSize = builder.servingSize;
        servings = builder.servings;
        calories = builder.calories;
        fat = builder.fat;
        sodium = builder.sodium;
        carbohydrate = builder.carbohydrate;
    }

    public int getServingSize() {
        return servingSize;
    }

    public int getServings() {
        return servings;
    }

    public int getCalories() {
        return calories;
    }

    public int getFat() {
        return fat;
    }

    public int getSodium() {
        return sodium;
    }

    public int getCarbohydrate() {
        return carbohydrate;
    }
}
이 방법의 장점은 다음과 같다.
- 각 인자가 어떤 의미인지 알기 쉽다.
- 한 번에 객체를 생성하므로 객체 일관성이 깨지지 않는다.
- 세터 메서드가 없으므로 변경 불가능한 객체를 만들 수 있다.
- 빌더 메서드에서 잘못된 값이 입력되었는지 검증할 수 있다.
CLOSING
빌더 패턴과 관련한 대부분의 포스트들은 Effective Java의 빌더 패턴과 관련된 내용들이다. GoF 디자인 패턴에서 제시한 방식과 다소 차이가 있으므로 이를 구분지어 사용하는 것이 좋다. OKKY 커뮤니티에서 본 빌더 패턴 관련 글들이 참고할 만한 내용이라 글 마지막에 추가했다.

댓글남기기