스프링 부트 런타임에서 TestContainer 사용
스프링 부트 3.1에서 향상된 테스트 컨테이너 지원과 @ServiceConnection을 소개하고, 개발 시점에 컨테이너 데이터베이스로 애플리케이션을 실행하는 방법을 정리했다.
- spring-boot
이 글의 목차
1. Improved Testcontainers Support in Spring Boot 3.1
최근 릴리스된 스프링 부트(spring boot) 3.1 버전에서 테스트 컨테이너(TestContainer)에 대한 지원이 향상됐다. 테스트 컨테이너는 애플리케이션에서 경량화된 도커 컨테이너를 띄워서 사용할 수 있는 오픈 소스 프레임워크이다.
Testcontainers is an open source framework for providing throwaway, lightweight instances of databases, message brokers, web browsers, or just about anything that can run in a Docker container.
테스트 컨테이너를 지원하는 기능에서 크게 바뀐 부분은 다음과 같다. 자세한 내용을 살펴보자.
- 결합 테스트(integration test)에서 컨테이너 접속 정보 자동 설정
- 로컬 런타임 환경에서 테스트 컨테이너 활용
1.1. @ServiceConnection Annotation
결합 테스트에서 테스트 컨테이너를 사용하면 애플리케이션이 실행 중인 컨테이너에 접근하기 위한 정보가 필요하다. 3.1 버전 이전에는 @DynamicPropertySource 애너테이션과 DynamicPropertyRegistry 클래스로 접근 정보를 설정하는 별도 코드가 필요했다.
@SpringBootTest
@Testcontainers
class MyIntegrationTests {

    @Container
    static Neo4jContainer<?> neo4j = new Neo4jContainer<>("neo4j:5");

    @Test
    void myTest() {
        // ...
    }

    @DynamicPropertySource
    static void neo4jProperties(DynamicPropertyRegistry registry) {
        registry.add("spring.neo4j.uri", neo4j::getBoltUrl);
    }

}
코틀린(kotlin)의 경우 init 메서드와 시스템 프로퍼티 설정 코드를 사용할 수도 있다.
@Testcontainers
@AutoConfigureMockMvc
@SpringBootTest(
    properties = [
        "spring.datasource.url=jdbc:h2:mem:test",
        "spring.datasource.driver-class-name=org.h2.Driver",
        "spring.datasource.username=sa"
    ]
)
class RestControllerIT {

    private final val redis = GenericContainer("redis:5.0.3-alpine")
        .withExposedPorts(6379)

    init {
        redis.start()
        System.setProperty("spring.data.redis.host", redis.host)
        System.setProperty("spring.data.redis.port", redis.getMappedPort(6379).toString())
    }

    @Autowired
    lateinit var userRepository: UserRepository

    @Autowired
    lateinit var sut: MockMvc

    @BeforeEach
    fun setup() {
        userRepository.save(
            UserEntity(
                name = "Junhyunny",
                favoritePosts = mutableListOf(1L, 2L)
            )
        )
    }

    @Test
    fun saveUserEntityInSession() {

        sut.perform(get("/users/1"))
            .andExpect(status().isOk)
    }
}
스프링 부트 3.1 버전부터 제공하는 @ServiceConnection 애너테이션을 사용하면 컨테이너 접근 정보를 획득하기 위한 코드가 필요 없다. 스프링 팀은 컨테이너 설정 초기화 문제를 다음과 같이 해결했다.
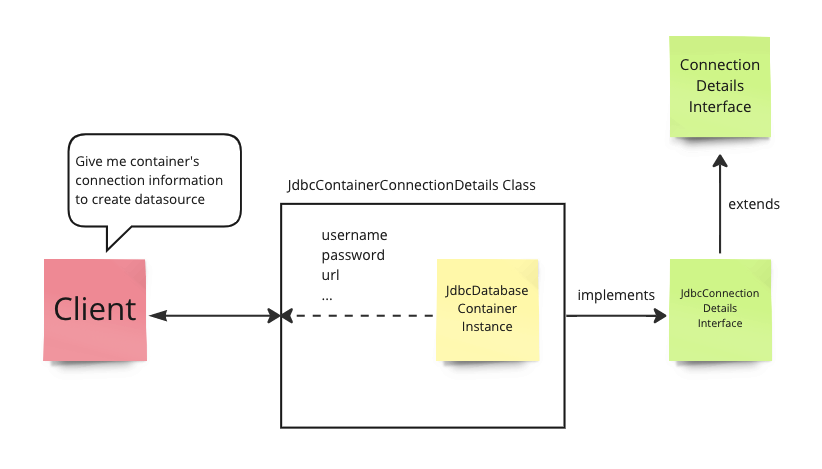
- @ServiceConnection 애너테이션을 붙이면 컨테이너 객체가 생성되는 시점에 컨테이너 커넥션 정보를 관리하는 ConnectionDetails 인터페이스의 구현 객체가 생성된다.
- ConnectionDetails 구현체는 내부에서 해당 컨테이너 객체를 참조하고 있다.
- ConnectionDetails 구현체는 아래 이미지에서 JdbcContainerConnectionDetails 인스턴스이다.
- 컨테이너 객체는 아래 이미지에서 JdbcDatabaseContainer 인스턴스이다.
- 애플리케이션이 커넥션 정보를 ConnectionDetails 구현체에게 요청한다.
- ConnectionDetails 구현체는 내부적으로 참조하고 있는 컨테이너 객체에게 접근 정보를 요청한다.
@ServiceConnection 애너테이션을 사용하면 다음과 같이 코드를 변경할 수 있다. @DynamicPropertySource 애너테이션이 붙은 메서드는 필요 없다.
@SpringBootTest
@Testcontainers
class MyIntegrationTests {

    @Container
    @ServiceConnection
    static Neo4jContainer<?> neo4j = new Neo4jContainer<>("neo4j:5");

    @Test
    void myTest() {
        // ...
    }
}
코틀린 코드도 다음과 같이 변경할 수 있다.
- 컨테이너 객체를 static 변수로 변경하고 @ServiceConnection 애너테이션을 추가한다.
- init 메서드를 제거한다.
@Testcontainers
@AutoConfigureMockMvc
@SpringBootTest(
    properties = [
        "spring.datasource.url=jdbc:h2:mem:test",
        "spring.datasource.driver-class-name=org.h2.Driver",
        "spring.datasource.username=sa"
    ]
)
class RestControllerIT {

    companion object {
        @Container
        @ServiceConnection
        private val redis = GenericContainer("redis:5.0.3-alpine")
            .withExposedPorts(6379)
    }

    @Autowired
    lateinit var userRepository: UserRepository

    @Autowired
    lateinit var sut: MockMvc

    @BeforeEach
    fun setup() {
        userRepository.save(
            UserEntity(
                name = "Junhyunny",
                favoritePosts = mutableListOf(1L, 2L)
            )
        )
    }

    @Test
    fun saveUserEntityInSession() {

        sut.perform(get("/users/1"))
            .andExpect(status().isOk)
    }
}
1.2. TestContainers at development time
로컬 개발 환경에서 테스트 컨테이너를 애플리케이션과 함께 실행할 수 있다. 로컬 개발 환경에서 겪는 다음과 같은 불편함을 해소해 줄 수 있는 좋은 기능이라고 생각한다.
- 로컬 환경에서만 사용하는 임베디드 데이터베이스
- 필요한 데이터베이스를 로컬 환경에 설치하는 작업은 번거롭기 때문에 H2 같은 임베디드 데이터베이스를 사용한다.
- 실제 프로덕션에서 사용하는 데이터베이스와 H2 데이터베이스의 초기화 SQL이나 마이그레이션 SQL 스크립트 문법이 다르다.
- 애플리케이션 코드는 JPA 같은 추상화된 계층 덕분에 코드의 변경이 크게 없겠지만 실제로 실행되는 동작이 다를 수 있으므로 주의가 필요하다.
- 데이터베이스를 컨테이너를 통해 구축하더라도 컴퓨터를 재부팅하면 매번 재실행해야 한다.
- 세션이나 캐시를 위해 사용하는 레디스 스토리지
- 임베디드 레디스를 사용한다면 이를 위한 설정들과 프로파일이 필요하다.
- 로컬 환경에 레디스 서버를 구축한다면 설치하는 작업이 불편하다.
- 스토리지를 컨테이너를 통해 구축하더라도 컴퓨터를 재부팅하면 매번 재실행해야 한다.
프로젝트 테스트 컨텍스트에 다음과 같은 main 메서드를 작성하고 실행하면 테스트 컨테이너들이 연결된 환경으로 애플리케이션을 실행할 수 있다.
- ActionInBlogApplication 클래스의 main 메서드를 실행한다.
- TestActionInBlogApplication 클래스의 빈(bean)들을 함께 사용한다.
- @TestConfiguration 애너테이션이 붙은 설정 빈이다.
- 내부에 테스트 컨테이너를 빈으로 생성하는 코드가 필요하다.
- 애플리케이션이 실행되면서 테스트 컨테이너의 접속 정보를 얻을 수 있도록 @ServiceConnection 애너테이션이 필요하다.
package action.in.blog;

import org.springframework.boot.SpringApplication;
import org.springframework.boot.test.context.TestConfiguration;
import org.springframework.boot.testcontainers.service.connection.ServiceConnection;
import org.springframework.context.annotation.Bean;
import org.testcontainers.containers.PostgreSQLContainer;
import org.testcontainers.utility.DockerImageName;

@TestConfiguration(proxyBeanMethods = false)
public class TestActionInBlogApplication {

    public static void main(String[] args) {
        SpringApplication
                .from(ActionInBlogApplication::main)
                .with(TestActionInBlogApplication.class)
                .run(args);
    }

    @Bean
    @ServiceConnection
    PostgreSQLContainer<?> postgresContainer() {
        return new PostgreSQLContainer<>(DockerImageName.parse("postgres:latest"));
    }
}
2. Practice
간단하게 로컬 개발 환경을 구축해보자. 프로젝트 구조는 다음과 같다.
./
├── HELP.md
├── build.gradle
├── gradle
│   └── wrapper
│       ├── gradle-wrapper.jar
│       └── gradle-wrapper.properties
├── gradlew
├── gradlew.bat
├── settings.gradle
└── src
    ├── main
    │   ├── java
    │   │   └── action
    │   │       └── in
    │   │           └── blog
    │   │               ├── ActionInBlogApplication.java
    │   │               ├── controller
    │   │               │   └── UserController.java
    │   │               ├── domain
    │   │               │   └── User.java
    │   │               └── repository
    │   │                   └── UserRepository.java
    │   └── resources
    │       └── application.yml
    └── test
        ├── java
        │   └── action
        │       └── in
        │           └── blog
        │               ├── ActionInBlogApplicationTests.java
        │               └── TestActionInBlogApplication.java
        └── resources
            ├── application.yml
            └── data.sql
2.1. application.yml
테스트 패키지에 위치한 설정 파일이다. 애플리케이션 실행을 위한 main 메서드의 클래스가 테스트 패키지에 위치하기 때문에 해당 위치의 리소스를 사용한다.
- 프로파일 설정을
test로 지정한다. - data.sql 파일을 사용해 스키마, 데이터를 초기화한다.
spring:
  profiles:
    active: test
---
spring:
  config:
    activate:
      on-profile: test
  sql:
    init:
      mode: always
      data-locations: classpath:data.sql
  jpa:
    defer-datasource-initialization: true
2.2. data.sql
스키마와 데이터를 초기화하는 SQL 스크립트도 테스트 패키지에 위치한다.
create table if not exists tb_user (
    id serial primary key,
    name varchar(50)
);

insert into tb_user (name) values ('Junhyunny');
insert into tb_user (name) values ('Jua');
2.3. UserController Class
기능을 제공하는 코드는 메인 패키지에 위치하며, 사용자 정보를 조회한 후 반환한다.
package action.in.blog.controller;

import action.in.blog.domain.User;
import action.in.blog.repository.UserRepository;
import org.springframework.web.bind.annotation.GetMapping;
import org.springframework.web.bind.annotation.RestController;

import java.util.List;

@RestController
public class UserController {

    private final UserRepository userRepository;

    public UserController(UserRepository userRepository) {
        this.userRepository = userRepository;
    }

    @GetMapping("/users")
    public List<User> getUsers() {
        return userRepository.findAll();
    }
}
2.4. TestActionInBlogApplication Class
테스트 패키지에 위치한 TestActionInBlogApplication 클래스를 살펴보자.
- main 메서드
- 애플리케이션 실행을 위해 ActionInBlogApplication 클래스의 main 메서드를 사용한다.
- TestActionInBlogApplication 클래스 자신을 설정 빈으로 사용한다.
- 내부에 정의된 빈들을 컨텍스트에 포함하여 실행한다.
- postgresContainer 메서드
- @Bean 애너테이션을 붙여 반환하는 객체가 빈으로 관리된다.
- @ServiceConnection 애너테이션을 붙여 애플리케이션이 접속하기 위해 필요한 정보를 제공한다.
package action.in.blog;

import org.springframework.boot.SpringApplication;
import org.springframework.boot.test.context.TestConfiguration;
import org.springframework.boot.testcontainers.service.connection.ServiceConnection;
import org.springframework.context.annotation.Bean;
import org.testcontainers.containers.PostgreSQLContainer;
import org.testcontainers.utility.DockerImageName;

@TestConfiguration(proxyBeanMethods = false)
public class TestActionInBlogApplication {

    public static void main(String[] args) {
        SpringApplication
                .from(ActionInBlogApplication::main)
                .with(TestActionInBlogApplication.class)
                .run(args);
    }

    @Bean
    @ServiceConnection
    PostgreSQLContainer<?> postgresContainer() {
        return new PostgreSQLContainer<>(DockerImageName.parse("postgres:latest"));
    }
}
TestActionInBlogApplication 클래스의 main 메서드를 실행한다. 테스트 컨테이너와 함께 애플리케이션이 실행된다.
> Task :TestActionInBlogApplication.main()

  .   ____          _            __ _ _
 /\\ / ___'_ __ _ _(_)_ __  __ _ \ \ \ \
( ( )\___ | '_ | '_| | '_ \/ _` | \ \ \ \
 \\/  ___)| |_)| | | | | || (_| |  ) ) ) )
  '  |____| .__|_| |_|_| |_\__, | / / / /
 =========|_|==============|___/=/_/_/_/
 :: Spring Boot ::                (v3.1.3)

2023-08-30T23:20:41.314+09:00  INFO 65213 --- [           main] action.in.blog.ActionInBlogApplication   : Starting ActionInBlogApplication using Java 17.0.8.1 with PID 65213
2023-08-30T23:20:41.319+09:00  INFO 65213 --- [           main] action.in.blog.ActionInBlogApplication   : The following 1 profile is active: "test"
...
2023-08-30T23:20:55.028+09:00  INFO 65213 --- [           main] action.in.blog.ActionInBlogApplication   : Started ActionInBlogApplication in 14.655 seconds (process running for 15.75)
실행 결과는 다음과 같다.
- 테스트 패키지에 위치한 애플리케이션을 실행했지만, 메인 패키지에 위치한 UserController 클래스의 기능이 정상적으로 수행된다.
- Postgres 테스트 컨테이너 데이터베이스에 초기화된 데이터들이 정상적으로 조회된다.
$ curl http://localhost:8080/users | jq .
  % Total    % Received % Xferd  Average Speed   Time    Time     Time  Current
                                 Dload  Upload   Total   Spent    Left  Speed
100    51    0    51    0     0    144      0 --:--:-- --:--:-- --:--:--   147
[
  {
    "id": 1,
    "name": "Junhyunny"
  },
  {
    "id": 2,
    "name": "Jua"
  }
]
TEST CODE REPOSITORY
REFERENCE
KEEP READING
함께 읽으면 좋은 글
DISCUSSION