Implement MQTT subscriber with Spring Boot
RECOMMEND POSTS BEFORE THIS
0. 들어가면서
MQTT 프로토콜에 대한 개념을 확인하고 싶으면 MQTT(Message Queuing Telemetry Transport) Protocol 글을 참고하길 바란다. 이번엔 구독자 애플리케이션을 구현하는 방법에 대해 정리했다.
1. Scenario
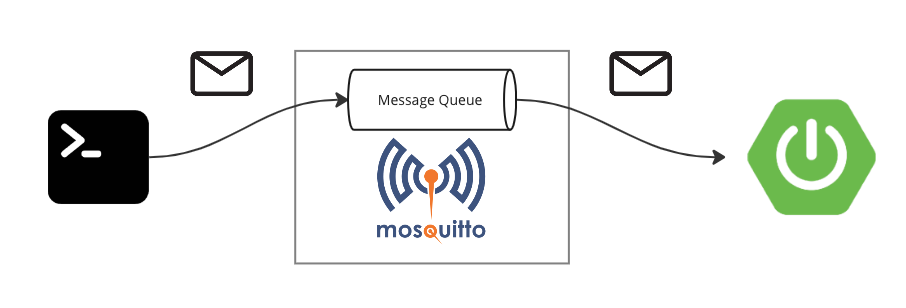
구독자 애플리케이션을 개발하기 전에 시스템이 어떤 식으로 구성되는지 먼저 살펴보자.
- 터미널이 발행자 역할을 수행한다.
- mqtt-cli 명령어를 사용해 MQTT 브로커에 메시지를 전달한다.
- MQTT 브로커 역할을 수행할 모스키토(Mosquitto) 서버는 컨테이너로 실행한다.
- 전달 받은 메시지를 스프링 부트 애플리케이션에 전달한다.
- 스프링 부트 애플리케이션이 구독자 역할을 수행한다.
- 브로커로부터 메시지를 수신 후 메시지를 로그로 출력한다.

2. Install mqtt-cli
발행자 역할을 수행하는 CLI를 설치한다. 여러가지 설치 방법이 있지만, 필자는 홈브루(homebrew)를 사용했다. 다른 설치 방법은 아래 링크를 참고하길 바란다.
$ brew install hivemq/mqtt-cli/mqtt-cli
3. Setup Mosquitto Broker Container
도커 컨테이너로 브로커 서버를 준비한다. MQTT 브로커 중에서 많이 사용되는 모스키토(Mosquitto)를 사용한다. 필요한 파일이 몇 개 존재한다.
3.1. password file
브로커에 접속하기 위해 필요한 사용자와 비밀번호를 준비한다. mosquitto_passwd 명령어가 필요하므로 모스키토 컨테이너에 미리 설치된 명령어를 사용한다.
- 호스트 현재 위치와 컨테이너 내부 temp 디렉토리를 볼륨으로 연결한다.
- 컨테이너 내부 mosquitto_passwd 명령어를 사용해
user사용자를 위한 암호 파일을 생성한다. - 콘솔을 통해 사용할 비밀번호를 입력한다.
$ docker run -it -v .:/temp eclipse-mosquitto mosquitto_passwd -c /temp/passwordfile user

Password:
Reenter password:
프로젝트 경로에 비밀번호 정보가 담긴 passwordfile 파일이 생성된다.
$ ls -al passwordfile
-rw-------  1 junhyunk  staff  118 Jan 16 14:03 passwordfile

$ cat passwordfile
user:$7$101$ZYIqRCDWfN2l+QRf$pjDZKazrlp9x2L3idiy/4qaWxSLV68eY1kf9h1qFmPZd0fwGlt/GieKh8qXccRjpLyzKocfaBeamvvfFVIhiRw==
3.2. mosquitto.config
프로젝트 경로에 모스키토 설정 파일을 생성한다. 다음과 같은 정보를 담고 있다.
- 1883 포트 번호를 사용한다.
- password 파일 경로를 지정한다.
- 익명 사용자가 접근하는 것을 막는다.
listener 1883
password_file /etc/mosquitto/passwd
allow_anonymous false
3.3. Run Mosquitto Broker
위 단계에서 생성한 모스키토 설정 파일을 사용해 브로커 서버를 실행한다. 다음 명령어로 모스키토 컨테이터를 실행한다.
- 1883 포트로 메시지를 수신한다.
- 프로젝트 경로에 만든
passwordfile을 컨테이너 볼륨과 연결한다. - 프로젝트 경로에 만든
mosquitto.conf을 컨테이너 볼륨과 연결한다.
$ docker run -d -p 1883:1883\
  -v ./passwordfile:/etc/mosquitto/passwd\
  -v ./mosquitto.conf:/mosquitto/config/mosquitto.conf\
  eclipse-mosquitto

58ada9e053613851b15c7611ae5166dfeae3e0e6d2c57564a4e86a53497d6373
4. Implement Subscriber
구독자 스프링 부트 애플리케이션을 구현한다.
4.1. build.gradle
다음과 같은 의존성이 필요하다. MQTT 구독자를 개발하기 위해 필요한 의존성은 다음과 같다.
- spring-boot-starter-integration
- 다른 시스템과의 결합을 지원하는 의존성
- spring-integration-mqtt
- MQTT 프로토콜을 지원하는 별도 의존성
plugins {
    id 'java'
    id 'org.springframework.boot' version '3.2.1'
    id 'io.spring.dependency-management' version '1.1.4'
}

group = 'blog.in.action'
version = '0.0.1-SNAPSHOT'

java {
    sourceCompatibility = '17'
}

repositories {
    mavenCentral()
}

dependencies {
    implementation 'org.springframework.boot:spring-boot-starter-web'
    testImplementation 'org.springframework.boot:spring-boot-starter-test'
    implementation 'org.springframework.boot:spring-boot-starter-integration'
    implementation 'org.springframework.integration:spring-integration-mqtt'
}

tasks.named('test') {
    useJUnitPlatform()
}
4.2. MqttBrokerConfig Class
구독 핸들러를 브로커에 연결하기 위한 설정 클래스를 만든다. 설명 가독성을 위해 코드에 주석으로 작성한다.
package blog.in.action.config;

import org.eclipse.paho.client.mqttv3.MqttConnectOptions;
import org.springframework.context.annotation.Bean;
import org.springframework.context.annotation.Configuration;
import org.springframework.integration.annotation.ServiceActivator;
import org.springframework.integration.channel.DirectChannel;
import org.springframework.integration.core.MessageProducer;
import org.springframework.integration.mqtt.core.DefaultMqttPahoClientFactory;
import org.springframework.integration.mqtt.core.MqttPahoClientFactory;
import org.springframework.integration.mqtt.inbound.MqttPahoMessageDrivenChannelAdapter;
import org.springframework.integration.mqtt.support.DefaultPahoMessageConverter;
import org.springframework.messaging.MessageChannel;
import org.springframework.messaging.MessageHandler;

@Configuration
public class MqttBrokerConfig {

    private static final String BROKER_URL = "tcp://localhost:1883";
    private static final String BROKER_CLIENT_ID = "unique-client-id";
    private static final String TOPIC_FILTER = "my-topic";
    private static final String USERNAME = "user";
    private static final String PASSWORD = "1234";

    @Bean
    public MqttPahoClientFactory mqttClientFactory() { // MQTT 클라이언트 관련 설정
        var factory = new DefaultMqttPahoClientFactory();
        var options = new MqttConnectOptions();
        options.setServerURIs(new String[]{BROKER_URL});
        options.setUserName(USERNAME);
        options.setPassword(PASSWORD.toCharArray());
        options.setAutomaticReconnect(true);
        factory.setConnectionOptions(options);
        return factory;
    }

    @Bean
    public MessageProducer inboundChannel(
            MqttPahoClientFactory mqttClientFactory,
            MessageChannel mqttInputChannel
    ) { // inboundChannel 어댑터
        var adapter = new MqttPahoMessageDrivenChannelAdapter(
                BROKER_URL,
                BROKER_CLIENT_ID,
                mqttClientFactory,
                TOPIC_FILTER
        );
        adapter.setCompletionTimeout(5000);
        adapter.setConverter(new DefaultPahoMessageConverter());
        adapter.setQos(1);
        adapter.setOutputChannel(mqttInputChannel);
        return adapter;
    }

    @Bean
    public MessageChannel mqttInputChannel() { // MQTT 구독 채널 생성
        return new DirectChannel();
    }

    @Bean
    @ServiceActivator(inputChannel = "mqttInputChannel") // MQTT 구독 핸들러
    public MessageHandler inboundMessageHandler() {
        return new MqttMessageSubscriber();
    }
}
채널 어댑터는 MqttConnectOptions 객체에 담긴 데이터로 IMqttAsyncClient 객체를 생성한다. 메시지를 수신했을 때 채널 인스턴스와 핸들러 인스턴스를 연결한다. 채널 인스턴스는 메시지 핸들링 전략에 따라 다양한 구현체들이 존재한다. 예를 들어 동기식 혹은 비동기식이라던지 큐 사용 여부라던지 메시지 순서 보장 여부 등이 있다. 수신한 메시지를 핸들링하는 비즈니스 로직이 실행되기 전에 애플리케이션이 메시지를 어떻게 다룰지 전략이 정의되어 있다. 핸들러는 메시지를 수신해 어떻게 처리할 것인지 관심사를 정의한 인스턴스이다.
4.3. MqttMessageSubscriber Class
메시지를 수신하면 어떻게 처리할 것인지 비즈니스 로직을 정의한 핸들러 클래스를 생성한다.
- MessageHandler 인터페이스를 구현한다.
- 단순히 로그를 출력한다.
package blog.in.action.listen;

import org.springframework.messaging.Message;
import org.springframework.messaging.MessageHandler;
import org.springframework.messaging.MessagingException;

public class MqttMessageSubscriber implements MessageHandler {

    @Override
    public void handleMessage(Message<?> message) throws MessagingException {
        System.out.println(message);
    }
}
5. Test
스프링 애플리케이션을 실행 후 터미널에서 mqtt-cli 명령어를 사용해 메시지를 전송한다.
- mqtt pub 명령어로 메시지를 발행한다.
- -u 옵션으로 사용자를 지정한다.
- -pw 옵션으로 비밀번호를 지정한다.
- 비밀번호 파일을 생성할 때 “1234”로 지정했다.
- -t 옵션으로 토픽 이름을 지정한다.
- -d 옵션으로 디버그 로그를 확인한다.
- -m 옵션으로 메시지를 전송한다.
$ mqtt pub\
  -u user\
  -pw 1234\
  -h localhost\
  -p 1883\
  -t my-topic\
  -d\
  -m "Hello World"

Client 'UNKNOWN@localhost' sending CONNECT
    MqttConnect{keepAlive=60, cleanStart=true, sessionExpiryInterval=0, simpleAuth=MqttSimpleAuth{username and password}}
Client 'UNKNOWN@localhost' received CONNACK
    MqttConnAck{reasonCode=SUCCESS, sessionPresent=false, assignedClientIdentifier=auto-8C32BE8C-3FCA-CB86-1549-C9AF2B13B8C1, restrictions=MqttConnAckRestrictions{receiveMaximum=20, maximumPacketSize=268435460, topicAliasMaximum=10, maximumQos=EXACTLY_ONCE, retainAvailable=true, wildcardSubscriptionAvailable=true, sharedSubscriptionAvailable=true, subscriptionIdentifiersAvailable=true}}
Client 'auto-8C32BE8C-3FCA-CB86-1549-C9AF2B13B8C1@localhost' sending PUBLISH ('Hello World')
    MqttPublish{topic=my-topic, payload=11byte, qos=AT_MOST_ONCE, retain=false}
Client 'auto-8C32BE8C-3FCA-CB86-1549-C9AF2B13B8C1@localhost' finish PUBLISH
    MqttPublishResult{publish=MqttPublish{topic=my-topic, payload=11byte, qos=AT_MOST_ONCE, retain=false}}
스프링 애플리케이션에선 다음과 같은 로그를 볼 수 있다.
GenericMessage [payload=Hello World, headers={mqtt_receivedRetained=false, mqtt_id=0, mqtt_duplicate=false, id=184235dd-327b-57a6-b1fe-d584993fb4ae, mqtt_receivedTopic=my-topic, mqtt_receivedQos=0, timestamp=1705439273967}]
CLOSING
구독자 인스턴스를 구현하는 방법은 스프링 프레임워크 덕분에 생각보다 단순했다. 더 나은 MQTT 프로토콜 기반 시스템 구현을 위해 다음과 같은 사항들을 공부해서 정리할 예정이다.
- 동일한 서버 컨테이너 인스턴스가 여러 개일 때 리더를 선출할 수 있는지
- 리더 선출이 안 된다면 로드 밸런싱이 가능한지
- 메시지 유실이나 처리 중 예외에 대해 어떻게 대처할 것인지
- 토픽 이름을 정하는 베스트 프랙티스는 무엇인지
TEST CODE REPOSITORY
REFERENCE
- https://underflow101.tistory.com/22
- https://aliencoder.tistory.com/52
- https://www.joinc.co.kr/w/man/12/MQTT/Tutorial
- http://www.steves-internet-guide.com/mqtt-username-password-example/
- https://docs.spring.io/spring-integration/reference/mqtt.html
- https://docs.spring.io/spring-integration/docs/2.0.0.RC1/reference/html/channel-adapter.html

댓글남기기