


스프링 부트(Spring Boot) GraalVM 네이티브 이미지 지원
RECOMMEND POSTS BEFORE THIS
0. 들어가면서
스프링 부트(spring boot) 3.X 버전에 관련된 내용들을 보면 GraalVM 지원에 대한 이야기가 있다. 이전 글에서 GraalVM에 대한 내용을 정리했다. 이번엔 간단한 네이티브 이미지를 만들어본다. 이번 글에서 사용하는 AOT(Ahead of Time) 컴파일러에 대한 내용은 이전 글을 참조하길 바란다.
1. Dynamic Features Limitation of Native Image
GraalVM은 AOT 컴파일러를 사용해 네이티브 이미지를 빌드한다. 이 과정에서 AOT 컴파일러는 정적 코드 분석과 최적화를 통해 바이트 코드를 운영체제에 맞는 머신 코드로 컴파일한다. 정적 코드 분석을 통해 머신 코드를 만들기 때문에 다음과 같은 동적 기능들을 사용하는데 제약이 생긴다.
- Accessing Resources
- Certificate Management
- Dynamic Proxy
- Java Native Interface (JNI)
- JCA Security Services
- Reflection
- URL Protocols
2. Understanding Spring Ahead-of-Time Processing
스프링 프레임워크는 런타임에 내부적으로 동적 프록시(dynamic proxy), 리플렉션(reflection) 기능을 사용한다. 그렇기 때문에 스프링의 일부 동적 기능들에 대한 사용이 제한된다. GraalVM에 의해 만들어지는 네이티브 이미지를 닫힌 세계(closed-world)라고 표현하는데 다음과 같은 동적 기능들이 제한된다.
- 클래스 경로(classpath)는 빌드 시에 고정되고, 완전히 정의된다.
- 애플리케이션에 정의된 빈(bean)들은 런타임에 변경될 수 없다.
- @Profile 애너테이션과 프로파일 정의에 따른 선택적 설정에 제한이 있다.
- @ConditionalOnProperty 애너테이션이나
.enable속성들처럼 빈 생성 시 변경되는 기능은 지원되지 않는다.
위 제한 사항들 때문에 스프링 프레임워크는 빌드 타임에 GraalVM이 사용할 수 있는 추가적인 애셋(asset)들을 생성한다.
- 자바(Java) 소스 코드
- 동적 프록시를 위한 바이트(byte) 코드
- GraalVM JSON 힌트 파일들
- resource-config.json - 리소스 힌트
- reflect-config.json - 리플렉션 힌트
- serialization-config.json - 직렬화 힌트
- proxy-config.json - 프록시 힌트
- jni-config.json - JNI(Java Native Interface) 힌트
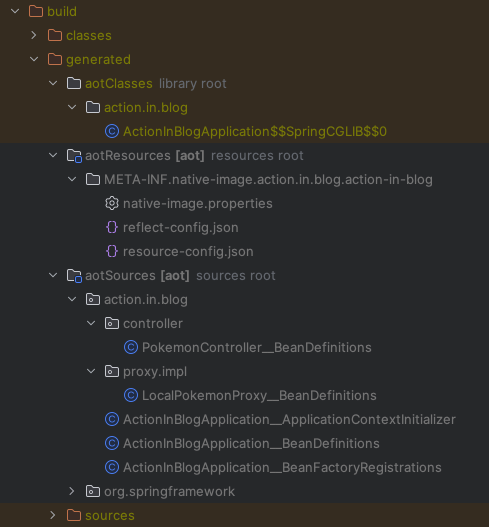
프로젝트를 빌드하면 다음과 같은 결과물들이 만들어진다.
3. Prerequisites
네이티브 이미지를 생성하려면 GraalVM JDK(Java Development Kit)가 필요하다. GraalVM 공식 홈페이지에서 제공하는 JDK를 사용하면 에러가 발생하기 때문에 스프링 공식 문서에 명시된 JDK를 사용한다. 필자의 개발 환경은 다음과 같다.
- MacBook Pro
- 2.4 GHz 8코어 Intel Core i9
- IntelliJ
공식 문서를 보면 SDKMAN을 사용할 것을 느낌표를 붙여가면서 강력하게 추천한다.
To build a native image using the Native Build Tools, you’ll need a GraalVM distribution on your machine. You can either download it manually on the Liberica Native Image Kit page, or you can use a download manager like SDKMAN!. To install the native image compiler on macOS or Linux, we recommend using SDKMAN!. Get SDKMAN! from sdkman.io and install the Liberica GraalVM distribution by using the following commands:
sdkman.io 사이트의 설치 방법을 따라 SDKMAN을 설치한다.
$ curl -s "https://get.sdkman.io" | bash
GraalVM JDK를 설치한다.
$ sdk install java 23.r17-nik
기본 JDK를 GraalVM JDK로 변경한다.
$ sdk use java 23.r17-nik
정상적으로 변경되었는지 자바 버전을 확인한다.
$ java -version

openjdk version "17.0.7" 2023-04-18 LTS
OpenJDK Runtime Environment Liberica-NIK-23.0.0-1 (build 17.0.7+7-LTS)
OpenJDK 64-Bit Server VM Liberica-NIK-23.0.0-1 (build 17.0.7+7-LTS, mixed mode, sharing)
4. Project Setup
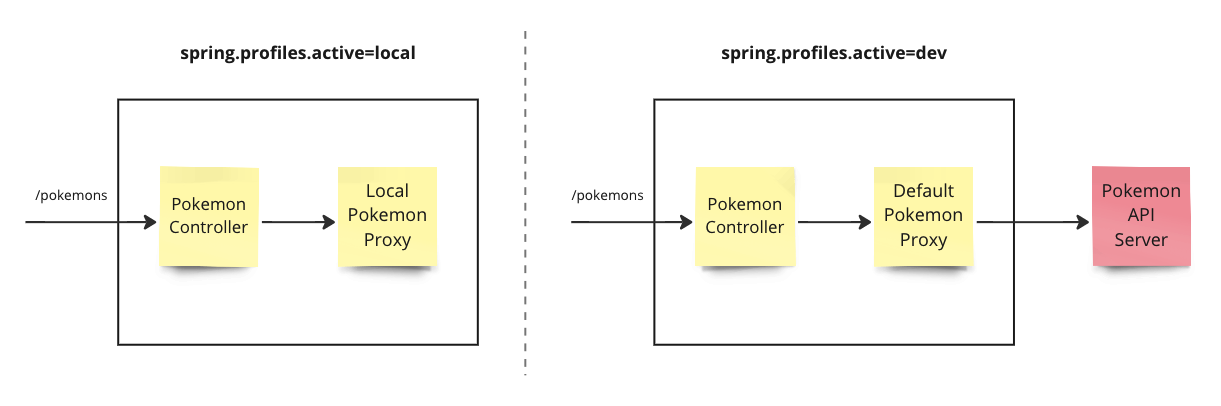
이번 예제에선 코드를 자세히 살펴보지 않는다. 다음과 같은 간단한 애플리케이션 서비스를 네이티브 이미지로 만들고 실행한다. 포켓몬 정보를 반환하는 API 서비스이다. 프로파일을 바꿔가면서 빌드하고 테스트하기 위해 2개의 프로파일을 준비한다. 프로파일 설정에 따라 다른 방식으로 동작한다.
- local 프로파일인 경우 메모리에 있는 포켓몬 정보를 반환한다.
- dev 프로파일인 경우 외부 서비스에 있는 포켓몬 정보를 반환한다.
프로젝트를 생성한 후 모듈 설정에서 SDK를 이전 단계에서 설치한 JDK로 변경한다. 모듈 설정(COMMAND + ;) 화면을 연다.
- 준비 단계에서 다운로드 받은 liberica-17 JDK를 설정한다.

이 예제는 그레이들(gradle) 프로젝트다. 네이티브 이미지를 생성할 수 있는 작업(task)들을 사용하기 위해 build.gradle 파일에 org.graalvm.buildtools.native 플러그인을 추가한다.
plugins {
    id 'java'
    id 'org.springframework.boot' version '3.1.3'
    id 'io.spring.dependency-management' version '1.1.3'
    id 'org.graalvm.buildtools.native' version '0.9.24'
}

group = 'action.in.blog'
version = '0.0.1-SNAPSHOT'

java {
    sourceCompatibility = '17'
}

repositories {
    mavenCentral()
}

dependencies {
    implementation 'org.springframework.boot:spring-boot-starter-web'
    testImplementation 'org.springframework.boot:spring-boot-starter-test'
    compileOnly 'org.projectlombok:lombok:1.18.28'
    annotationProcessor 'org.projectlombok:lombok:1.18.28'
    testCompileOnly 'org.projectlombok:lombok:1.18.28'
    testAnnotationProcessor 'org.projectlombok:lombok:1.18.28'
}

tasks.named('test') {
    useJUnitPlatform()
}
application YAML 설정 파일을 통해 애플리케이션 프로파일을 변경하면서 테스트한다.
spring:
  profiles:
    active: local
프록시 클래스들을 만든다. 설정 파일에 정의된 활성화된 프로파일에 따라 빈(bean) 객체를 선택적으로 주입하여 사용한다. LocalPokemonProxy 클래스는 로컬 혹은 테스트에서 사용한다.
package action.in.blog.proxy.impl;

import action.in.blog.domain.Pokemon;
import action.in.blog.domain.PokemonResponse;
import action.in.blog.proxy.PokemonProxy;
import org.springframework.context.annotation.Profile;
import org.springframework.stereotype.Service;

import java.util.List;

@Profile(value = {"local", "test"})
@Service
public class LocalPokemonProxy implements PokemonProxy {

    @Override
    public PokemonResponse getPokemons() {
        return PokemonResponse.builder()
                .count(3)
                .next("https://pokeapi.co/api/v2/pokemon?offset=10&limit=10")
                .results(
                        List.of(
                                new Pokemon("bulbasaur", "https://pokeapi.co/api/v2/pokemon/1/"),
                                new Pokemon("ivysaur", "https://pokeapi.co/api/v2/pokemon/2/"),
                                new Pokemon("venusaur", "https://pokeapi.co/api/v2/pokemon/3/")
                        )
                )
                .build();
    }
}
DefaultPokemonProxy 클래스는 로컬, 테스트 환경이 아닌 경우 사용한다.
package action.in.blog.proxy.impl;

import action.in.blog.domain.PokemonResponse;
import action.in.blog.proxy.PokemonProxy;
import org.springframework.context.annotation.Profile;
import org.springframework.stereotype.Service;
import org.springframework.web.client.RestTemplate;

@Profile("!local & !test")
@Service
public class DefaultPokemonProxy implements PokemonProxy {

    private final RestTemplate restTemplate;

    public DefaultPokemonProxy() {
        this.restTemplate = new RestTemplate();
    }

    @Override
    public PokemonResponse getPokemons() {
        return restTemplate.getForObject("https://pokeapi.co/api/v2/pokemon", PokemonResponse.class);
    }
}
5. Practice
지금부터 GraalVM을 사용해 네이티브 이미지를 만들어 사용해본다. 네이티브 이미지를 실행하는 방법은 두 가지이다.
- 로컬 머신에 적합한 네이티브 이미지를 생성하고 실행한다.
jar패키지 파일이 아니라 실행 파일이 생성된다.
- 빌드팩(buildpack) 기반으로 컨테이너 이미지를 생성하고 이를 실행한다.
- 도커(docker) 같은 컨테이너 런타임이 필요하다.
애플리케이션 실행 속도 차이를 확인해보자. 먼저 네이티브 이미지가 아닌 일반적인 방법으로 자바 애플리케이션을 실행해보자. IDE를 사용해 애플리케이션을 실행한다. 빌드한 jar 패키지 파일을 실행해도 좋다.
- 애플리케이션 실행까지 1.221초 소요된다.
  .   ____          _            __ _ _
 /\\ / ___'_ __ _ _(_)_ __  __ _ \ \ \ \
( ( )\___ | '_ | '_| | '_ \/ _` | \ \ \ \
 \\/  ___)| |_)| | | | | || (_| |  ) ) ) )
  '  |____| .__|_| |_|_| |_\__, | / / / /
 =========|_|==============|___/=/_/_/_/
 :: Spring Boot ::                (v3.1.3)

2023-09-18T10:57:01.010+09:00  INFO 20936 --- [           main] action.in.blog.ActionInBlogApplication   : Starting ActionInBlogApplication using Java 17.0.8 with PID 20936 (/Users/junhyunk/Desktop/action-in-blog/build/classes/java/main started by junhyunk in /Users/junhyunk/Desktop/action-in-blog)
2023-09-18T10:57:01.012+09:00  INFO 20936 --- [           main] action.in.blog.ActionInBlogApplication   : The following 1 profile is active: "dev"
2023-09-18T10:57:01.596+09:00  INFO 20936 --- [           main] o.s.b.w.embedded.tomcat.TomcatWebServer  : Tomcat initialized with port(s): 8080 (http)
2023-09-18T10:57:01.602+09:00  INFO 20936 --- [           main] o.apache.catalina.core.StandardService   : Starting service [Tomcat]
2023-09-18T10:57:01.602+09:00  INFO 20936 --- [           main] o.apache.catalina.core.StandardEngine    : Starting Servlet engine: [Apache Tomcat/10.1.12]
2023-09-18T10:57:01.661+09:00  INFO 20936 --- [           main] o.a.c.c.C.[Tomcat].[localhost].[/]       : Initializing Spring embedded WebApplicationContext
2023-09-18T10:57:01.662+09:00  INFO 20936 --- [           main] w.s.c.ServletWebServerApplicationContext : Root WebApplicationContext: initialization completed in 611 ms
2023-09-18T10:57:01.912+09:00  INFO 20936 --- [           main] o.s.b.w.embedded.tomcat.TomcatWebServer  : Tomcat started on port(s): 8080 (http) with context path ''
2023-09-18T10:57:01.919+09:00  INFO 20936 --- [           main] action.in.blog.ActionInBlogApplication   : Started ActionInBlogApplication in 1.221 seconds (process running for 1.684)
네이티브 이미지에선 얼마나 실행 속도가 빨라질까? ./gradlew nativeCompile 명령어로 네이티브 이미지를 생성한다.
$ ./gradlew nativeCompile
다음과 같이 네이티브 이미지 생성 로그를 확인할 수 있다. 컴파일 과정에서 정적 코드 분석을 수행한다. 빌드 시간이 약 3분 정도 소요된다. 정적 코드 분석, 메모리 최적화, 힌트 생성 등으로 일반적인 빌드 시간보다 더 오래 걸린다.
> Task :processAot

  .   ____          _            __ _ _
 /\\ / ___'_ __ _ _(_)_ __  __ _ \ \ \ \
( ( )\___ | '_ | '_| | '_ \/ _` | \ \ \ \
 \\/  ___)| |_)| | | | | || (_| |  ) ) ) )
  '  |____| .__|_| |_|_| |_\__, | / / / /
 =========|_|==============|___/=/_/_/_/
 :: Spring Boot ::                (v3.1.3)

2023-09-18T11:02:29.603+09:00  INFO 21251 --- [           main] action.in.blog.ActionInBlogApplication   : Starting ActionInBlogApplication using Java 17.0.7 with PID 21251 (/Users/junhyunk/Desktop/action-in-blog/build/classes/java/main started by junhyunk in /Users/junhyunk/Desktop/action-in-blog)
2023-09-18T11:02:29.606+09:00  INFO 21251 --- [           main] action.in.blog.ActionInBlogApplication   : The following 1 profile is active: "dev"

> Task :compileAotJava
Note: /Users/junhyunk/Desktop/action-in-blog/build/generated/aotSources/org/springframework/boot/autoconfigure/web/servlet/WebMvcAutoConfiguration__BeanDefinitions.java uses or overrides a deprecated API.
Note: Recompile with -Xlint:deprecation for details.

> Task :generateResourcesConfigFile
[native-image-plugin] Resources configuration written into /Users/junhyunk/Desktop/action-in-blog/build/native/generated/generateResourcesConfigFile/resource-config.json

> Task :nativeCompile
[native-image-plugin] GraalVM Toolchain detection is disabled
[native-image-plugin] GraalVM location read from environment variable: JAVA_HOME
[native-image-plugin] Native Image executable path: /Users/junhyunk/.sdkman/candidates/java/23.r17-nik/lib/svm/bin/native-image
========================================================================================================================
GraalVM Native Image: Generating 'action-in-blog' (executable)...
========================================================================================================================
[1/8] Initializing...                                                                                   (12.8s @ 0.24GB)

....

Produced artifacts:
 /Users/junhyunk/Desktop/action-in-blog/build/native/nativeCompile/action-in-blog (executable)
========================================================================================================================
Finished generating 'action-in-blog' in 1m 44s.
[native-image-plugin] Native Image written to: /Users/junhyunk/Desktop/action-in-blog/build/native/nativeCompile

Deprecated Gradle features were used in this build, making it incompatible with Gradle 9.0.

You can use '--warning-mode all' to show the individual deprecation warnings and determine if they come from your own scripts or plugins.

For more on this, please refer to https://docs.gradle.org/8.2.1/userguide/command_line_interface.html#sec:command_line_warnings in the Gradle documentation.

BUILD SUCCESSFUL in 1m 54s
9 actionable tasks: 9 executed
./gradlew nativeRun 명령어로 네이티브 이미지를 실행한다.
$ ./gradlew nativeRun
애플리케이션 실행까지 0.06초 소요된다. 일반 실행보다 약 20배 이상 빠르다.
> Task :nativeRun

  .   ____          _            __ _ _
 /\\ / ___'_ __ _ _(_)_ __  __ _ \ \ \ \
( ( )\___ | '_ | '_| | '_ \/ _` | \ \ \ \
 \\/  ___)| |_)| | | | | || (_| |  ) ) ) )
  '  |____| .__|_| |_|_| |_\__, | / / / /
 =========|_|==============|___/=/_/_/_/
 :: Spring Boot ::                (v3.1.3)

2023-09-18T11:09:25.040+09:00  INFO 21882 --- [           main] action.in.blog.ActionInBlogApplication   : Starting AOT-processed ActionInBlogApplication using Java 17.0.7 with PID 21882 (/Users/junhyunk/Desktop/action-in-blog/build/native/nativeCompile/action-in-blog started by junhyunk in /Users/junhyunk/Desktop/action-in-blog)
2023-09-18T11:09:25.040+09:00  INFO 21882 --- [           main] action.in.blog.ActionInBlogApplication   : The following 1 profile is active: "dev"
2023-09-18T11:09:25.057+09:00  INFO 21882 --- [           main] o.s.b.w.embedded.tomcat.TomcatWebServer  : Tomcat initialized with port(s): 8080 (http)
2023-09-18T11:09:25.058+09:00  INFO 21882 --- [           main] o.apache.catalina.core.StandardService   : Starting service [Tomcat]
2023-09-18T11:09:25.058+09:00  INFO 21882 --- [           main] o.apache.catalina.core.StandardEngine    : Starting Servlet engine: [Apache Tomcat/10.1.12]
2023-09-18T11:09:25.066+09:00  INFO 21882 --- [           main] o.a.c.c.C.[Tomcat].[localhost].[/]       : Initializing Spring embedded WebApplicationContext
2023-09-18T11:09:25.066+09:00  INFO 21882 --- [           main] w.s.c.ServletWebServerApplicationContext : Root WebApplicationContext: initialization completed in 26 ms
2023-09-18T11:09:25.087+09:00  INFO 21882 --- [           main] o.s.b.w.embedded.tomcat.TomcatWebServer  : Tomcat started on port(s): 8080 (http) with context path ''
2023-09-18T11:09:25.087+09:00  INFO 21882 --- [           main] action.in.blog.ActionInBlogApplication   : Started ActionInBlogApplication in 0.06 seconds (process running for 0.072)
빌드 경로에 생성된 파일을 직접 실행하는 것도 가능하다. ./build/native/nativeCompile/action-in-blog 파일을 실행한다. 실행 결과는 그레이들 태스크와 동일하다.
$ ./build/native/nativeCompile/action-in-blog
이번엔 네이티브 이미지를 컨테이너에 올려서 실행해보자. 컨테이너 환경에서 동작할 수 있는 네이티브 이미지를 빌드해야 한다. 해당 작업을 수행할 땐 도커 같은 컨테이너 런타임이 필요하다. ./gradlew bootBuildImage 명령어를 사용한다.
$ ./gradlew bootBuildImage
컨테이너 이미지 빌드에 시간이 약 4분 소요된다. 빌드팩 기반으로 컨테이너 이미지를 생성한다. 정적 코드 분석, 메모리 최적화, 힌트 생성 등으로 일반적인 빌드 시간보다 더 오래 걸린다. 생성된 이미지 이름은 docker.io/library/action-in-blog:0.0.1-SNAPSHOT이다.
> Task :bootBuildImage
Building image 'docker.io/library/action-in-blog:0.0.1-SNAPSHOT'

 > Pulling builder image 'docker.io/paketobuildpacks/builder:tiny' ..................................................
 > Pulled builder image 'paketobuildpacks/builder@sha256:1a59354925fcb7ba54744b8017630c97c2b035e1a9e19309330557b9c66bfc2c'
 > Pulling run image 'docker.io/paketobuildpacks/run:tiny-cnb' ..................................................
 > Pulled run image 'paketobuildpacks/run@sha256:adf913cf28031f2090aeaedac65edb36f2987d81a23a8dffab5ea18ca216c94c'
 > Executing lifecycle version v0.16.5
 > Using build cache volume 'pack-cache-29e09935f167.build'

 > Running creator
    [creator]     ===> ANALYZING
    [creator]     Restoring data for SBOM from previous image
    [creator]     ===> DETECTING
    [creator]     6 of 15 buildpacks participating
    [creator]     paketo-buildpacks/ca-certificates   3.6.3
    [creator]     paketo-buildpacks/bellsoft-liberica 10.2.6
    [creator]     paketo-buildpacks/syft              1.32.1
    [creator]     paketo-buildpacks/executable-jar    6.7.4
    [creator]     paketo-buildpacks/spring-boot       5.26.1
    [creator]     paketo-buildpacks/native-image      5.12.1
    [creator]     ===> RESTORING
    [creator]     Restoring metadata for "paketo-buildpacks/ca-certificates:helper" from app image
    [creator]     Restoring metadata for "paketo-buildpacks/bellsoft-liberica:native-image-svm" from cache
    [creator]     Restoring metadata for "paketo-buildpacks/syft:syft" from cache
    [creator]     Restoring metadata for "paketo-buildpacks/native-image:native-image" from cache
    [creator]     Restoring data for "paketo-buildpacks/bellsoft-liberica:native-image-svm" from cache
    [creator]     Restoring data for "paketo-buildpacks/syft:syft" from cache
    [creator]     Restoring data for "paketo-buildpacks/native-image:native-image" from cache
    [creator]     Restoring data for SBOM from cache

    ...

    [creator]     ===> EXPORTING
    [creator]     Reusing layer 'paketo-buildpacks/ca-certificates:helper'
    [creator]     Reusing layer 'paketo-buildpacks/executable-jar:classpath'
    [creator]     Reusing layer 'buildpacksio/lifecycle:launch.sbom'
    [creator]     Adding 1/1 app layer(s)
    [creator]     Reusing layer 'buildpacksio/lifecycle:launcher'
    [creator]     Reusing layer 'buildpacksio/lifecycle:config'
    [creator]     Reusing layer 'buildpacksio/lifecycle:process-types'
    [creator]     Adding label 'io.buildpacks.lifecycle.metadata'
    [creator]     Adding label 'io.buildpacks.build.metadata'
    [creator]     Adding label 'io.buildpacks.project.metadata'
    [creator]     Adding label 'org.opencontainers.image.title'
    [creator]     Adding label 'org.opencontainers.image.version'
    [creator]     Adding label 'org.springframework.boot.version'
    [creator]     Setting default process type 'web'
    [creator]     Saving docker.io/library/action-in-blog:0.0.1-SNAPSHOT...
    [creator]     *** Images (ce848b153d90):
    [creator]           docker.io/library/action-in-blog:0.0.1-SNAPSHOT
    [creator]     Reusing cache layer 'paketo-buildpacks/bellsoft-liberica:native-image-svm'
    [creator]     Reusing cache layer 'paketo-buildpacks/syft:syft'
    [creator]     Adding cache layer 'paketo-buildpacks/native-image:native-image'
    [creator]     Reusing cache layer 'buildpacksio/lifecycle:cache.sbom'

Successfully built image 'docker.io/library/action-in-blog:0.0.1-SNAPSHOT'


Deprecated Gradle features were used in this build, making it incompatible with Gradle 9.0.

You can use '--warning-mode all' to show the individual deprecation warnings and determine if they come from your own scripts or plugins.

For more on this, please refer to https://docs.gradle.org/8.2.1/userguide/command_line_interface.html#sec:command_line_warnings in the Gradle documentation.

BUILD SUCCESSFUL in 2m 23s
9 actionable tasks: 1 executed, 8 up-to-date
도커 명령어로 컨테이너를 실행할 수 있다.
$ docker run -p 8080:8080 docker.io/library/action-in-blog:0.0.1-SNAPSHOT
애플리케이션 컨테이너를 실행하는데 0.142초 소요된다. 일반 실행보다 약 8배 이상 빠르다.
  .   ____          _            __ _ _
 /\\ / ___'_ __ _ _(_)_ __  __ _ \ \ \ \
( ( )\___ | '_ | '_| | '_ \/ _` | \ \ \ \
 \\/  ___)| |_)| | | | | || (_| |  ) ) ) )
  '  |____| .__|_| |_|_| |_\__, | / / / /
 =========|_|==============|___/=/_/_/_/
 :: Spring Boot ::                (v3.1.3)

2023-09-18T02:21:40.457Z  INFO 1 --- [           main] action.in.blog.ActionInBlogApplication   : Starting AOT-processed ActionInBlogApplication using Java 17.0.7 with PID 1 (/workspace/action.in.blog.ActionInBlogApplication started by cnb in /workspace)
2023-09-18T02:21:40.458Z  INFO 1 --- [           main] action.in.blog.ActionInBlogApplication   : The following 1 profile is active: "dev"
2023-09-18T02:21:40.490Z  INFO 1 --- [           main] o.s.b.w.embedded.tomcat.TomcatWebServer  : Tomcat initialized with port(s): 8080 (http)
2023-09-18T02:21:40.494Z  INFO 1 --- [           main] o.apache.catalina.core.StandardService   : Starting service [Tomcat]
2023-09-18T02:21:40.494Z  INFO 1 --- [           main] o.apache.catalina.core.StandardEngine    : Starting Servlet engine: [Apache Tomcat/10.1.12]
2023-09-18T02:21:40.508Z  INFO 1 --- [           main] o.a.c.c.C.[Tomcat].[localhost].[/]       : Initializing Spring embedded WebApplicationContext
2023-09-18T02:21:40.508Z  INFO 1 --- [           main] w.s.c.ServletWebServerApplicationContext : Root WebApplicationContext: initialization completed in 50 ms
2023-09-18T02:21:40.557Z  INFO 1 --- [           main] o.s.b.w.embedded.tomcat.TomcatWebServer  : Tomcat started on port(s): 8080 (http) with context path ''
2023-09-18T02:21:40.558Z  INFO 1 --- [           main] action.in.blog.ActionInBlogApplication   : Started ActionInBlogApplication in 0.142 seconds (process running for 0.197)
CLOSING
예제를 만들어보면서 GraalVM에 대해 받은 인상은 다음과 같다.
- 네이티브 이미지로 빌드된 파일의 실행 속도는 확실히 빠르다.
- 빌드하는데 시간이 오래 소요되기 때문에 로컬 개발 환경이나 프로젝트 애플리케이션이 자주 변경되는 프로젝트 초반일 경우 불편할 것 같다.
- @Profile 애너테이션을 사용한 선택적인 빈 주입은 정상적으로 수행된다. 공식 문서에서 제약 사항이 있다는 것을 보면 완벽하게 지원하진 않지만, 예제 수준의 간단한 프로파일 사용은 가능할 것으로 보인다.
- GraalVM JDK를 사용하면 필요에 따라 컴파일 방법을 선택할 수 있다.
- OpenJDK 컴파일러와 Graal JIT 컴파일러를 jar 패키징 빌드
- AOT 컴파일러를 사용한 네이티브 이미지 빌드
댓글남기기