


React redux-thunk 테스트 전략
1. redux-thunk 테스트하기
두 단계로 나누어 테스트를 수행한다.
- 화면에서 미들웨어에서 수행할 비동기 처리 함수를 디스패치(dispatch)했는가?
- 사용자 이벤트에 의해 스토어(store)에 저장된 상태(state)를 변경하려면 비동기 처리를 위한 함수를 디스패치해야 한다.
- 화면에서 비동기 처리 함수를 디스패치한 것을 테스트함으로써 사용자 인터랙션이
미들웨어-스토어까지 전달될 수 있음을 보장한다. - 아래 이미지에
UI > Event Handler > Dispatch과정을 테스트한다.
- 미들웨어에서 비동기 처리 후 시나리오에 맞는
액션 크리에이터(Action Creator)를 디스패치했는가?- API 요청 같은 비동기 처리 후 시나리오에 맞는
액션 크리에이터를 디스패치했다면 미들웨어의 역할은 종료된다. - 아래 이미지에서
Middleware > Dispatch과정을 테스트한다.
- API 요청 같은 비동기 처리 후 시나리오에 맞는

2. 화면에서 미들웨어에서 실행하는 함수를 실행했는가?
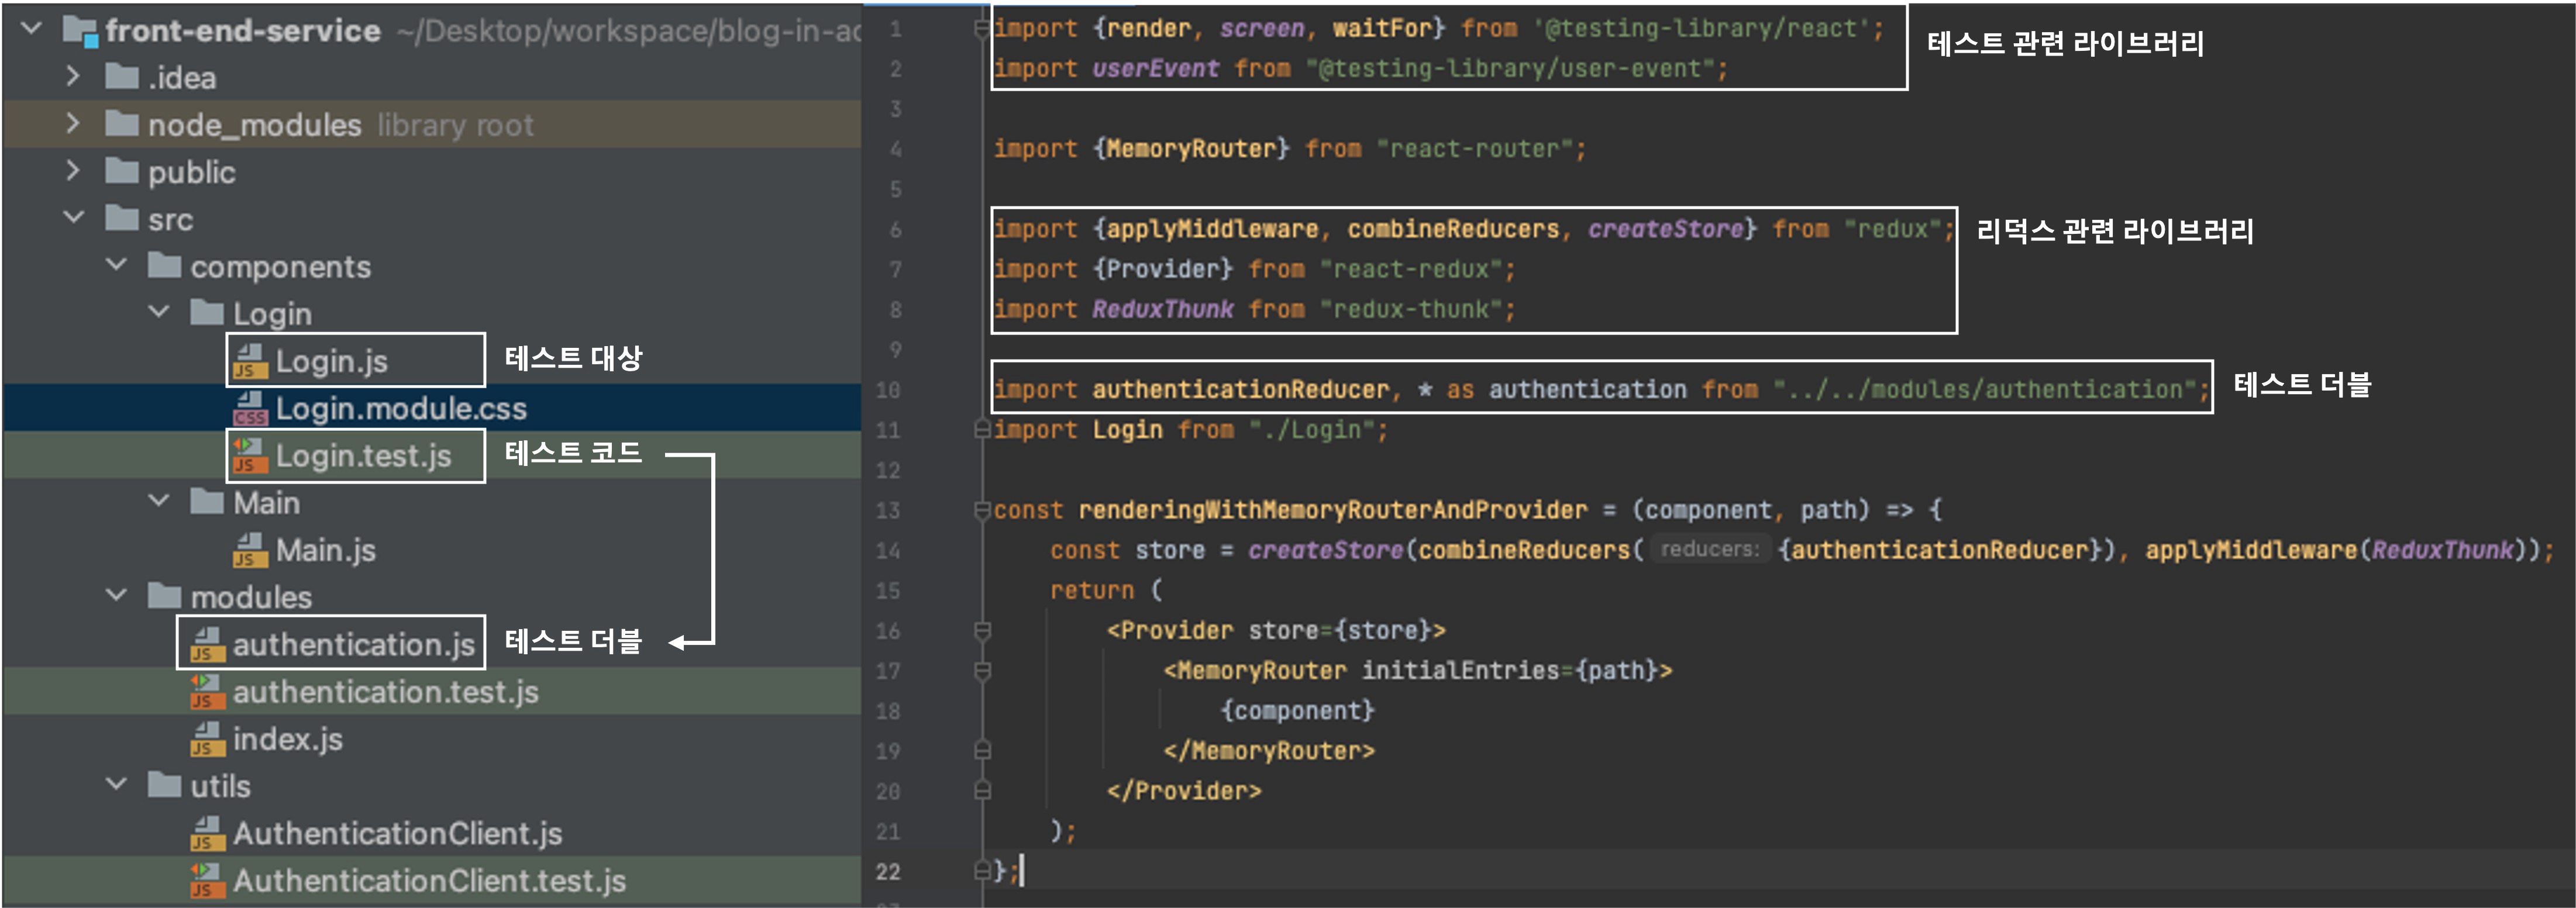
다음과 같이 테스트 코드를 작성한다. 컴포넌트(component)에 대한 요소(element) 렌더링 테스트는 모두 진행했다고 가정한다. 로그인 화면에 필요한 리듀서(reducer)로만 이루어진 스토어를 화면 렌더링 시 만들어 사용한다.
- setup 단계
authentication모듈의authenticate액션 크리에이터수행 여부를 확인할 스파이(spy) 객체를 만든다.- 이때 반환 값은 프로미스 객체를 반환하는 함수이므로
mockReturnValue를 통해 스터빙(stubbing)한다. - 화면을 렌더링하고, 필요한 데이터들을 입력한다.
- act 단계
- 사용자 클릭 이벤트를 발생시킨다.
- assert 단계
spyAuthenticationModule스파이를 이용해 원하는액션 크리에이터가 적절한 파라미터로 수행되었는지 확인한다.- 부수적으로 화면에서 데이터가 삭제되었는지 확인한다.
import {render, screen, waitFor} from '@testing-library/react';
import userEvent from "@testing-library/user-event";

import {MemoryRouter} from "react-router";

import {applyMiddleware, combineReducers, createStore} from "redux";
import {Provider} from "react-redux";
import ReduxThunk from "redux-thunk";

import authenticationReducer, * as authentication from "../../modules/authentication";
import Login from "./Login";

const renderingWithMemoryRouterAndProvider = (component, path) => {
    const store = createStore(combineReducers({authenticationReducer}), applyMiddleware(ReduxThunk));
    return (
        <Provider store={store}>
            <MemoryRouter initialEntries={path}>
                {component}
            </MemoryRouter>
        </Provider>
    );
};

// ...

describe('test login', () => {

    describe('test user interaction', () => {

        it('call authenticate method with params and clear inputs when click submit button', async () => {

            // setup
            const spyAuthenticationModule = jest.spyOn(authentication, 'authenticate').mockReturnValue(() => {
                return Promise.resolve(true);
            });
            render(renderingWithMemoryRouterAndProvider(<Login/>, ['/']));
            userEvent.type(screen.getByPlaceholderText('USER ID'), 'junhyunny');
            userEvent.type(screen.getByPlaceholderText('PASSWORD'), '123');

            // act
            userEvent.click(screen.getByRole('button', {
                name: 'Submit'
            }));

            // assert
            await waitFor(() => {
                expect(spyAuthenticationModule).toHaveBeenNthCalledWith(1, {
                    username: 'junhyunny',
                    password: '123'
                });
            });
            expect(screen.getByPlaceholderText('USER ID').value).toEqual('');
            expect(screen.getByPlaceholderText('PASSWORD').value).toEqual('');
        });
    });
});
위 테스트 코드에 대한 구현 코드는 다음과 같다.
import classes from './Login.module.css';
import {useState} from "react";
import {useNavigate} from "react-router";
import {useDispatch} from "react-redux";
import {authenticate} from "../../modules/authentication";

const Login = () => {

    const [isValid, setIsValid] = useState(true);
    const [userId, setUserId] = useState('');
    const [password, setPassword] = useState('');

    const dispatch = useDispatch();
    const navigate = useNavigate();

    const submitHandler = (event) => {
        event.preventDefault();
        if (userId.trim().length <= 0) {
            setIsValid(false);
            return;
        }
        if (password.trim().length <= 0) {
            setIsValid(false);
            return;
        }
        setIsValid(true);
        setUserId('');
        setPassword('');
        dispatch(authenticate({
            username: userId,
            password: password
        })).then(result => {
            if (result) {
                navigate('/main');
            }
        });
    };

    const userIdChangeHandler = ({target: {value}}) => {
        setUserId(value);
    };

    const passwordChangeHandler = ({target: {value}}) => {
        setPassword(value);
    };

    return (
        <div className={classes.login}>
            <form className={classes.control} onSubmit={submitHandler}>
                <div>
                    <input placeholder="USER ID" onChange={userIdChangeHandler} value={userId}/>
                </div>
                <div>
                    {!isValid && !userId && <label>ID가 유효하지 않습니다.</label>}
                </div>
                <div>
                    <input placeholder="PASSWORD" onChange={passwordChangeHandler} value={password} type="password"/>
                </div>
                <div>
                    {!isValid && !password && <label>비밀번호가 유효하지 않습니다.</label>}
                </div>
                <button type="submit">Submit</button>
            </form>
        </div>
    );
};

export default Login;
패키지 구조에서 테스트 의존성을 확인해 보자.
- 테스트 코드에 임포트(import)한 의존성을 확인해 보면 다음과 같다.
- 테스트를 위한 라이브러리
- 리덕스 관련 라이브러리
- 리덕스 기능 사용을 위한 모듈
- 테스트를 위한 컴포넌트
- 리덕스 테스트에 필요한 모듈은 테스트 더블(test double)로 사용한다.
- 최대한 다른 패키지에 대한 종속성(dependency)이 없도록 테스트를 구성한다.
3. 미들웨어에서 비동기 처리 후 적절한 액션 크리에이터를 디스패치했는가?
화면 혹은 컴포넌트 테스트에서 원하는 액션 크리에이터 수행을 확인한다. 이를 통해 사용자 인터랙션에 의한 액션 크리에이터가 미들웨어까지 전달되었다고 가정할 수 있다. 다음과 같은 테스트 코드를 작성한다. API 요청의 성공, 실패로 인한 반환 값에 따라 개발자가 의도한 액션 크리에이터를 디스패치했는지 확인한다.
- setup 단계
- 미들웨어가 반환하는 함수의 파라미터로 전달될
dispatch를 스파이로 만든다. - API 요청을 위한
AuthenticationClient모듈의authenticate함수 반환 값을 스터빙한다.
- 미들웨어가 반환하는 함수의 파라미터로 전달될
- act 단계
- 비동기 처리를 위한
authenticate함수가 반환하는 함수를 실행하면서dispatch스파이를 함께 전달한다.
- 비동기 처리를 위한
- assert 단계
dispatch스파이가 적절한액션 크리에이터를 디스패치했는지 확인한다.
import AuthenticationClient from "../utils/AuthenticationClient";
import * as authentication from "./authentication";

describe('test groups container', () => {

    it('call setAuthentication action of authentication module when succeed authentication', async () => {

        // setup
        const dispatch = jest.fn();
        jest.spyOn(AuthenticationClient, 'authenticate').mockResolvedValue(true);

        // act
        await authentication.authenticate({})(dispatch);

        // assert
        expect(dispatch).toHaveBeenNthCalledWith(1, authentication.setAuthentication(true));
    });

    it('call authenticationFailure action of authentication module when occur exception', async () => {

        // setup
        const dispatch = jest.fn();
        jest.spyOn(AuthenticationClient, 'authenticate').mockRejectedValue({});

        // act
        await authentication.authenticate({})(dispatch);

        // assert
        expect(dispatch).toHaveBeenNthCalledWith(1, authentication.authenticationFailure());
    });
});
구현 코드는 다음과 같다.
import AuthenticationClient from "../utils/AuthenticationClient";

const AUTHENTICATION_SUCCESS = 'authentication/AUTHENTICATION_SUCCESS';
const AUTHENTICATION_FAILURE = 'authentication/AUTHENTICATION_FAILURE';

const initialState = {
    isAuthenticate: localStorage.getItem('access_token') ? true : false
};

export const setAuthentication = (isAuthenticate) => {
    return {type: isAuthenticate ? AUTHENTICATION_SUCCESS : AUTHENTICATION_FAILURE};
}

export const authenticationFailure = () => {
    return {type: AUTHENTICATION_FAILURE};
}

export const authenticate = (params) => (dispatch) => {
    return AuthenticationClient.authenticate(params)
        .then(result => {
            dispatch(setAuthentication(result));
            return result;
        }).catch(error => {
            dispatch(authenticationFailure());
            return error;
        });
}

export default (state = initialState, action) => {
    switch (action.type) {
        case AUTHENTICATION_SUCCESS:
            return {
                isAuthenticate: true
            };
        case AUTHENTICATION_FAILURE:
            return {
                isAuthenticate: false
            };
        default:
            return state;
    }
};
이번에도 테스트 대상(system under test)과 테스트 더블이 누구인지 패키지 구조에서 살펴보자.
4. Redux 테스트 작성 가이드 원칙
위에서 다뤘던 방법은 테스트 더블을 적극 활용한 단위 테스트다. 리덕스 공식 사이트의 리덕스 테스트 코드 작성 원칙을 보면 다른 이야기를 하고 있다.
Use integration tests for everything working together. I.e. for a React app using Redux, render a
with a real store instance wrapping the component/s being tested. Interactions with the page being tested should use real Redux logic, with API calls mocked out so app code doesn't have to change, and assert that the UI is updated appropriately.
결합 테스트를 이용해 함께 동작하는 모든 것을 테스트해야 하고, 실제 사용하는 스토어를 그대로 이용하고, 사용자 인터랙션에 의한 실제 리덕스 로직으로 화면이 적절하게 바뀌었는지 확인하는 것을 추천한다고 한다. 나도 공식 문서의 가이드를 따라 결합 테스트를 작성하는 편이 비즈니스 로직에 대한 적절한 테스트가 가능하다고 생각한다.
처음엔 리듀서(Reducer)에 대한 테스트는 고민해 보지 않았다. '액션 타입에 따른 스테이트(state) 변경만 있는데 테스트할 가치가 있을까?'라고 생각했었지만, 가이드를 보고 나서 테스트 필요성을 느꼈다. 아래 예제 코드에서 todoAdded 리듀서를 보면 이전 상태 값과 이번 액션에 따라 처리되는 간단한 연산이 들어가 있다. 만약 개발자 실수로 인해 중복된 id나 누락된 id 값을 가진 스테이트 리스트가 만들어진다면 컴포넌트 렌더링 시 의도치 않은 에러가 발생할 수 있다. 이런 실수를 막기 위해 초기 스테이트 값 확인과 적절한 스테이트 변경이 이루어졌는지 확인하는 작업은 필요하다고 생각된다.
import { createSlice } from '@reduxjs/toolkit'

const initialState = [
  {
    text: 'Use Redux',
    completed: false,
    id: 0
  }
]

const todosSlice = createSlice({
  name: 'todos',
  initialState,
  reducers: {
    todoAdded(state, action: PayloadAction<string>) {
      state.push({
        id: state.reduce((maxId, todo) => Math.max(todo.id, maxId), -1) + 1,
        completed: false,
        text: action.payload
      })
    }
  }
})

export const { todoAdded } = todosSlice.actions

export default todosSlice.reducer
위 코드는 다음과 같은 테스트 코드를 통해 검증할 수 있다.
import reducer, { todoAdded } from './todosSlice'

test('should return the initial state', () => {
  expect(reducer(undefined, {})).toEqual([
    {
      text: 'Use Redux',
      completed: false,
      id: 0
    }
  ])
})

test('should handle a todo being added to an empty list', () => {
  const previousState = []
  expect(reducer(previousState, todoAdded('Run the tests'))).toEqual([
    {
      text: 'Run the tests',
      completed: false,
      id: 0
    }
  ])
})

test('should handle a todo being added to an existing list', () => {
  const previousState = [
    {
      text: 'Run the tests',
      completed: true,
      id: 0
    }
  ]
  expect(reducer(previousState, todoAdded('Use Redux'))).toEqual([
    {
      text: 'Run the tests',
      completed: true,
      id: 0
    },
    {
      text: 'Use Redux',
      completed: false,
      id: 1
    }
  ])
})
CLOSING
TDD에 대한 이야기를 하면 테스트 커버리지(coverage)가 꼬리표처럼 따라붙는다. 예전에 참석했던 기술 컨퍼런스에서 테스트 커버리지 100% 달성에 대한 이야기를 들었었는데, 당시에는 굉장히 멋진 일이라고 생각했었다.
테스트 커버리지 100%이면, 에러가 절대 없겠는데?
최근 들어 생각이 조금 바뀌었는데, 애플리케이션 곳곳을 훑는 테스트 코드가 무슨 의미를 가지는지 문득 의문이 들었다. 물론 중요한 지표이지만, 사용자 시나리오에 맞는 테스트와 예외 사항에 대한 테스트 코드 정도면 충분하지 않을까 싶다.
댓글남기기