


Install Harbor using Docker Compose
RECOMMEND POSTS BEFORE THIS
1. Harbor
Our mission is to be the trusted cloud native repository for Kubernetes
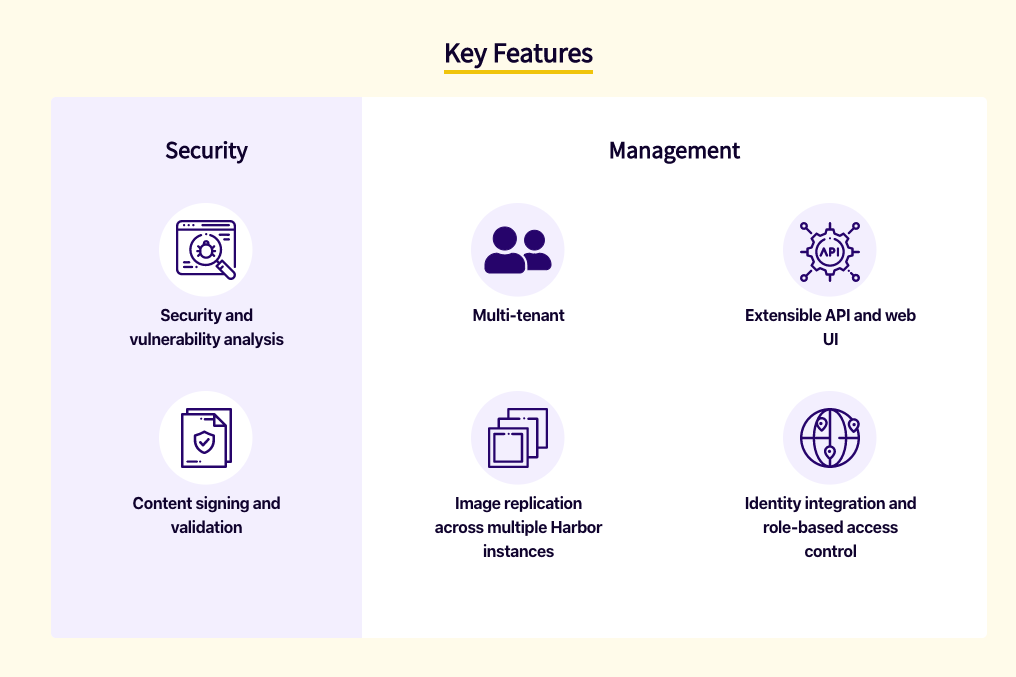
클라우드 네이티브 플랫폼인 쿠버네티스(kubernetes)나 도커(docker)를 위한 오픈 소스 이미지 저장소입니다. 하버는 다음과 같은 특징들은 가지고 있습니다.
- CNCF(Cloud Native Computing Foundation)에서 보장하는 오픈 소스 프레임워크
- 웹 UI 제공
- 역할 기반(role based) 사용자 접근 제어
- AD(Active Directory) / LDAP(Lightweight Directory Access Protocol) / OIDC 기반 인증
- 이미지 스캔을 통한 취약점 분석
- 서명을 통한 이미지 유효성 검증
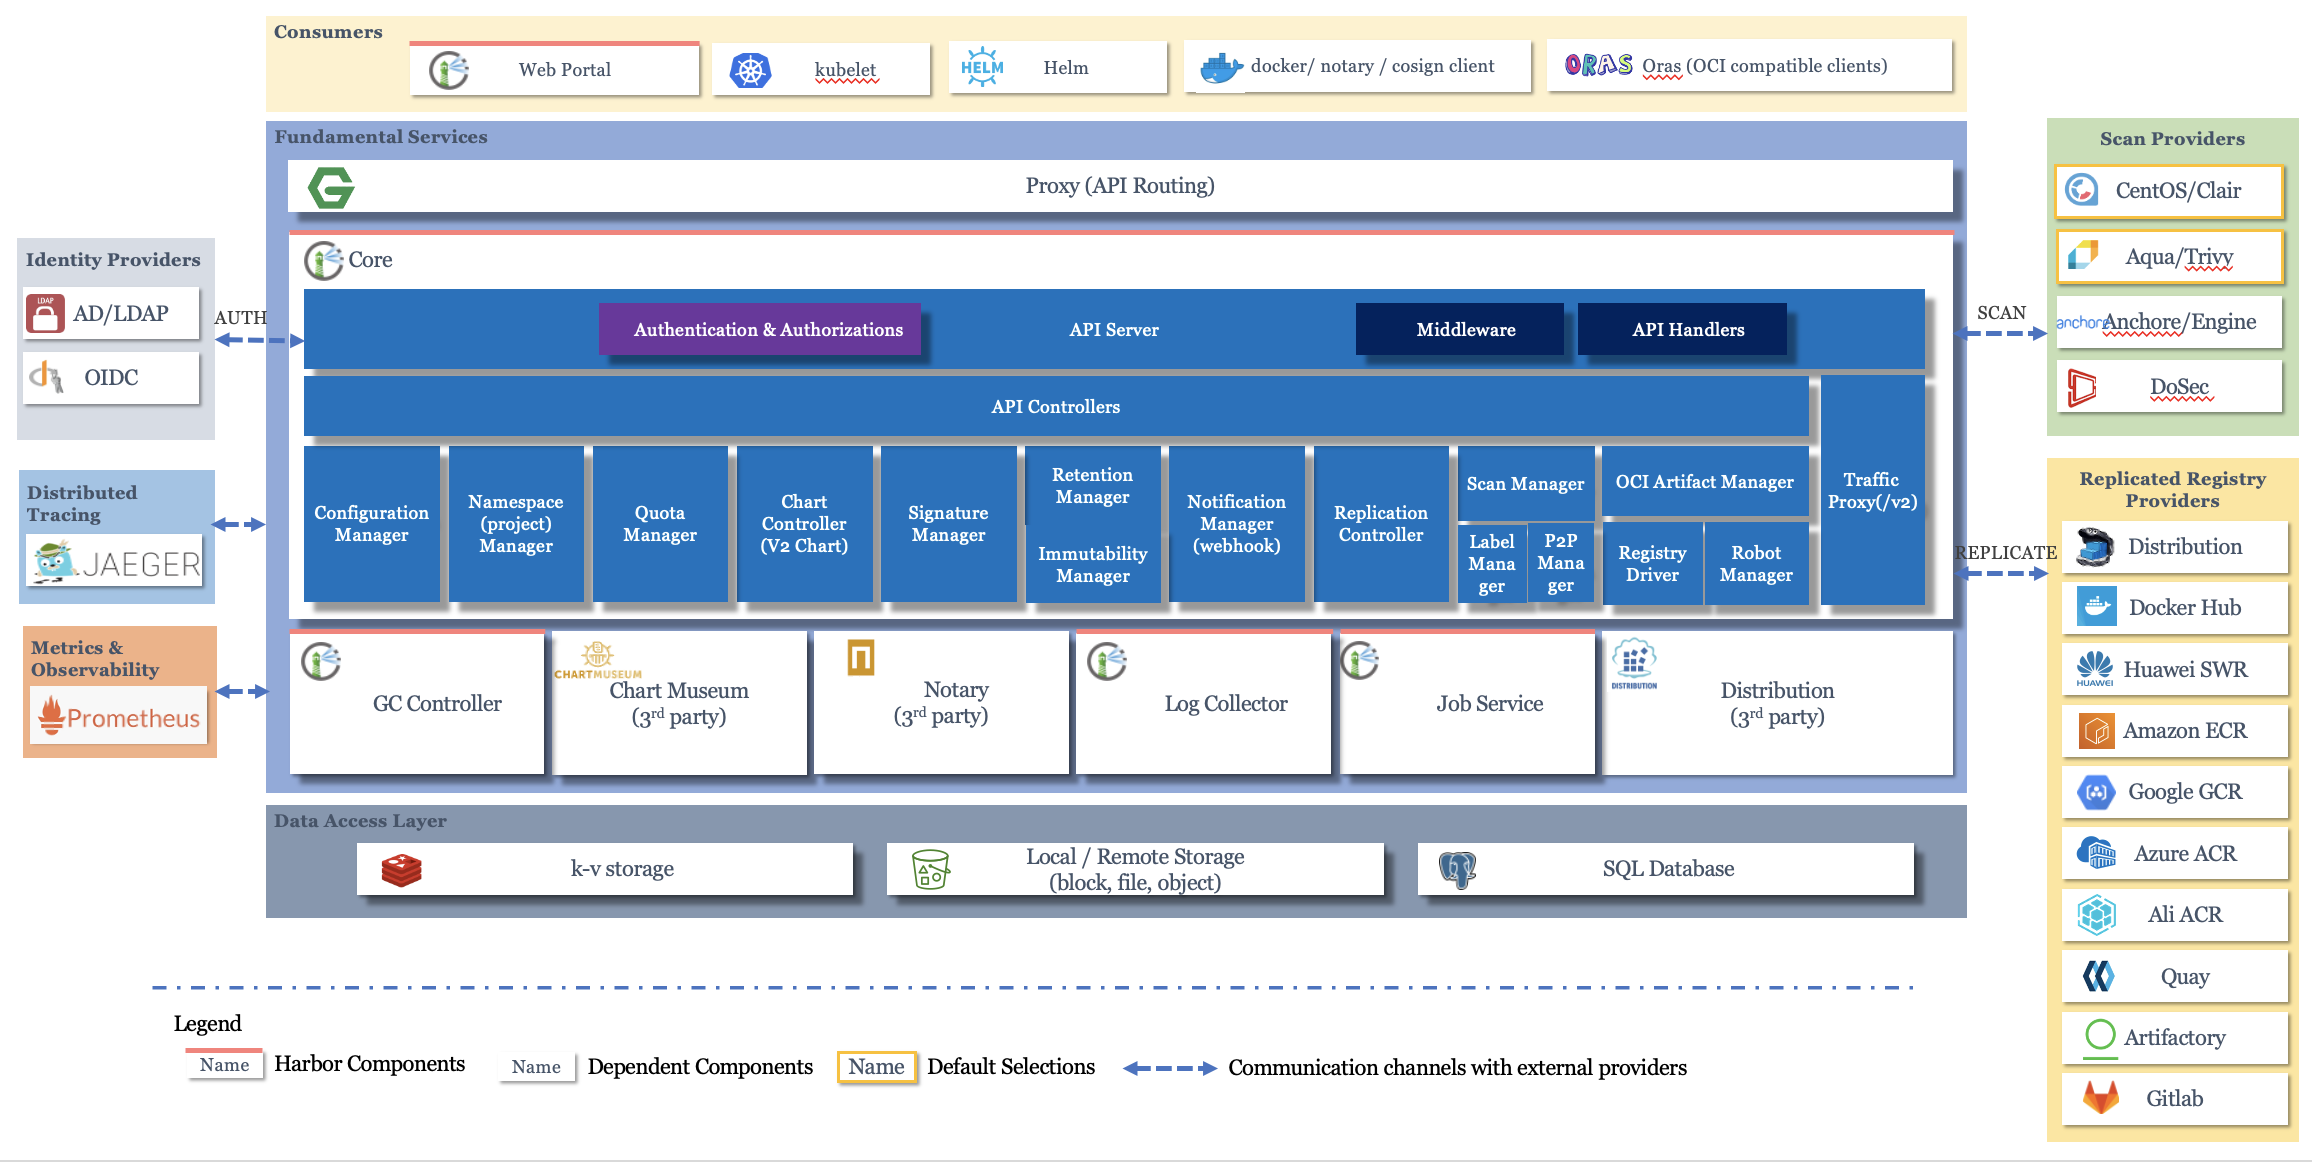
Harbor Architecture
다음과 같은 아키텍처 구조를 가지고 주변 컴포넌트들과 상호 작용합니다.
2. Installation
도커 컴포즈(docker compose)를 이용해 하버를 설치할 수 있습니다. 설치 과정을 살펴보겠습니다.
2.1. Create Self-Signed Certificate
하버 설치와 접근을 위한 인증서가 필요합니다.
테스트 용도이기 때문에 OpenSSL을 사용해 자체 증명서를 발급합니다.
발급 과정과 각 명령어에 대한 자세한 설명은 Create Self-Signed SAN SSL Ceriticate 포스트를 참고하시길 바랍니다.
- 서버 인증서 발급을 위한 자체 CA 인증서를 생성합니다.
- 인증서 폴더 생성
- 인증서 폴더 이동
- CA 발급을 위한 비공개 키 생성
- CA 인증서 생성
$ mkdir certs

$ cd certs

$ openssl genrsa -out ca.key 4096

$ openssl req -x509 -new -sha512 -days 365 -key ca.key -out ca.crt

You are about to be asked to enter information that will be incorporated
into your certificate request.
What you are about to enter is what is called a Distinguished Name or a DN.
There are quite a few fields but you can leave some blank
For some fields there will be a default value,
If you enter '.', the field will be left blank.
-----
Country Name (2 letter code) [AU]:KR
State or Province Name (full name) [Some-State]:Seoul
Locality Name (eg, city) []:Seoul
Organization Name (eg, company) [Internet Widgits Pty Ltd]:VMWare
Organizational Unit Name (eg, section) []:Tanzu Labs
Common Name (e.g. server FQDN or YOUR name) []:root.ca
Email Address []:
- SAN(Subject Alternative Name) 서버 인증서를 생성합니다.
- SAN 인증서 발급을 위한 설정 파일 생성
- 서버 인증서 생성을 위한 비공개 키 생성
- 인증서 발급을 위한 CSR(Certificate Signing Request) 생성
- CA 인증서로 서명한 서버 인증서 생성
$ echo 'subjectAltName=DNS:myharbor.io,DNS:www.myharbor.io' > version3extions.cnf

$ openssl genrsa -out server.key 4096

$ openssl req -sha512 -new -key server.key -out server.csr

You are about to be asked to enter information that will be incorporated
into your certificate request.
What you are about to enter is what is called a Distinguished Name or a DN.
There are quite a few fields but you can leave some blank
For some fields there will be a default value,
If you enter '.', the field will be left blank.
-----
Country Name (2 letter code) [AU]:KR
State or Province Name (full name) [Some-State]:Seoul
Locality Name (eg, city) []:Seoul
Organization Name (eg, company) [Internet Widgits Pty Ltd]:VMWare
Organizational Unit Name (eg, section) []:Tanzu Labs
Common Name (e.g. server FQDN or YOUR name) []:myharbor.io
Email Address []:

Please enter the following 'extra' attributes
to be sent with your certificate request
A challenge password []:
An optional company name []:

$ openssl x509 -req -sha512 -days 365 \

-extfile version3extions.cnf \
-CA ca.crt -CAkey ca.key -CAcreateserial \
-in server.csr \
-out server.crt

Certificate request self-signature ok
subject=C = KR, ST = Seoul, L = Seoul, O = VMWare, OU = Tanzu Labs, CN = myharbor.io
2.2. Harbor Package Download
23년 9월 기준 최신 버전인 2.9.0를 오프라인 방식으로 설치합니다.
- 이전 경로로 이동하여 패키지를 다운로드 받습니다.
- 다운 받은 패키지의 압축을 해제합니다.
- 압축 해제한 하버 경로로 이동합니다.
- 이전 단계에서 생성한 인증서를 하버 경로로 복사합니다.
$ cd ..

$ wget https://github.com/goharbor/harbor/releases/download/v2.9.0/harbor-offline-installer-v2.9.0.tgz

$ tar xzvf harbor-offline-installer-v2.9.0.tgz

$ cd harbor

$ cp -rf ../certs ./
2.3. harbor.yml
하버 패키지 경로를 살펴보면 harbor.yml 템플릿(template)이 존재합니다.
해당 파일을 복사한 후 적절하게 변경합니다.
$ cp harbor.yml.tmpl harbor.yml
불필요한 주석들을 제거하고 변경한 내용만 살펴보겠습니다.
- 호스트 이름을
myharbor.io으로 설정합니다.- 인증서를 만들 때 CN(common name)으로 지정한 도메인과 동일해야 합니다.
- 인증서 위치를 지정합니다.
- 데이터 볼륨을 하버 설치 경로에
data디렉토리로 지정합니다. - 로그 위치를 하버 설치 경로에
log디렉토리로 지정합니다.
hostname: myharbor.io

http:
  port: 80

https:
  port: 443
  certificate: /certs/server.crt
  private_key: /certs/server.key

harbor_admin_password: Harbor12345

database:
  password: root123
  max_idle_conns: 100
  max_open_conns: 900
  conn_max_lifetime: 5m
  conn_max_idle_time: 0

data_volume: ./data

trivy:
  ignore_unfixed: false
  skip_update: false
  offline_scan: false
  security_check: vuln
  insecure: false

jobservice:
  max_job_workers: 10
  job_loggers:
    - STD_OUTPUT
    - FILE
  logger_sweeper_duration: 1 #days
notification:
  webhook_job_max_retry: 3
  webhook_job_http_client_timeout: 3 #seconds

log:
  level: info
  local:
    rotate_count: 50
    rotate_size: 200M
    location: ./log
_version: 2.9.0

proxy:
  http_proxy:
  https_proxy:
  no_proxy:
  components:
    - core
    - jobservice
    - trivy

upload_purging:
  enabled: true
  age: 168h
  interval: 24h
  dryrun: false

cache:
  enabled: false
  expire_hours: 24
2.4. Install
2.4.1. Not Found Certificate
하버 패키지 경로에 위치한 인스톨 스크립트를 실행합니다.
$ sh install.sh
설치 과정 중 다음과 같은 에러가 발생합니다.
[Step 4]: preparing harbor configs ...
prepare base dir is set to /Users/junhyunk/Desktop/TAP/harbor
Traceback (most recent call last):
  File "/usr/src/app/main.py", line 15, in <module>
    cli()
  File "/usr/lib/python3.11/site-packages/click/core.py", line 1137, in __call__
Generated configuration file: /config/portal/nginx.conf
Generated configuration file: /config/log/logrotate.conf
Generated configuration file: /config/log/rsyslog_docker.conf
    return self.main(*args, **kwargs)
           ^^^^^^^^^^^^^^^^^^^^^^^^^^
  File "/usr/lib/python3.11/site-packages/click/core.py", line 1062, in main
    rv = self.invoke(ctx)
         ^^^^^^^^^^^^^^^^
  File "/usr/lib/python3.11/site-packages/click/core.py", line 1668, in invoke
    return _process_result(sub_ctx.command.invoke(sub_ctx))
                           ^^^^^^^^^^^^^^^^^^^^^^^^^^^^^^^
  File "/usr/lib/python3.11/site-packages/click/core.py", line 1404, in invoke
    return ctx.invoke(self.callback, **ctx.params)
           ^^^^^^^^^^^^^^^^^^^^^^^^^^^^^^^^^^^^^^^
  File "/usr/lib/python3.11/site-packages/click/core.py", line 763, in invoke
    return __callback(*args, **kwargs)
           ^^^^^^^^^^^^^^^^^^^^^^^^^^^
  File "/usr/src/app/commands/prepare.py", line 43, in prepare
    prepare_nginx(config_dict)
  File "/usr/src/app/utils/nginx.py", line 23, in prepare_nginx
    render_nginx_template(config_dict)
  File "/usr/src/app/utils/nginx.py", line 56, in render_nginx_template
    prepare_nginx_certs(config_dict['cert_key_path'], config_dict['cert_path'])
  File "/usr/src/app/utils/nginx.py", line 42, in prepare_nginx_certs
    shutil.copy2(host_ngx_cert_key_path, real_key_path)
  File "/usr/lib/python3.11/shutil.py", line 436, in copy2
    copyfile(src, dst, follow_symlinks=follow_symlinks)
  File "/usr/lib/python3.11/shutil.py", line 256, in copyfile
    with open(src, 'rb') as fsrc:
         ^^^^^^^^^^^^^^^
FileNotFoundError: [Errno 2] No such file or directory: '/hostfs/certs/server.key'
깃허브(github) 하버 레포지토리 이슈에서 해당 에러에 대한 해결책을 확인할 수 있습니다.
- 원인은
prepare파일에서 도커 컨테이너를 실행할 때 볼륨 경로를 호스트 머신의 루트(root)로 지정해놨기 때문입니다. - 볼륨 경로를 다시 설정하면 해당 문제가 해결됩니다.
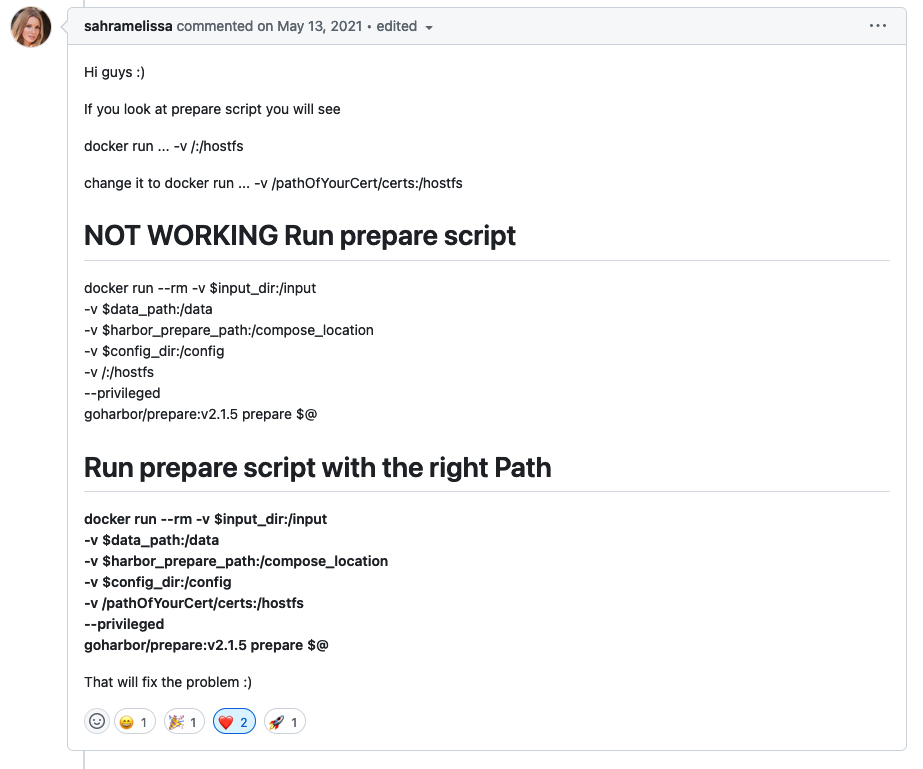
Fix prepare script
문제 해결을 위해 하버 패키지 경로에 위치한 prepare 파일을 수정합니다.
- 루트 경로를 현재 하버 설치 경로로 변경합니다.
# Run prepare script
docker run --rm -v $input_dir:/input \
                    -v $data_path:/data \
                    -v $harbor_prepare_path:/compose_location \
                    -v $config_dir:/config \
                    -v /Users/junhyunk/Desktop/TAP/harbor:/hostfs \
                    --privileged \
                    goharbor/prepare:v2.9.0 prepare $@
2.4.2. Installation
설치 스크립트를 다시 실행하면 정상적으로 서비스 실행까지 진행됩니다.
sh install.sh

[Step 0]: checking if docker is installed ...

Note: docker version: 24.0.5

[Step 1]: checking docker-compose is installed ...

Note: Docker Compose version v2.20.2-desktop.1

[Step 2]: loading Harbor images ...
Loaded image: goharbor/harbor-registryctl:v2.9.0
Loaded image: goharbor/nginx-photon:v2.9.0
Loaded image: goharbor/registry-photon:v2.9.0
Loaded image: goharbor/prepare:v2.9.0
Loaded image: goharbor/harbor-portal:v2.9.0
Loaded image: goharbor/harbor-log:v2.9.0
Loaded image: goharbor/harbor-exporter:v2.9.0
Loaded image: goharbor/redis-photon:v2.9.0
Loaded image: goharbor/trivy-adapter-photon:v2.9.0
Loaded image: goharbor/harbor-core:v2.9.0
Loaded image: goharbor/harbor-db:v2.9.0
Loaded image: goharbor/harbor-jobservice:v2.9.0


[Step 3]: preparing environment ...

[Step 4]: preparing harbor configs ...
prepare base dir is set to /Users/junhyunk/Desktop/TAP/harbor
Clearing the configuration file: /config/log/logrotate.conf
Clearing the configuration file: /config/log/rsyslog_docker.conf
Clearing the configuration file: /config/portal/nginx.conf
Generated configuration file: /config/portal/nginx.conf
Generated configuration file: /config/log/logrotate.conf
Generated configuration file: /config/log/rsyslog_docker.conf
Generated configuration file: /config/nginx/nginx.conf
Generated configuration file: /config/core/env
Generated configuration file: /config/core/app.conf
Generated configuration file: /config/registry/config.yml
Generated configuration file: /config/registryctl/env
Generated configuration file: /config/registryctl/config.yml
Generated configuration file: /config/db/env
Generated configuration file: /config/jobservice/env
Generated configuration file: /config/jobservice/config.yml
Generated and saved secret to file: /data/secret/keys/secretkey
Successfully called func: create_root_cert
Generated configuration file: /compose_location/docker-compose.yml
Clean up the input dir


Note: stopping existing Harbor instance ...


[Step 5]: starting Harbor ...
[+] Running 10/10
 ✔ Network harbor_harbor        Created                         0.0s
 ✔ Container harbor-log         Started                         0.7s
 ✔ Container redis              Started                         1.4s
 ✔ Container harbor-db          Started                         1.2s
 ✔ Container registry           Started                         1.4s
 ✔ Container registryctl        Started                         1.1s
 ✔ Container harbor-portal      Started                         1.5s
 ✔ Container harbor-core        Started                         1.8s
 ✔ Container nginx              Started                         2.2s
 ✔ Container harbor-jobservice  Started                         2.1s
✔ ----Harbor has been installed and started successfully.----
3. Connect to Harbor
3.1. Add Host Name
도메인 이름으로 설정한 myharbor.io를 호스트 파일에 등록합니다.
필자는 맥북(macbook)에서 실습하여 다음과 같은 과정을 통해 호스트 이름을 등록하였습니다.
각 운영체제에 따라 호스트 등록 방법이 다르므로 확인하시길 바랍니다.
$ sudo vi /etc/hosts

##
# Host Database
#
# localhost is used to configure the loopback interface
# when the system is booting.  Do not change this entry.
##
127.0.0.1       localhost
255.255.255.255 broadcasthost

127.0.0.1       myharbor.io

::1             localhost
# Added by Docker Desktop
# To allow the same kube context to work on the host and the container:
127.0.0.1 kubernetes.docker.internal
# End of section
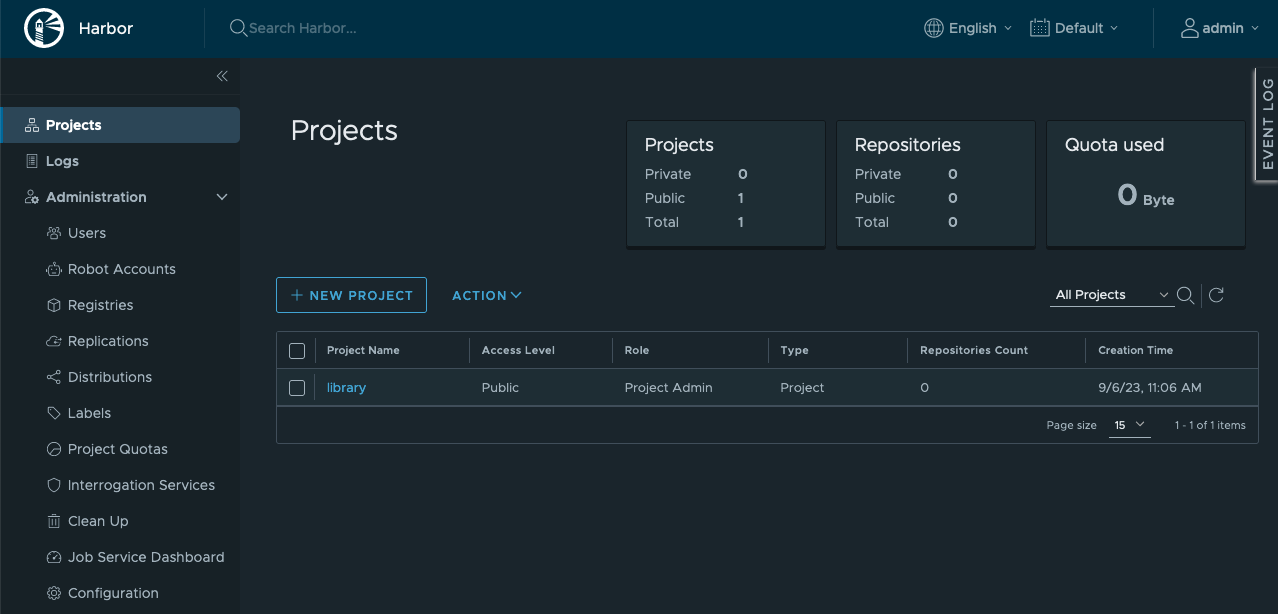
3.2. Connect Harbor Webpage
브라우저를 통해 하버 웹 페이지로 접속합니다. 변경하지 않았다면 초기 사용자 이름과 비밀번호는 다음과 같습니다.
- Username - admin
- Password - Harbor12345
CLOSING
도커 컴포즈를 사용해 설치하였으므로 docker-compose 명령어를 사용하면 하버 컨테이너를 종료하거나 재실행하는 것이 가능합니다.
REFERENCE
- https://en.wikipedia.org/wiki/Cloud_Native_Computing_Foundation
- https://goharbor.io/docs/2.0.0/install-config/configure-https/
- https://github.com/goharbor/harbor/issues/13461
- https://engineering.linecorp.com/ko/blog/harbor-for-private-docker-registry/
- https://happycloud-lee.tistory.com/165
- https://velog.io/@hyeseong-dev/Harbor-%EC%86%8C%EA%B0%9C-%EC%84%A4%EC%B9%98-%EB%B0%8F-%EB%B0%B0%ED%8F%AC
댓글남기기